Orthodontic Separator and Banding Setup
Written by the Equate Instruments Technical Team · Reviewed by the Medical & Dental Board, Equate Instruments · Updated ·
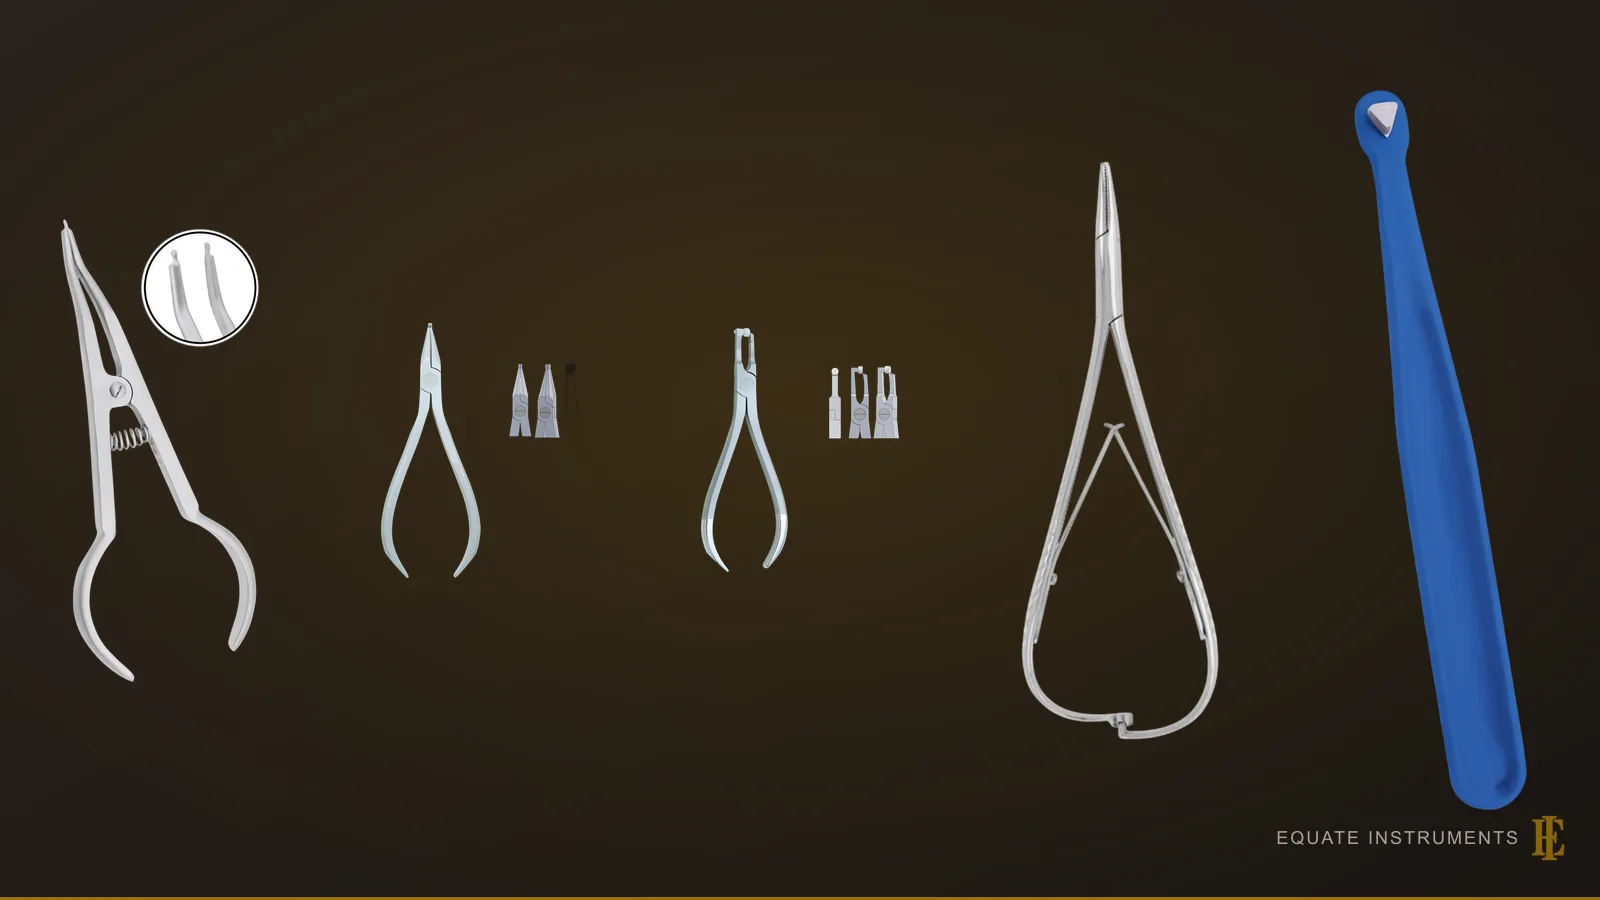
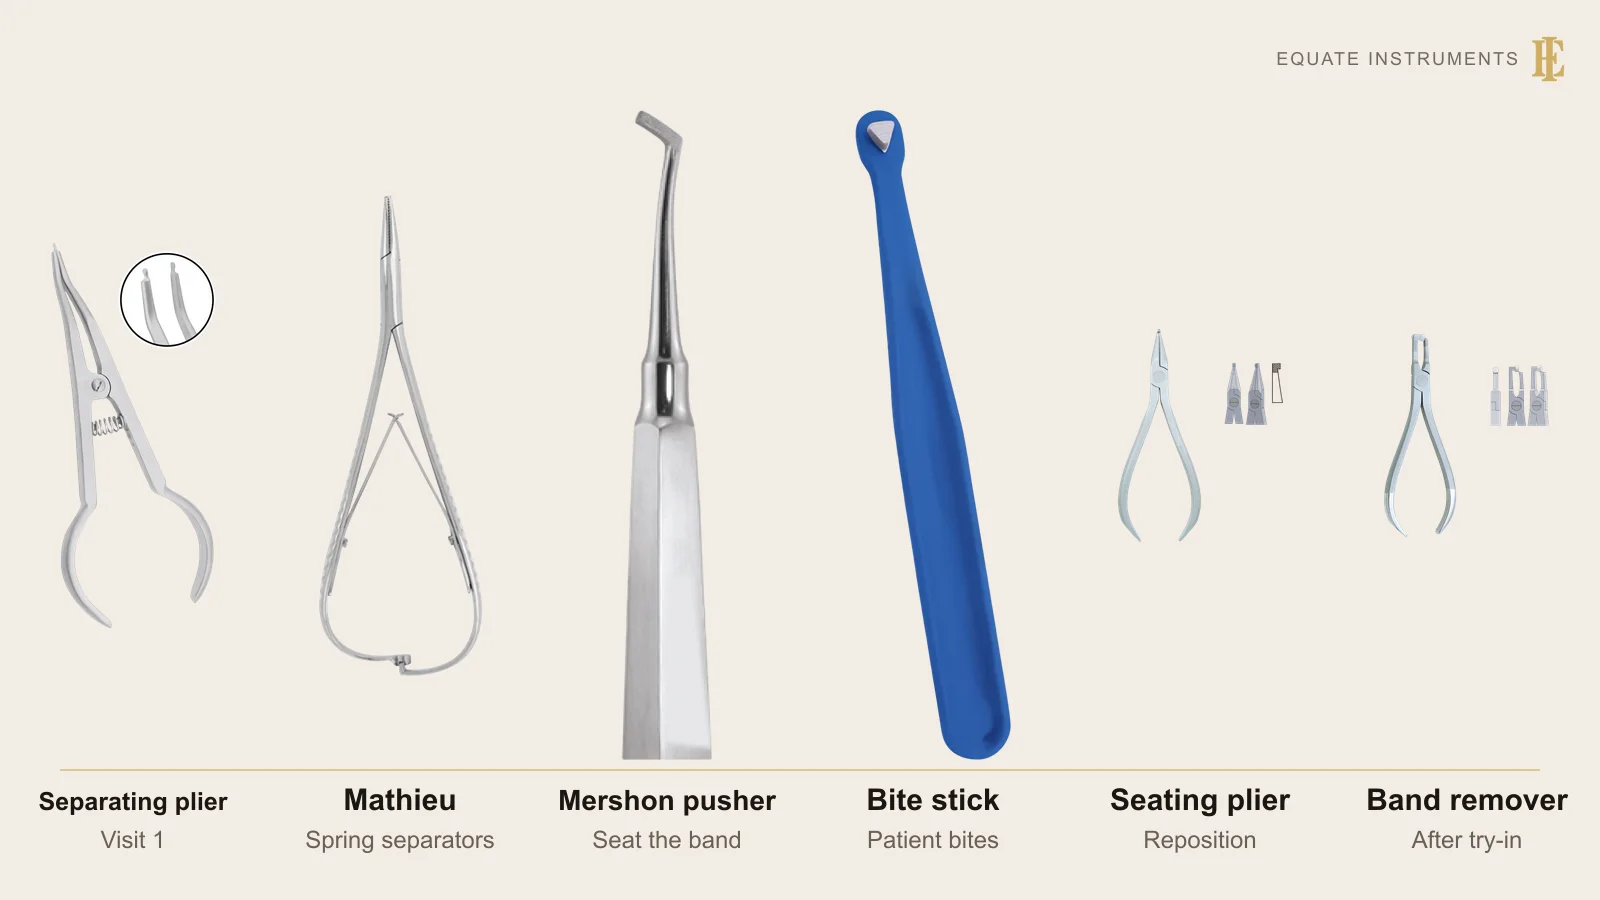
An orthodontic separator and banding setup covers two visits. The first tray places separators with an elastic separating plier, floss or a Mathieu plier. The second fits and cements molar bands with a band pusher, a band seater or bite stick, a band seating plier and a band removing plier, plus a mirror, explorer, scaler, cement and a flexible spatula.
Key points
- Separators go in first so the thin band metal can pass through the contact points at the next visit.
- A band is seated with finger pressure, then a pusher on the mesial and distal edges and a bite stick, and it is checked against fixed fit criteria before cementing.
- Every band tried in the mouth has touched saliva, so it is cleaned and sterilised before it goes back into the band kit.
Step by step
- 1
Check the contacts
Pass floss through each contact that needs a band to judge how tight it is. Very tight contacts may need a separator in place for longer.
- 2
Place elastomeric separators
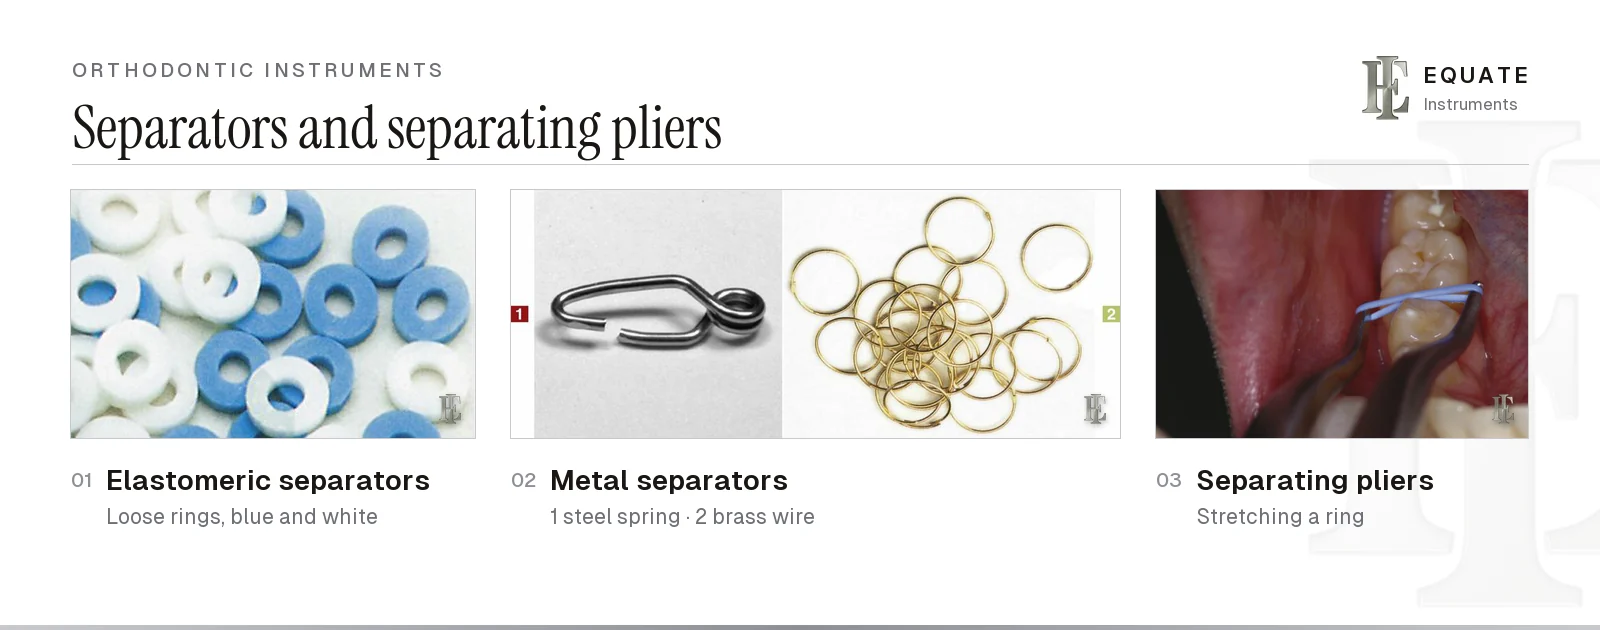
Load a ring on the elastic separating plier, stretch it and work it through the contact with a gentle see-saw movement so that it sits half above and half below the contact point. Release and check that it hugs the contact.
- 3
Use floss or a spring separator where needed
Thread two loops of floss through a ring and floss it through a contact the plier can't reach, or hold a steel spring separator in a Mathieu plier or bird beak plier and seat it over the contact. A brass wire separator is looped under the contact, twisted tight, cut short and tucked so the end can't catch the gum. Give the patient written care advice.
- 4
Remove the separators
At the banding visit, lift each separator out with an explorer or scaler and count them against the record of rings placed.
- 5
Select and try the band
Pick a band from the graded kit, starting with one that looks slightly small, and press it on with finger pressure along the long axis of the tooth.
- 6
Seat the band
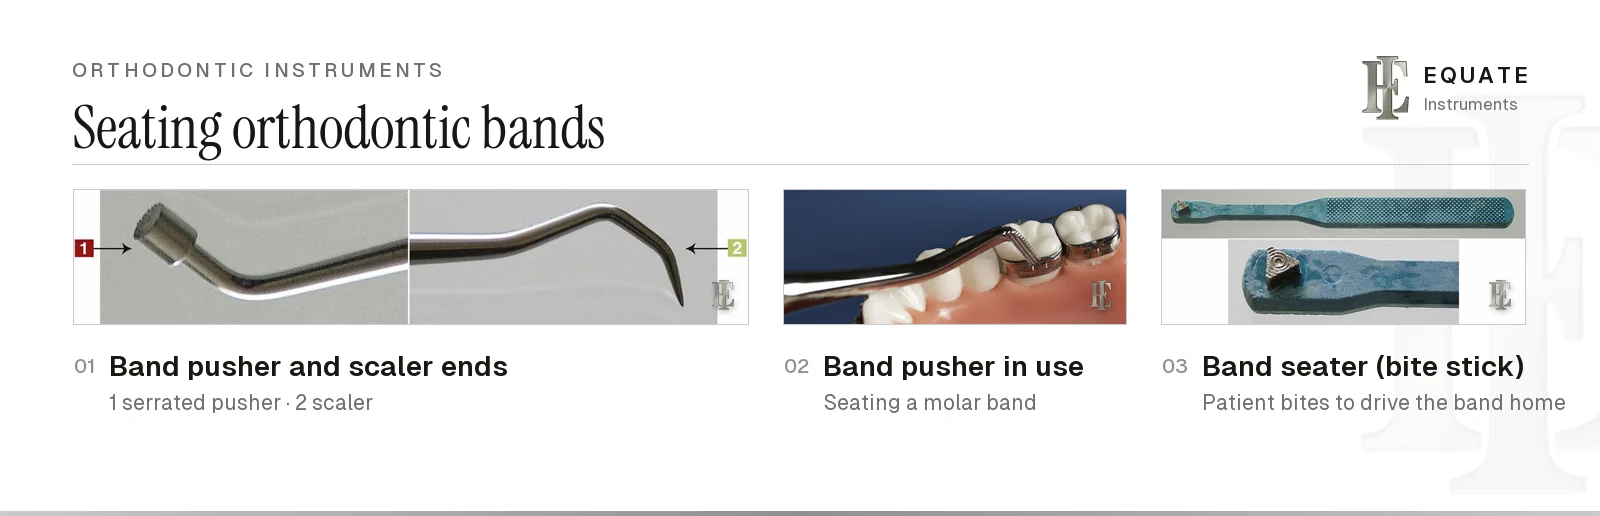
Push the band down with the band pusher on its mesial and distal edges, not the buccal or lingual, then have the patient bite on the bite stick. Use the band seating plier to reposition it if it tips.
- 7
Check the fit
Viewed from above, the band should follow the crown contour, with its buccal indentation in the buccal groove on an upper molar or the mesiobuccal groove on a lower one. It sits below the marginal ridges, parallel to the occlusal plane, with the tube or slot at mid-crown height, and ends at the gingival margin without entering the sulcus. It should be snug yet leave room for cement.
- 8
Remove, dry and cement
Lift the band off with the band removing plier, isolate and dry the tooth, fill the band with cement and reseat it with the pusher and bite stick, with gauze behind the tooth in case the band slips.
- 9
Clear excess cement
Remove excess cement from the margins with the scaler end of the band pusher before it sets, and check the occlusion.
Tray checklist
Both visits start from a mirror, explorer and cotton pliers. The separating tray is short; the banding tray adds the seating instruments and cement. The Schure band pusher–scaler listed here is the instrument Boyd calls the orthodontic (Shure) scaler, and it belongs on both trays.
| Instrument | What it is for | Guide |
|---|---|---|
| Mouth mirror, explorer, cotton pliers | Examine, remove separators, handle cotton rolls | Mouth mirrors, cotton pliers |
| Elastic separating plier | Stretch and place elastomeric separators | Elastic separating plier |
| Mathieu plier or bird beak plier | Hold steel spring and brass wire separators | Mathieu plier, bird beak plier |
| Orthodontic scaler or band pusher scaler | Remove separators and ties, clear excess cement, check for loose bands | Band pusher |
| Band pusher | Push the band down on its mesial and distal edges | Band pusher |
| Band seater or bite stick | Let the patient's bite seat the band | Band pusher |
| Band seating plier | Grip, reposition and seat the band | Band seating plier |
| Band removing plier | Lift the band off after try-in | Band removing plier |
| Flexible cement spatula, mixing pad, cement | Mix and load the band cement | Materials |
Which separator should be used?
Elastomeric rings are the usual choice and are placed with the elastic separating plier or with floss; the elastic separating plier page compares plier designs and how long separators stay in. Steel spring separators hold themselves in place and can suit contacts where a ring keeps slipping out, and they and brass wire separators are handled with a Mathieu plier or a bird beak plier. William Proffit's Contemporary Orthodontics discusses separation as the step that opens contacts before banding.
Separators usually stay in for several days, although Davidovitch and colleagues (2008) found that 12 hours gave more space than the band thickness in all 30 adults they studied and suggested placing them the day before banding. The orthodontic instruments guide shows each separator type alongside the rest of the orthodontic kit.
| Separator | Placed with | Notes |
|---|---|---|
| Elastomeric ring | Elastic separating plier, or two loops of floss | Quick to place; check for any ring lost below the contact |
| Dumbbell elastomeric | Elastic separating plier | Opened the most space by day 7 in a 60-patient study (0.48 mm, against 0.33 mm for Kesling springs and 0.28 mm for round elastomerics), with the fewest patients in pain |
| Steel spring (Kesling) separator | Mathieu plier or bird beak plier | Holds by its own spring; useful where rings slip out |
| Brass wire separator | Mathieu plier or bird beak plier | Looped under the contact and twisted tight; the tail is cut short and tucked |
What else is needed besides the instruments?
- A graded band kit and any bands with pre-welded attachments: a buccal tube for the archwire, often a headgear tube and a hook for elastics. Bands are still chosen where a bonded tube might fail.
- Band cement and its mixing materials. A Cochrane review by Millett and colleagues (2016) found eight split-mouth studies (five randomised) of zinc phosphate, glass ionomer, compomer and glass phosphonate cements, and too little high-quality evidence to name the most effective one.
- Cotton rolls, a saliva ejector, an air-water syringe and high-volume suction.
- Floss, gloves, mask and eye protection.
- A gauze pack behind the tooth while bands are seated and cemented. Molar bands are among the orthodontic parts reported swallowed, one of them during recementation, and a 2022 review notes the risk is higher when the patient is lying supine or semi-reclined (Karamani and colleagues).
- Used elastomeric separators are disposed of as healthcare waste, and metal separators and any bands that are discarded go in a sharps container, according to national rules.
How are banding instruments and try-in bands reprocessed?
The pliers, pushers and scalers on this tray touch the mucosa, so they are semi-critical items that the CDC's 2003 guidelines and its sterilisation guidance say should be cleaned and heat-sterilised if they tolerate heat. Clean pliers open, brush cement out of pusher serrations before it hardens, lubricate the joints and check that plier tips still meet, then pack and sterilise the pliers open and unlocked with an internal indicator. Check the external indicator when the load comes out and the internal one when the pack is opened. Bands that were tried in but not used have been in saliva, so they are cleaned and sterilised before going back into the kit. Follow each manufacturer's ISO 17664-1 instructions and, in England, HTM 01-05.
What are the common mistakes?
- Starting with a band that is too large, so it seats easily but leaves a gap that cement can't fill.
- Pushing on the buccal or lingual surface instead of the mesial and distal edges, which tips the band rather than seating it.
- Forcing the band into the sulcus, which hurts and traps plaque.
- Leaving excess cement to set at the margins.
- Returning tried-in bands to the kit without cleaning and sterilising them.
Build this tray with Equate
Equate lists 5 elastic separating pliers, including a 17.5 cm slim long pattern, a version without stop and a combined separating and elastomer placing plier. There are 10 band pusher scalers, including Mershon 14 cm and Schure band seater and scaler patterns, a nickel titanium band pusher, a positive positioner, 2 band seating pliers, 11 band removing pliers with replacement plastic tips, 3 band seating sticks and 2 Mathieu pliers. All are orthodontic family items except the seating sticks.
Instruments are passivated stainless steel, ultrasonically cleaned, shape-, boil- and performance-tested and individually packed, and designed in Finland. Clinics can request samples and a quote. For removing bands at the end of treatment, see the bracket debonding setup. Brackets are bonded on the bracket bonding setup.
The Equate difference
Equate lists 38 references across the 8 subcategories on these trays: 5 elastic separating pliers from 15 to 17.5 cm, 10 band pusher scalers including Mershon and Schure patterns, 2 band seating pliers, 11 band removing pliers in short, long-neck and tungsten carbide versions, 3 band seating sticks and 2 Mathieu pliers.
Equate Orthodontic Separator and Banding Setup options

Band Seating Stick in Plastic 13cm - Blue
EI-0692
Band Seating Stick in Plastic 13cm
EI-2564
Band Seater Stick, Blue - Autoclavable
EI-3341
Posterior Band Removing Pliers Long Handle
EI-0696
Plastic Replacement Tips for Band Remover (5 pcs)
EI-0697
Mershon Band Pusher 14 cm
EI-0701
Mathieu Orthodontic Ligature Pliers 14 cm
EI-0703
Elastic Separating and Elastomer Placing Pliers 15.5 cm
EI-0704
Mathieu Narrow-Tip Ligature Pliers 14 cm
EI-0705
Angle Plier for Band Setting
EI-0796
Orthodontic Separating Plier for Elastic Separators - 15 cm
EI-2377
Positive Positioner
EI-2565Browse all orthodontic instruments Browse all restorative & operative instruments
Buying in your market
Frequently asked questions
Why are separators placed before bands?
Molar bands are thin metal rings that can't pass through tight contacts. Separators open a small space between the teeth so the band can be seated at the next visit.
How is a molar band seated?
With finger pressure first, then a band pusher on the mesial and distal edges and a bite stick that the patient bites on. The band seating plier helps reposition it.
How do you know a band fits?
It follows the crown contour with its buccal indentation in the molar groove, sits below the marginal ridges and parallel to the occlusal plane, and ends at the gingival margin without going into the sulcus, snug but with room for cement.
Which cement is best for orthodontic bands?
A 2016 Cochrane review found too little high-quality evidence to say. Clinics choose between glass ionomer, compomer and other cements on handling and their own experience.
Can tried-in bands be reused?
Yes, once they have been cleaned and sterilised, because a band tried in the mouth has been contaminated with saliva.
References
- Proffit WR, Fields HW, Larson BE, Sarver DM. Contemporary Orthodontics, 6th edition. Elsevier, 2018 (separation and banding)
- Millett DT, Glenny A-M, Mattick RCR, Hickman J, Mandall NA. Adhesives for fixed orthodontic bands. Cochrane Database of Systematic Reviews, 2016, Issue 10
- Kohn WG, Collins AS, Cleveland JL, Harte JA, Eklund KJ, Malvitz DM. Guidelines for Infection Control in Dental Health-Care Settings, 2003. MMWR Recommendations and Reports 52(RR-17), Centers for Disease Control and Prevention, 2003
- Centers for Disease Control and Prevention. Dental infection prevention and control FAQs: sterilization of patient-care items
- Department of Health. Health Technical Memorandum 01-05: Decontamination in primary care dental practices, 2013 edition
- Boyd LB. Dental Instruments: A Pocket Guide, 7th edition. Elsevier, 2020. Chapter 14, Orthodontic Instruments (photographs used under licence)
- Sharma K (reviewed by Tompson B, Wilson B). Orthodontic Band Selection and Placement. University of Toronto Faculty of Dentistry
- Davidovitch M, Papanicolaou S, Vardimon AD, Brosh T. Duration of elastomeric separation and effect on interproximal contact point characteristics. American Journal of Orthodontics and Dentofacial Orthopedics 133(3):414-422, 2008
- Shamsuddin SV, Alshahrani S, Sam G, Jeri SY, Bhuyan SKR, Mahanta D. Assessment of separation impact and perception of discomfort on various orthodontic separators: a comparative clinical study. Journal of Pharmacy and Bioallied Sciences 13(Suppl 1):S642-S645, 2021
- Karamani II, Makrygiannakis MA, Bitsanis I, Tsolakis AI. Ingestion of orthodontic appliances: a literature review. Journal of Orthodontic Science 11:20, 2022
I am a…