Orthodontic Instruments: What Each One Does, Stage by Stage
Written by the Equate Instruments Technical Team · Reviewed by the Medical & Dental Board, Equate Instruments · Updated ·
Orthodontic instruments are the hand instruments used to fit, adjust and remove fixed braces. They include separating pliers, band pushers and bite sticks for bands, bracket tweezers for bonding, utility pliers such as the Howe and Weingart for archwires, bending pliers, ligating instruments, distal end and ligature cutters, and band, bracket and adhesive removers for debonding.
Key points
- Each appointment has its own tray: separating, banding and bonding, tying in the archwire, and debonding. The instruments overlap but the emphasis changes.
- Pliers are chosen by what touches the wire: serrated pads hold it, smooth beaks bend it, and hardened cutting edges cut it within a stated wire capacity.
- Hinged pliers and cutters go through cleaning and sterilisation open and unlocked; separators, bands, brackets, archwires and ligatures are single use and are disposed of under national waste rules.
What are orthodontic instruments?
Fixed orthodontic treatment uses a small set of consumables (separators, bands, brackets, archwires and ligatures) and a larger set of reusable hand instruments that place, adjust and finally remove them. Linda Bartolomucci Boyd's Dental Instruments: A Pocket Guide (Elsevier) arranges the orthodontic chapter in treatment order, and this guide follows the same path: separating the teeth, fitting bands, bonding brackets, placing and tying in the archwire, and debonding at the end of treatment.
Most of the reusable instruments are pliers. They look alike at a glance, but the beak decides the job, and using a bending plier as a cutter, or a utility plier to bend heavy wire, is the quickest way to ruin one. Every tray also starts from the basic setup of mirror, explorer and cotton forceps. For a ranked shortlist, see the best orthodontic pliers and the orthodontic plier starter kit. Clinics equipping a new orthodontic surgery can buy the instruments together as a starter orthodontic instrument set on its product page.
| Stage | Main instruments | Consumables |
|---|---|---|
| Separating | Elastic separating pliers, orthodontic hemostat (Mathieu plier), band pusher–scaler | Elastomeric, steel spring or brass wire separators |
| Banding and bonding | Band pusher, bite stick, band pusher–scaler, bracket tweezers or placement pliers, cheek retractor | Bands, brackets, bracket placement card, cement or adhesive |
| Archwire placement | Howe and Weingart pliers, bending pliers, ligature director, ligature-tying plier, distal end and ligature cutters | Archwires, wire or elastomeric ligatures |
| Debonding | Posterior band remover, bracket remover or debonding plier, adhesive-removing plier | None; everything removed is discarded |
Separators and separating pliers
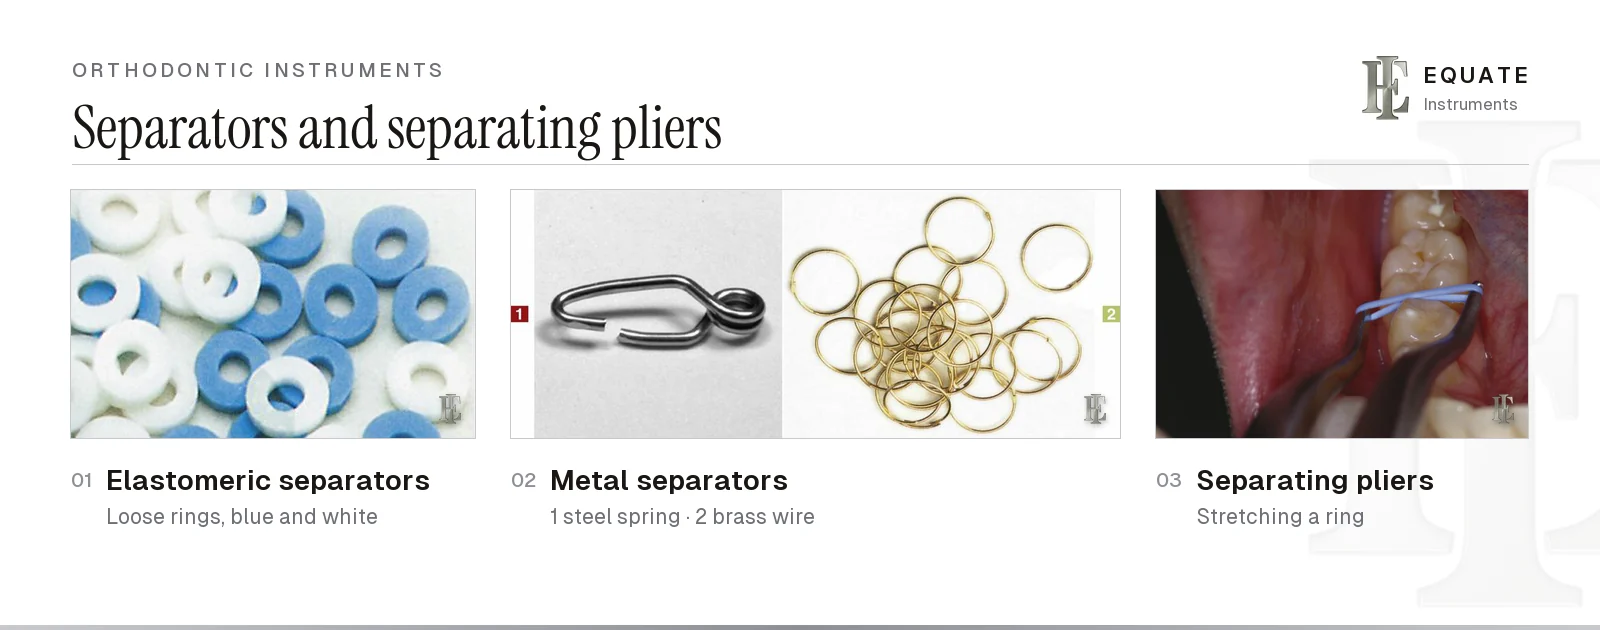
Molar contacts are usually too tight for a band to slide through, so a separator is placed a few days before banding to open a small gap. Elastomeric separators are small rings, sold loose or supplied on a moulded carrier. Metal alternatives are a steel spring that clips around the contact, or a length of soft brass wire looped under the contact and twisted tight, with the twisted tail trimmed short and tucked away so it doesn't catch the gum or bite.
Elastic separating pliers have two beaks that open when the handles are squeezed. The ring is hooked over both beaks, stretched thin, and worked through the contact with a gentle buccolingual see-saw until the ring encircles the contact point, with one side above it and one below. The separator and banding tray sets out both visits step by step. Brass wire and spring separators are placed instead with an orthodontic hemostat such as a Mathieu plier, or a bird beak plier. Separators are single-use; dispose of elastomers and metal separators as healthcare waste according to national rules. The elastic separating plier page compares beak styles.
Bands, band pushers and bite sticks
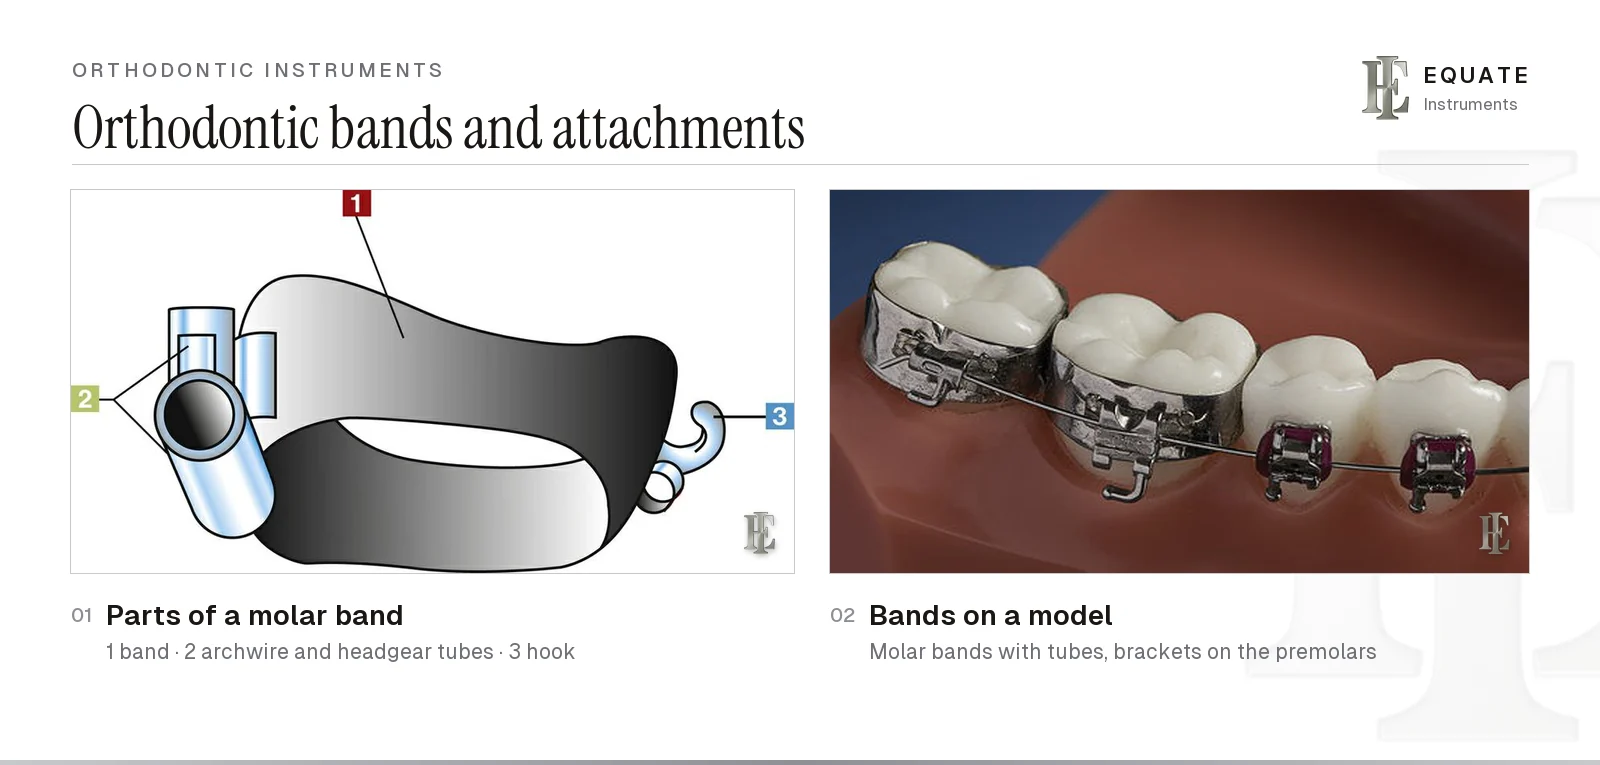
An orthodontic band is a thin stainless steel ring cemented around the crown, usually on molars. It carries welded attachments: a buccal tube for the archwire, often a second tube for headgear, and a hook for elastics. Bands are still used where a bonded tube might fail, such as on teeth that will take heavy forces or that carry an appliance.
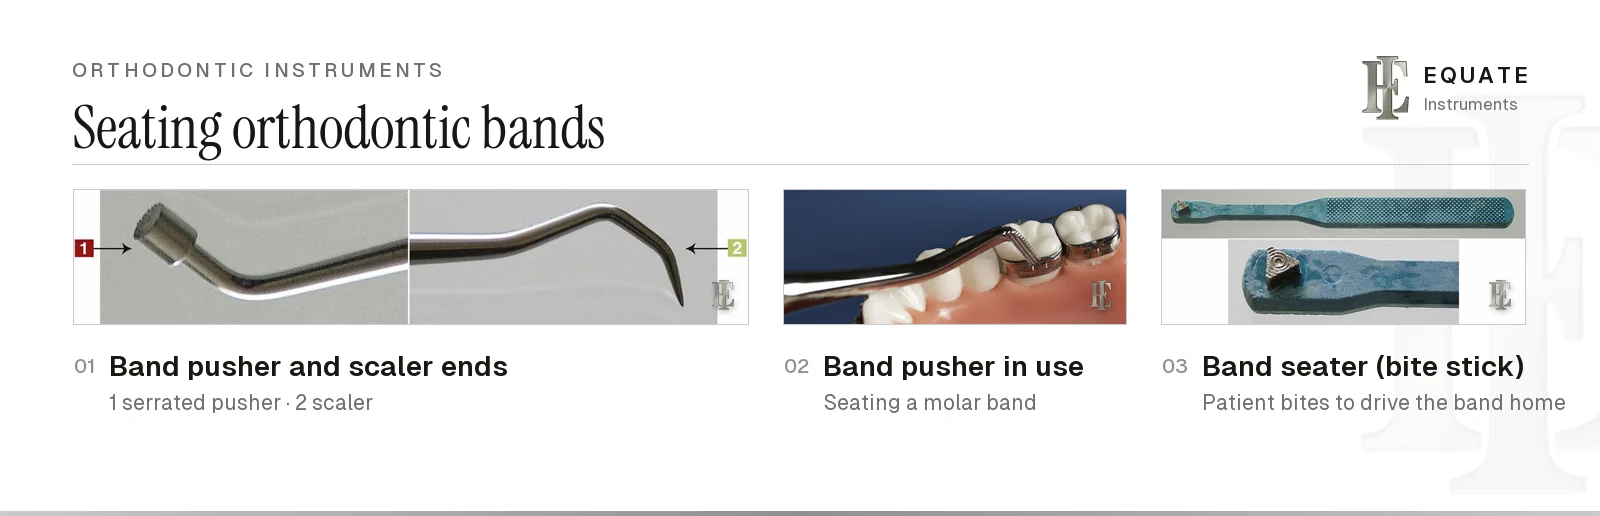
Seating a band takes pressure in the right direction. A band pusher has a small serrated end that grips the band edge while the clinician pushes it down on the mesial and distal edges in turn, not on the buccal or lingual side, as the University of Toronto's band placement notes advise. A bite stick, or band seater, has a small metal insert at one end; it is placed on the band margin and the patient bites to drive the band home. Many pushers are double-ended with a scaler at the other end for removing excess cement after seating, the design Boyd calls the orthodontic (Shure) scaler. Its scaler end also lifts out separators and elastic ligatures, both ends help place brackets and check for loose bands or brackets, which is why it appears on every orthodontic tray. Compare tip designs on the band pusher and band seating plier pages.
The University of Toronto's band placement notes describe a band that fits: viewed from above it follows the contour of the crown, its buccal indentation lies in the buccal groove of an upper molar or the mesiobuccal groove of a lower one, and it is snug yet leaves room for cement. Its occlusal edge should also sit below the marginal ridges and parallel to the occlusal plane, and its gingival edge should stop at the gum margin without entering the sulcus. A 2016 Cochrane review by Millett and colleagues found too little good evidence to name a best band cement. Bands tried in but not used go back into the kit only after cleaning and sterilising. The separator and banding setup covers sizing, seating and cementing in order.
Brackets and bracket placement instruments
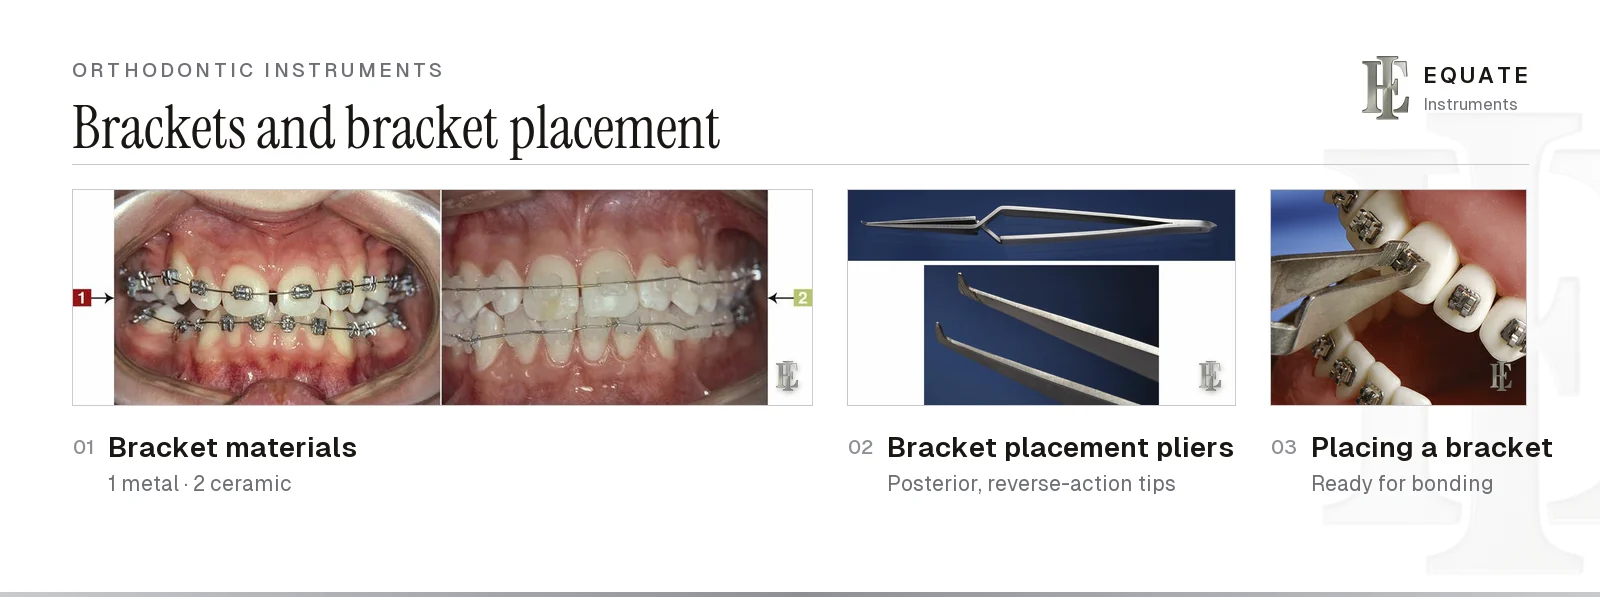
Brackets are bonded to each tooth and hold the archwire in their slot. Metal brackets are the most robust; ceramic brackets are tooth-coloured but harder and more brittle, so they need more care at debonding. Self-ligating brackets have a built-in clip or door that closes over the wire, opened and closed with a small dedicated instrument instead of a ligature.
Before bonding, brackets are often laid out on a placement card in tooth order so the right one is picked up each time. They are carried to the tooth with bracket-holding tweezers, placement pliers or a bracket holder. Reverse-action tweezers stay closed until squeezed, so the bracket can't drop, and the tips are shaped to engage the bracket slot or wings. Anterior and posterior versions differ in tip angle. A bracket positioning gauge is then used to set the height from the incisal edge or cusp tip before the adhesive is cured. See also the bracket holding tweezer guide.
The bonding itself runs clean, etch, prime, place and cure, and keeping the enamel dry matters throughout. In a clinical trial of 1,174 bonds, Kinch and colleagues (1988) saw no difference in failures between 15- and 60-second etching, and in a laboratory study Bishara and colleagues (2002) found that saliva on the enamel both before and after a self-etch primer cut bond strength sharply. The bracket bonding setup lists the etch, prime and cure steps.
Archwires and utility pliers: Howe and Weingart
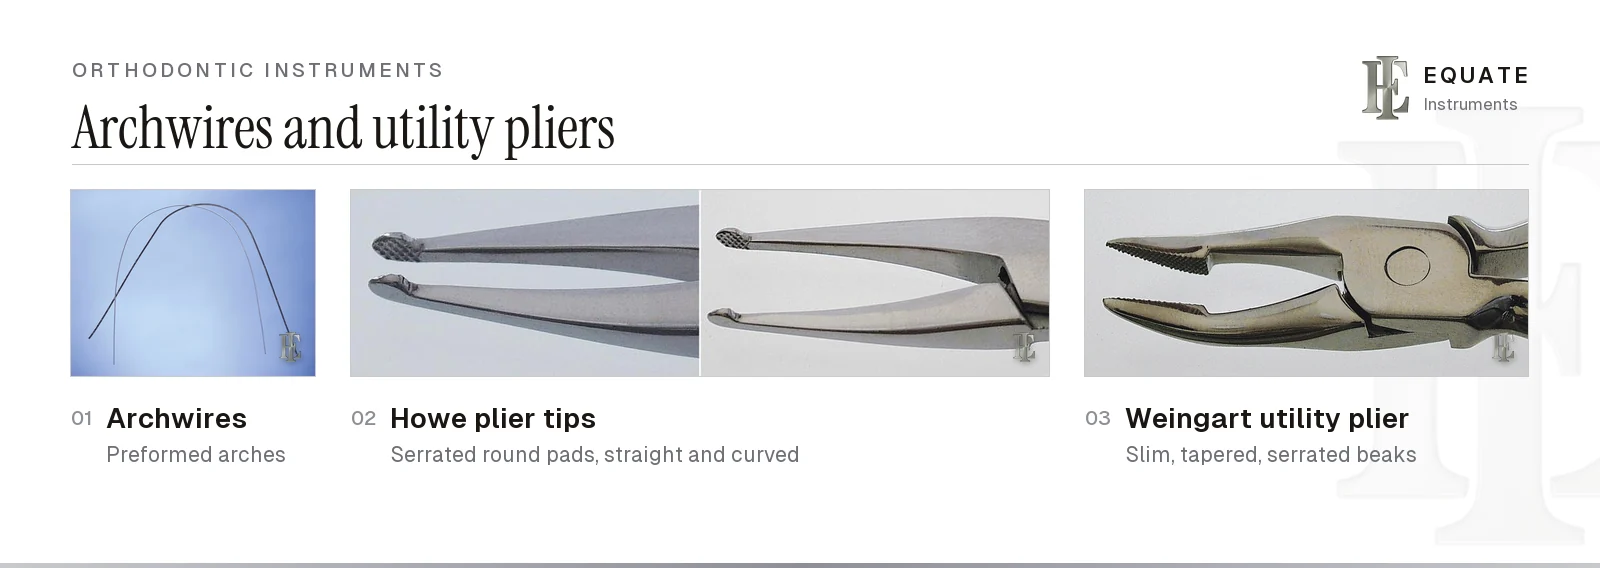
The archwire supplies the force that moves teeth. As Proffit and colleagues describe in Contemporary Orthodontics, treatment usually begins with light, flexible nickel-titanium round wire for levelling and alignment, moves through heavier wires, and ends with stiffer stainless steel or beta-titanium rectangular wire, which fills more of the slot and gives control of root position. Archwires are single-use and are discarded in a sharps container.
Two utility pliers do most of the wire handling. The Howe plier has small round, serrated pads at the end of straight or curved beaks; it grips the wire firmly to insert it into molar tubes, pull it out, and check whether a band is loose. The Weingart plier has long, slim, tapered serrated beaks, usually curved, that reach between brackets to guide a wire into the slots. Neither is a bending plier, and serrations will mark wire that is meant to stay smooth. Read the Weingart vs Howe comparison or the individual Howe plier and Weingart plier pages.
Wire-bending pliers
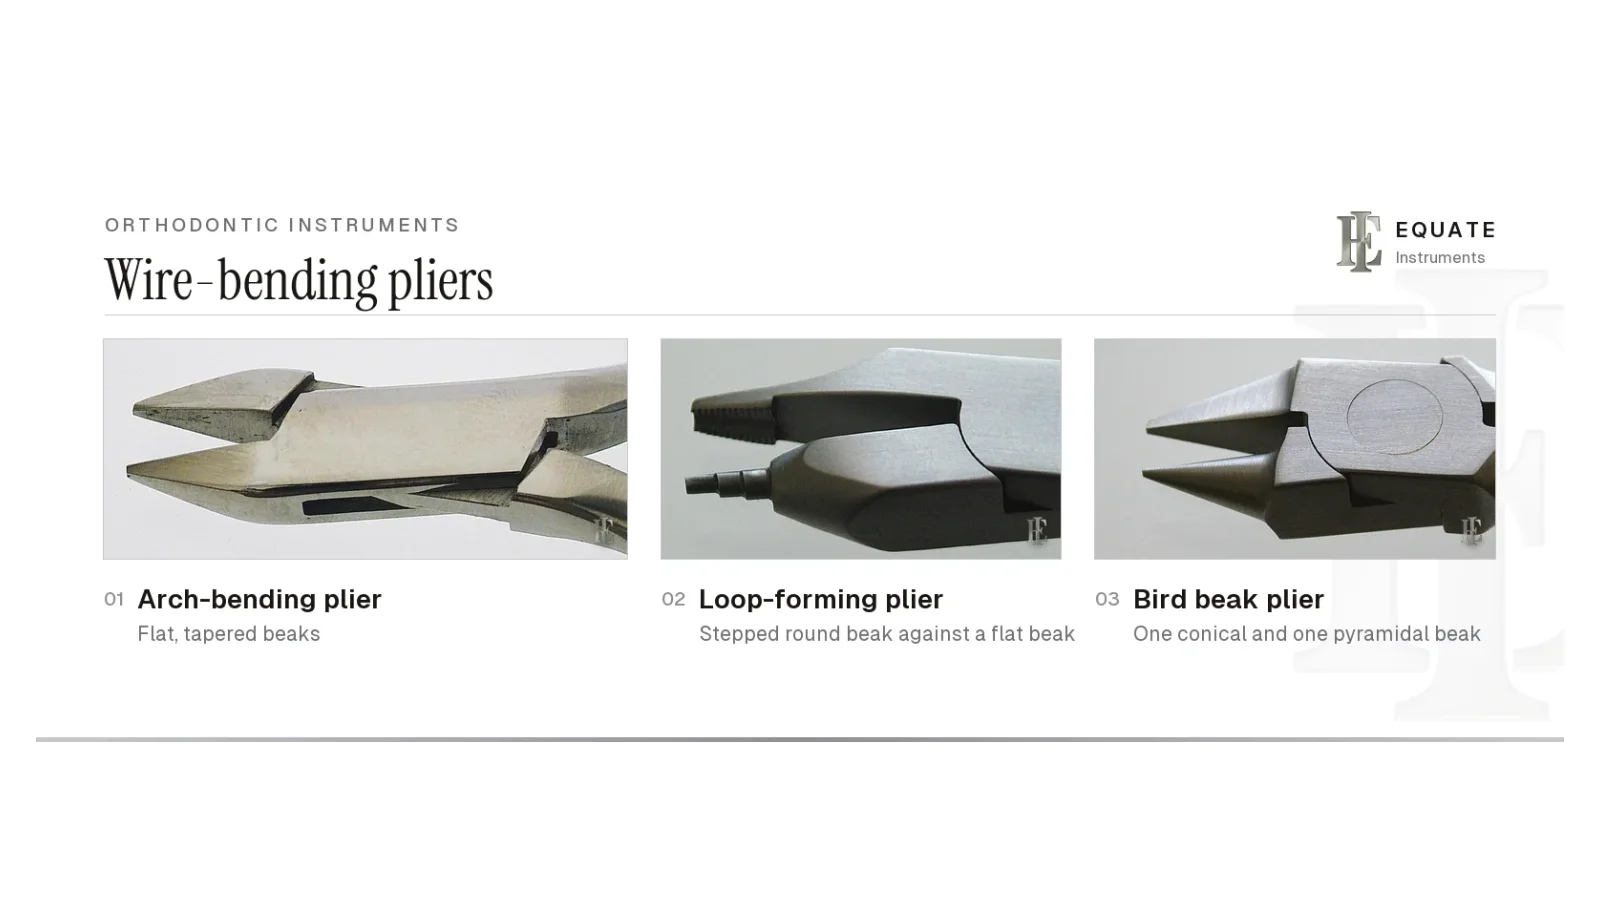
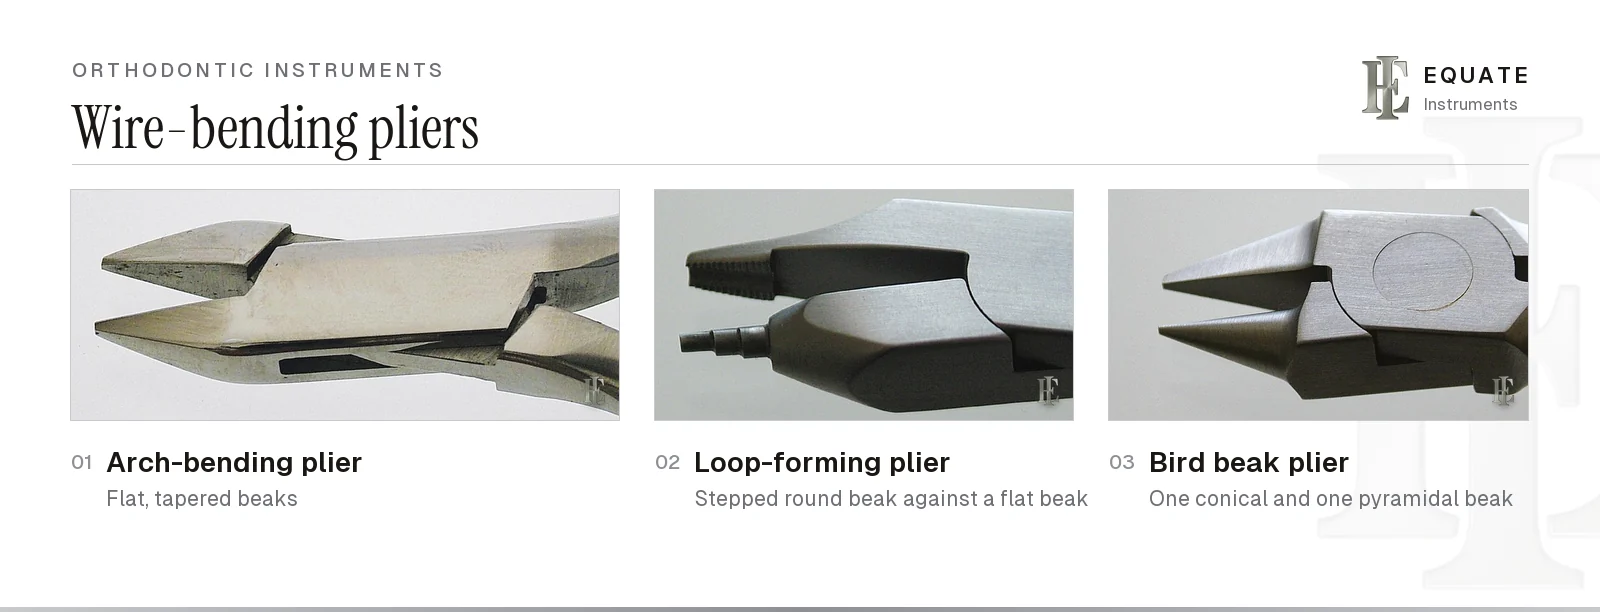
Bending pliers have smooth beaks so they shape wire without nicking it, and each beak profile produces a different kind of bend. Boyd groups them broadly as arch-bending pliers, which come in styles for round, square or rectangular wire, then loop-forming pliers, three-prong pliers and bird beak pliers.
Buy bending pliers with their wire limits in mind. Each bending plier has a maximum wire size stated by its maker, typically around 0.5 mm (0.020 inch) round wire for light-wire pliers; bending heavier or rectangular wire in them springs the joint and chips the tips. The best wire bending pliers guide and the archwire bending procedure cover the bends step by step.
| Plier | Beak design | Typical use |
|---|---|---|
| Bird beak | One conical and one pyramidal beak | General bends and loops in light round wire, clasps and springs on removable appliances |
| Tweed loop-forming | Round beak with stepped diameters opposite a concave or flat beak | Loops of consistent size in archwires |
| Three-prong | Two prongs on one beak, one on the other | Adjusting clasps and bending light wire |
| Rectangular arch-forming (Tweed arch-bending) | Flat, parallel, square-edged beaks | First, second and third-order bends in rectangular wire |
Ligating and cutting the archwire
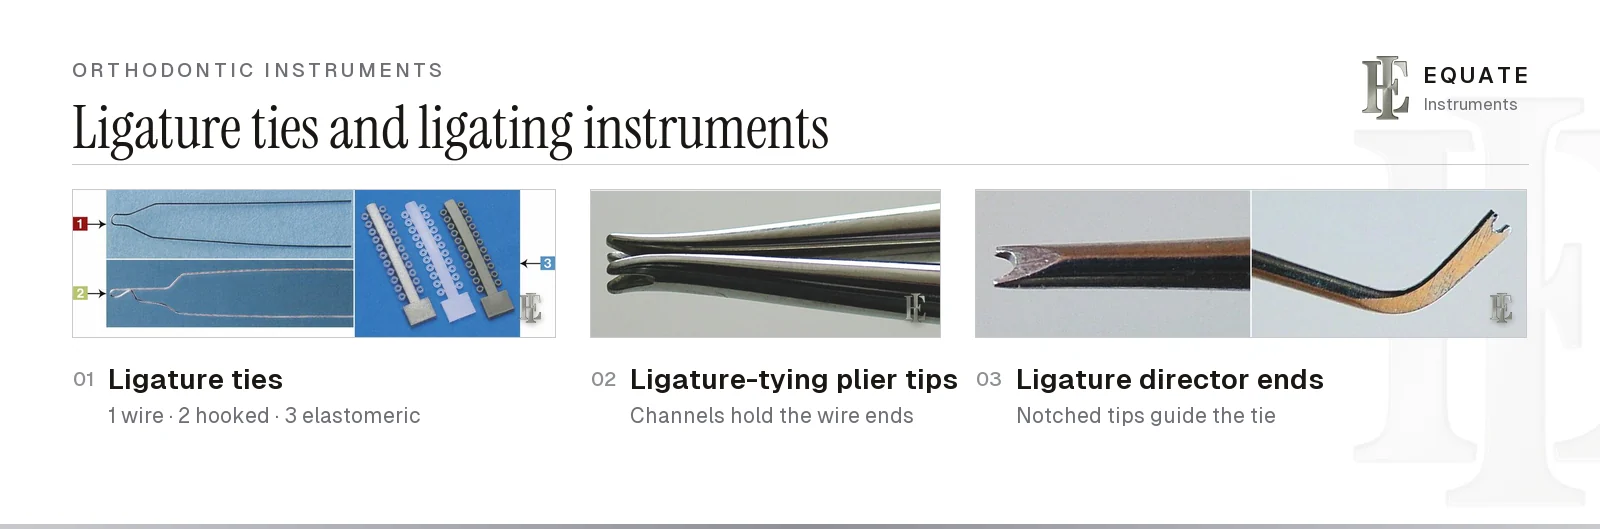
Unless brackets are self-ligating, the archwire is held in each slot by a ligature. Elastomeric ligatures are small coloured rings supplied on sticks or as chain; they're quick to place with a Mathieu plier or ligature placer. Stainless steel wire ligatures, cut or pre-formed, hold the wire more firmly. In laboratory tests, elastomeric ties showed their greatest force loss in the first 24 hours (Taloumis and colleagues, 1997), and a split-arch study of 12 patients found more microorganisms on incisors tied with elastomeric rings than with steel (Forsberg and colleagues, 1991). The archwire ligation setup compares the two and gives the tying-in order. Some pre-formed wire ties carry a small hook for attaching elastics.
A ligature director has a notched tip that pushes the tie under the bracket wings and seats it around the wire. Wire ligatures are twisted tight with a Mathieu plier (an orthodontic hemostat that locks when closed) or with a ligature-tying plier, sometimes called a Coon plier, on which the twisted ends of the tie are caught in a channel on the beak; squeezing the reverse-action handles spreads the tips and tensions the tie, and turning the plier twists it tight. The cut tail is then tucked in with a ligature tucker so it can't irritate the lip. See the ligature director, Mathieu plier and ligature tying plier pages.
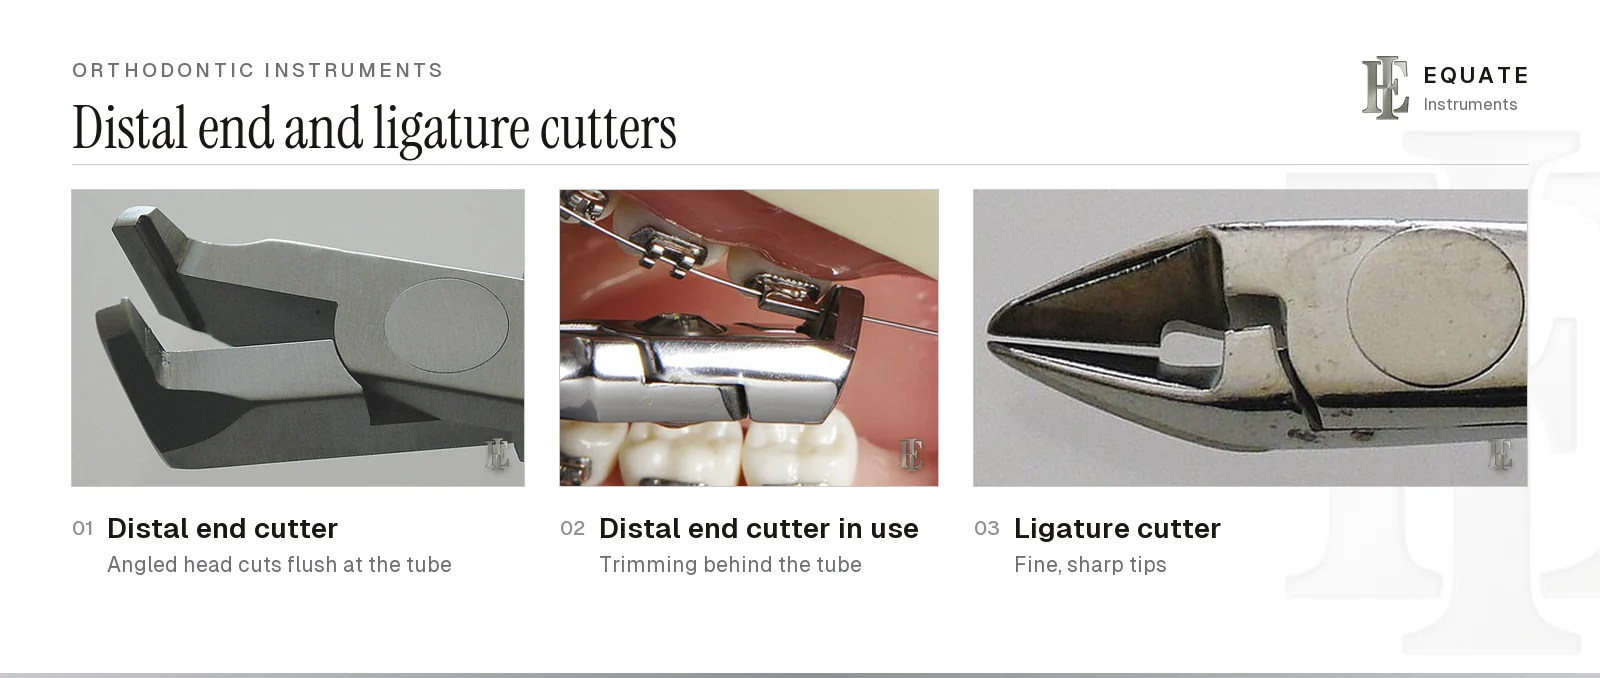
A distal end cutter trims the archwire flush behind the last molar tube. Its head sits at right angles to the handles so it reaches the back of the mouth, and the safety-hold design is meant to grip the cut end so it is less likely to drop into the mouth or be inhaled; check the piece is retained before withdrawing the cutter. A 2022 review of 19 published case reports and series on swallowed orthodontic parts (Karamani and colleagues) lists wire segments, expansion keys and molar bands among the appliances most commonly ingested, and advises a gauze pad placed distal to the wire as well as checking the cutter. The ends are cut last, once every tie is in, so the wire cannot slip out of a tube, and a cinch back plier turns the end in where the plan calls for it. A ligature cutter has fine, sharp tips that slip under a wire ligature to cut it, either after tying or when the archwire is changed. For a shortlist, see the best distal end cutters.
Cutters are the instruments most often damaged by misuse. A ligature cutter used on archwire, or a light-wire cutter used on heavy rectangular wire, will notch its edges. Match the cutter to the wire size printed on it and keep a separate hard wire cutter for heavy wire. Compare designs on the distal end cutter and ligature cutter pages, or read distal end cutter vs pin and ligature cutter.
Debonding: removing bands, brackets and adhesive
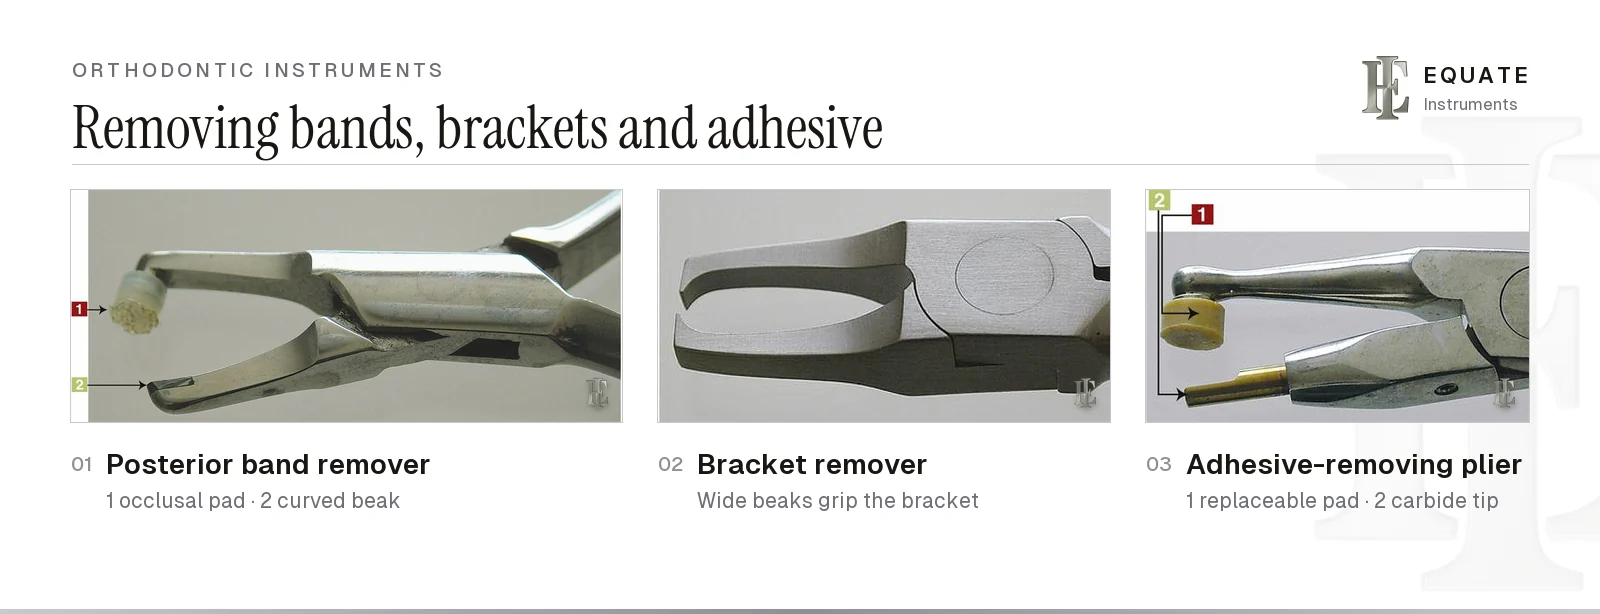
At the end of treatment, a posterior band remover lifts bands off the molars. One beak carries a replaceable pad that rests on the biting surface; the other has a curved tip that hooks under the gingival edge of the band, so squeezing the handles levers the band occlusally along the long axis of the tooth. Brackets come off with a bracket remover or debonding plier that grips the bracket base and breaks the adhesive bond by deforming the bracket; Boyd also notes that Weingart and bird beak pliers can squeeze a bracket off.
Adhesive left on the enamel is removed next. An adhesive-removing plier has a replaceable pad on one beak and a hard carbide-tipped blade on the other to shear off the bulk of the composite, and the surface is then finished with low-speed burs and polishers. Ceramic brackets need the specific technique their manufacturer gives, because they fracture rather than flex. The debonding plier, band removing plier and bracket debonding setup pages go further. For a ranked shortlist, see the best bracket removers and debonding pliers.
Orthodontic tray setups
Boyd describes four orthodontic trays. All of them build on the mirror, explorer and cotton forceps with suction and an air/water syringe tip, and the orthodontic scaler is on every one. Boyd combines banding with bonding on a single tray; here banding and cementation sit with separating, so the bonding tray needs no band remover or cement spatula. Each visit has its own page with the full tray and steps:
- Separating and banding: separating pliers, an orthodontic hemostat, floss, then band pushers, a bite stick, a band remover and cement. See the separator and banding setup.
- Bonding brackets: a placement card, bracket tweezers or placement pliers, cheek retractors, fluoride-free prophy paste and microbrushes. See the bracket bonding setup.
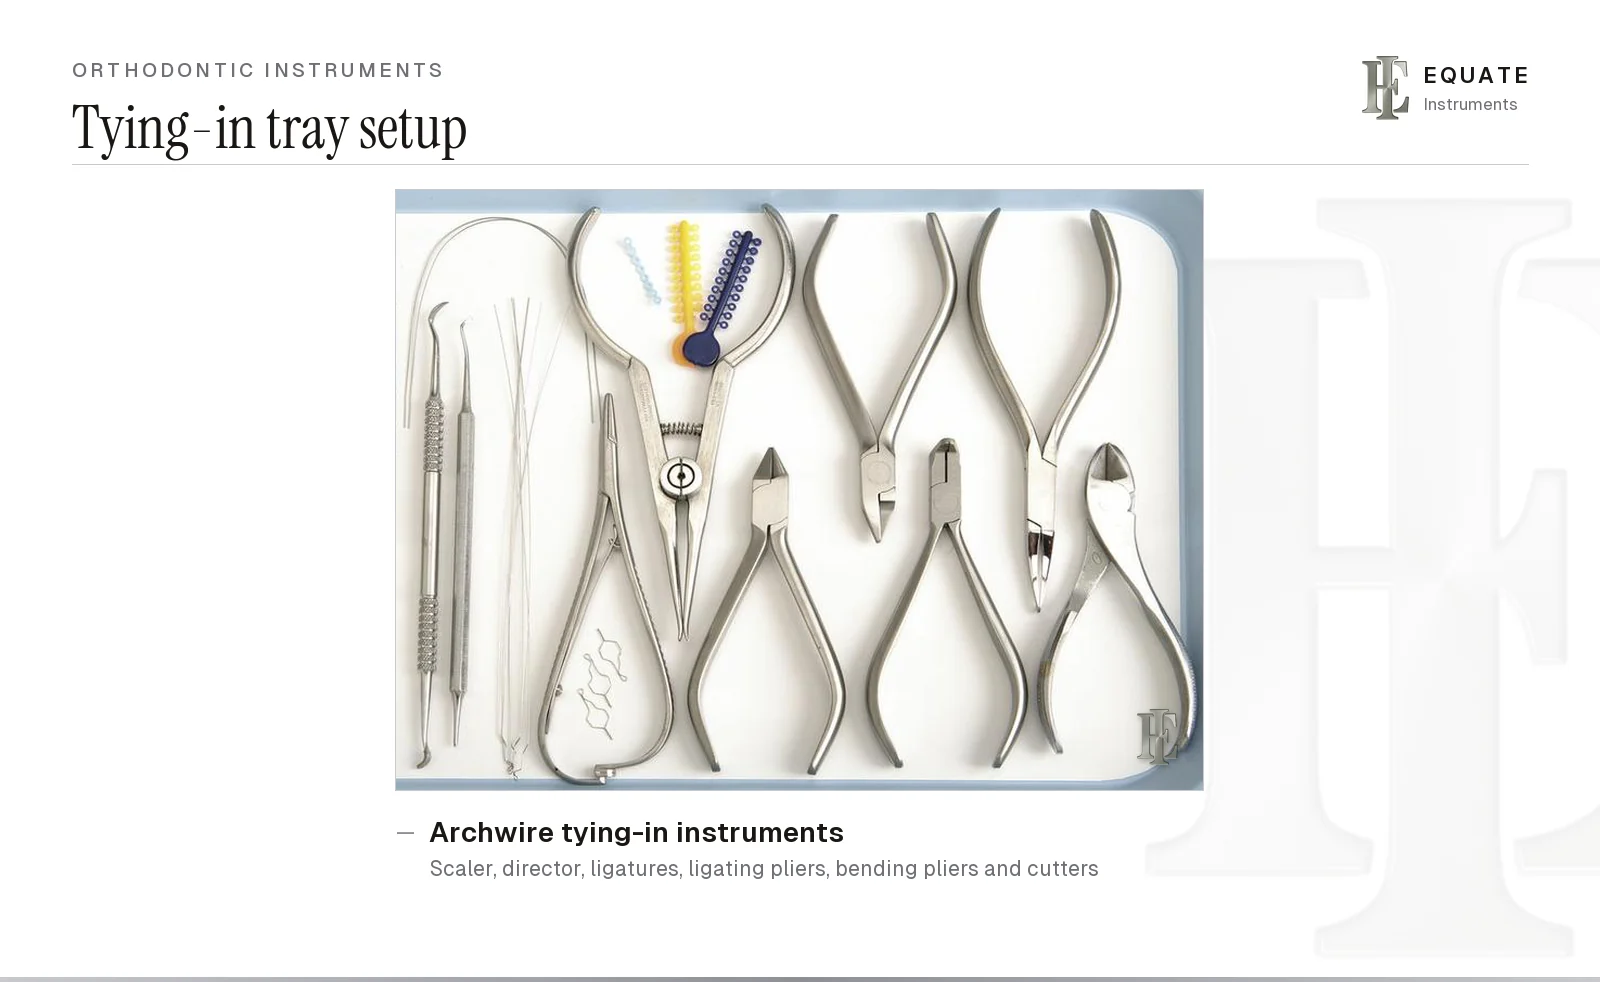
- Tying in the archwire: Howe and bending pliers, ligature instruments and both cutters. See the archwire ligation setup.
- Removing bands and brackets: a band remover, bird beak plier, curette and scaler. See the bracket debonding setup.
Beyond fixed braces: aligners, removable appliances and records
Orthodontic practices also use lip and cheek retractors for clinical photographs, intraoral scanners for digital impressions and aligner treatment (covered with barriers and disinfected as their maker directs), and temporary anchorage devices, small titanium mini-screws placed for skeletal anchorage, which are single-use.
Clear aligner work has its own small set of pliers: clear aligner pliers for attachments and trimming that add or adjust pressure points and edges on a thermoformed aligner, and thermoforming pliers used on the plastic after it has been heated. For removable appliances, the Adams plier, with short, square-ended beaks, is the classic instrument for forming and adjusting clasps, alongside the three-prong plier and bird beak plier. Keep these separate from archwire pliers so their tips stay clean and true.
Cleaning and sterilising orthodontic pliers
Orthodontic pliers touch mucous membranes and are reprocessed after every patient. The US Centers for Disease Control and Prevention guidelines (Kohn and colleagues, 2003) and the Department of Health's HTM 01-05 for dental practices in England both expect heat-tolerant instruments like these to be cleaned and heat sterilised between patients. Follow the manufacturer's reprocessing instructions, written under ISO 17664-1, and your national regulations. Done that way, pliers last: in a six-month study of 72 orthodontic pliers in routine hospital use with steam autoclaving, Jones and colleagues (1993) found they generally held up well, stainless steel performed best, and a disciplined clean, lubricate and autoclave routine mattered most.
- Clean with the joint open: hinged pliers and cutters go into the ultrasonic or washer-disinfector opened and unlocked so debris and cement are flushed out of the box joint.
- Dry and lubricate: a drop of instrument lubricant suitable for steam sterilisation on the joint keeps the action smooth and protects against corrosion.
- Pack and sterilise open: pouch or wrap each instrument with an internal process indicator, still opened, and steam sterilise it.
- Check indicators: confirm the external indicator has changed when the load comes out and the internal one when the pack is opened at the chair.
- Store and record: keep packs dry and intact in a closed drawer or cabinet away from clinical splatter, and record each cycle as national rules require.
- Return tried-in bands only when clean: bands tried in the mouth but not cemented go back into the kit after cleaning and sterilising.
- Dispose of single-use items correctly: archwires, bands, brackets, metal separators and wire ligatures go in a sharps container; elastomeric separators and ligatures are disposed of as healthcare waste according to national rules.
Buying orthodontic instruments: what to check
- Beak alignment: bending plier tips should meet along their length, and cutter edges should close without light showing between them.
- Wire capacity: check the maximum wire size for every cutter and bending plier, and buy for the heaviest wire you use.
- Joint: box joints are stronger and stay aligned longer than lap joints on pliers that take heavy loads.
- Tips: tungsten carbide inserts hold an edge longer on cutters and gripping pliers, while plain stainless steel is cheaper to replace. Compare them in tungsten carbide vs stainless steel orthodontic pliers.
- Safety-hold: on distal end cutters, a hold feature that retains the cut end is worth paying for.
- Material and finish: passivated stainless steel that tolerates repeated steam sterilisation without pitting, and a satin finish that cuts glare under the operating light.
The Equate difference
Equate's orthodontic catalogue lists 396 products in 70 subcategories, including 19 Weingart pliers, 43 utility pliers (including 4 Howe pliers), 12 bird beak pliers, 14 Tweed loop-forming pliers, 13 rectangular arch-forming pliers, 6 three-prong pliers, 28 distal end and flush cutters (27 with a wire hold), 17 ligature cutters, 13 hard wire cutters, 13 ligature directors, 10 ligature tuckers, 2 Mathieu pliers, 14 bracket-holding tweezers, 7 bracket positioning gauges and 4 height gauges, 10 band pusher scalers, 11 band-removing pliers, 6 bracket removers, 8 debonding pliers and 5 elastic separating pliers. Equate does not supply the single-use consumables (separators, bands, brackets, archwires or ligature ties).
Equate Orthodontic Instruments: What Each One Does, Stage by Stage options

Howe Utility Plier 3.2mm Max 0.028 Inch Wire
EI-0679
Bracket Positioning Tweezer 12 cm
EI-0680
Hard Wire Cutter Plier 15 Degree Tungsten-Carbide Max 0.028 Inch Wire
EI-0681
Orthodontic Bracket Height Gauge with 3.5, 4.0, 4.5 and 5.0 mm Arms
EI-0682
Micro Pin and Ligature Cutter Max 0.012 Inch Wire Tungsten-Carbide
EI-0683
Direct Bond Bracket Remover Plier
EI-0684
Angulated Debonding Pliers (TC)
EI-0685
Adhesive Removing Pliers (TC)
EI-0686
Adhesive Remover Changeable Parts - 5 Sets (Carbide Tip + Teflon Pad)
EI-0687
Bracket Holding Tweezers 12 cm
EI-0689
Bracket Placing Tweezers 13 cm
EI-0690
Tweed Loop Forming Pliers 0.55 x 0.64 mm (.021″ x .025″ Wire)
EI-0691Browse all orthodontic instruments
Buying in your market
Frequently asked questions
What instruments are used to put on braces?
It takes several visits. Separating pliers open the contacts first; band pushers and a bite stick seat any bands; bracket tweezers or placement pliers and a positioning gauge place the brackets; and Howe or Weingart pliers, a ligature director, a Mathieu plier and a distal end cutter place and secure the archwire. Each visit has its own tray setup page: separators and banding, bracket bonding, and archwire ligation.
What is the difference between a Howe plier and a Weingart plier?
Both are utility pliers with serrated tips. The Howe has short beaks ending in small round pads for a strong grip on the wire end, while the Weingart has long, slim, tapered beaks that reach between brackets to guide the wire into the slots.
What is a distal end cutter used for?
It trims the archwire flush behind the last molar tube, and safety-hold models keep hold of the cut piece so it is not dropped into the mouth.
Which instrument is on every orthodontic tray?
The orthodontic scaler, usually a double-ended band pusher–scaler, is on all four of Boyd's trays alongside the mirror, explorer and cotton forceps. It lifts out separators and elastic ties, clears cement and adhesive, helps place brackets and checks for loose bands or brackets.
How do you remove brackets at the end of treatment?
A bracket remover or debonding plier grips the bracket base and breaks the adhesive bond, a band remover lifts any molar bands, and an adhesive-removing plier and low-speed burs clear the remaining composite before the enamel is polished.
Can orthodontic pliers be autoclaved?
Yes, stainless steel orthodontic pliers are cleaned and steam sterilised after every patient. Process them opened and unlocked so the joint is cleaned and sterilised, lubricate the joint, and follow the manufacturer's instructions and your national regulations.
How long do fixed braces stay on?
The NHS says a fixed brace usually stays in place for 1 to 2 years, after which the patient wears a retainer for as long as the orthodontist advises. Over that time the clinic uses four trays in turn: separating and banding, bracket bonding, tying-in at each adjustment, and debonding at the end.
References
- Boyd LB. Dental Instruments: A Pocket Guide, 7th edition. Elsevier, 2020 (photographs used under licence)
- Proffit WR, Fields HW, Larson BE, Sarver DM. Contemporary Orthodontics, 6th edition. Elsevier, 2018
- Kohn WG, et al. Guidelines for Infection Control in Dental Health-Care Settings, 2003. MMWR 52(RR-17), Centers for Disease Control and Prevention
- Department of Health. Health Technical Memorandum 01-05: Decontamination in primary care dental practices, 2013 edition
- ISO 17664-1:2021 Processing of health care products — Information to be provided by the medical device manufacturer for the processing of medical devices — Part 1: Critical and semi-critical medical devices
- Sharma K (reviewed by Tompson B, Wilson B). Orthodontic Band Selection and Placement. University of Toronto Faculty of Dentistry
- Millett DT, Glenny A-M, Mattick RCR, Hickman J, Mandall NA. Adhesives for fixed orthodontic bands. Cochrane Database of Systematic Reviews, 2016, Issue 10
- Kinch AP, Taylor H, Warltier R, Oliver RG, Newcombe RG. A clinical trial comparing the failure rates of directly bonded brackets using etch times of 15 or 60 seconds. American Journal of Orthodontics and Dentofacial Orthopedics 94(6):476-483, 1988
- Bishara SE, Oonsombat C, Ajlouni R, Denehy G. The effect of saliva contamination on shear bond strength of orthodontic brackets when using a self-etch primer. Angle Orthodontist 72(6):554-557, 2002
- Taloumis LJ, Smith TM, Hondrum SO, Lorton L. Force decay and deformation of orthodontic elastomeric ligatures. American Journal of Orthodontics and Dentofacial Orthopedics 111(1):1-11, 1997
- Forsberg CM, Brattström V, Malmberg E, Nord CE. Ligature wires and elastomeric rings: two methods of ligation, and their association with microbial colonization of Streptococcus mutans and lactobacilli. European Journal of Orthodontics 13(5):416-420, 1991
- Karamani II, Makrygiannakis MA, Bitsanis I, Tsolakis AI. Ingestion of orthodontic appliances: a literature review. Journal of Orthodontic Science 11:20, 2022
- Jones M, Pizarro K, Blunden R. The effect of routine steam autoclaving on orthodontic pliers. European Journal of Orthodontics 15(4):281-290, 1993
- NHS. Braces and orthodontics
- British Orthodontic Society. Fixed Appliances: patient information leaflet, 2019
I am a…