Basic Dental Tray Setup (Dental Exam Tray)
Written by the Equate Instruments Technical Team · Reviewed by the Medical & Dental Board, Equate Instruments · Updated ·
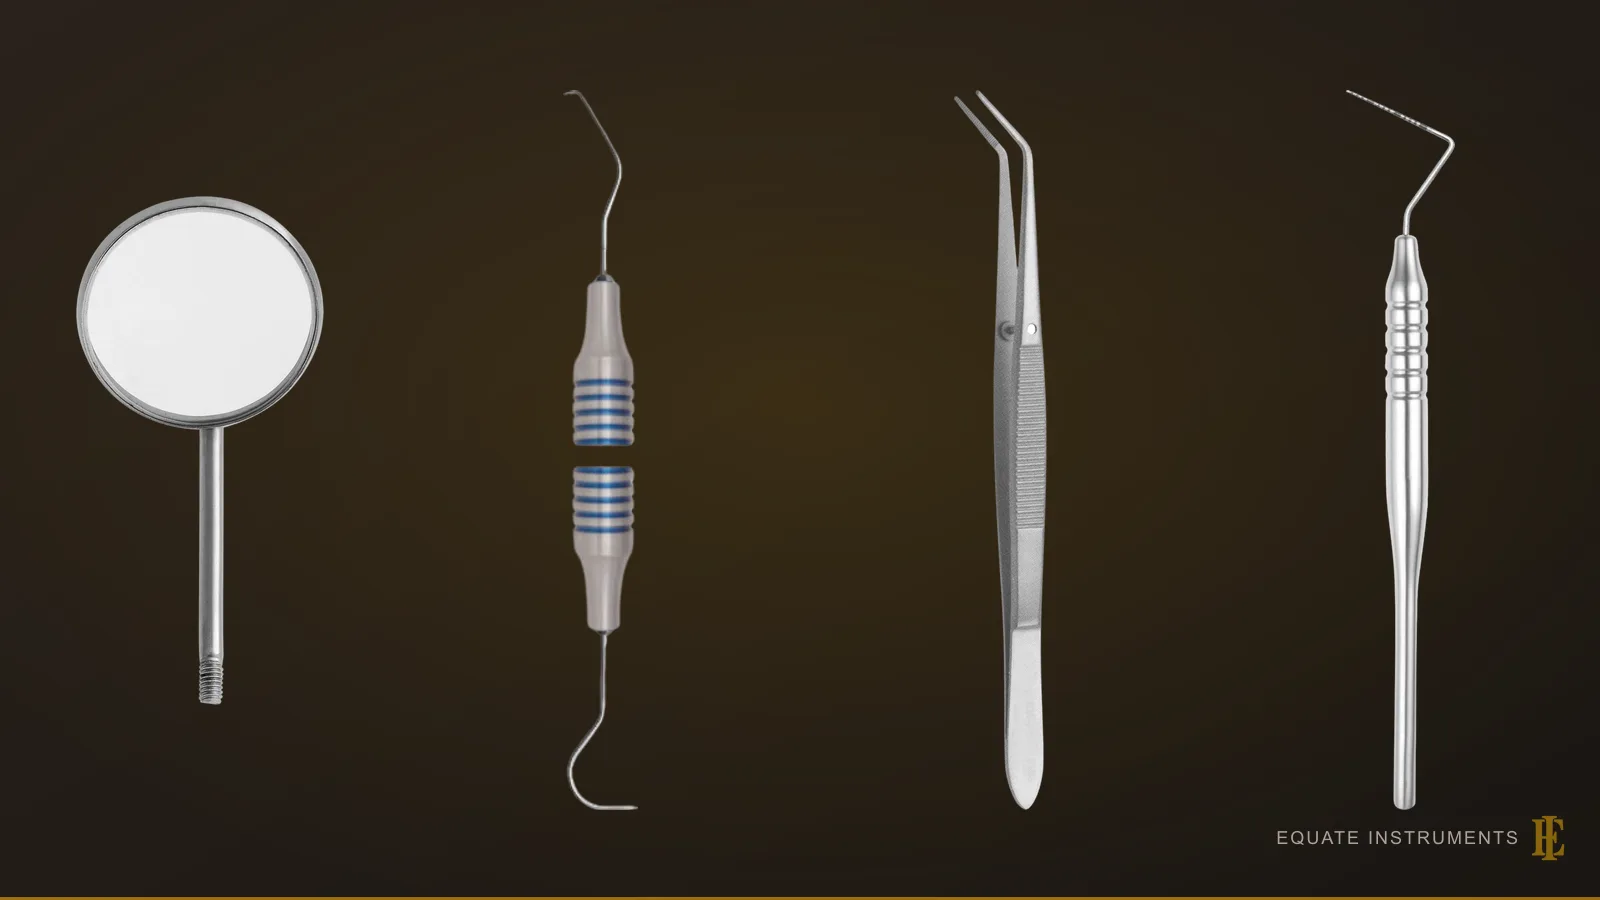
A basic dental tray setup is the examination tray that opens almost every appointment: the basic three (mouth mirror, explorer and cotton pliers) plus a periodontal probe. They're set out in order of use, top to bottom in a cassette or left to right on a flat tray for a right-handed operator, and the same core starts nearly every other tray.
Key points
- The mirror, explorer, cotton pliers and probe are the diagnostic core that every other tray setup builds on.
- Set them out in order of use, top to bottom in a cassette or left to right on a flat tray, and return each to the same slot so nothing goes missing.
- Every instrument set out for a patient counts as contaminated afterwards, used or not, and goes back for full reprocessing.
Step by step
- 1
Check the appointment
Read the notes to see whether this is a recall, a new-patient examination or an emergency. That decides whether the basic four are enough or a charting probe, articulating paper forceps or radiograph holders should join them.
- 2
Open the cassette at the chair
Wash or rub your hands, glove, and open the sealed cassette or pouch at the chairside. Check the external and internal chemical indicators before anything touches the patient, and reject a pack that is torn or damp.
- 3
Set out the mouth mirror
Place the mirror first, on the left for a right-handed operator, with the head facing up. It stays in the non-dominant hand for most of the visit, for indirect vision, light and retraction.
- 4
Add the explorer
Lay the explorer next to the mirror with its tips pointing away from the operator. It's used to feel margins, restorations and calculus, so check that the tips are fine and unbent; for a suspected fissure lesion, ICDAS favours a ball-ended probe over pressing in a sharp tip.
- 5
Add the cotton pliers
Cotton pliers come third. They carry cotton pellets, rolls and small items into and out of the mouth, and pick up anything dropped on the tray. Use locking pliers, or keep the tips closed, when passing small items, and pass them in the transfer zone below the patient's chin.
- 6
Add the periodontal probe
The probe sits fourth, ready for screening or full charting. In the UK that usually means a WHO BPE probe for the Basic Periodontal Examination; pick the marking pattern the practice uses so readings are comparable from visit to visit.
- 7
Add the disposables
Fit a single-use air/water syringe tip and saliva ejector or suction tip, and put out cotton rolls, gauze and floss. Keep the patient's protective eyewear and bib to hand.
- 8
Close down after the examination
Return each instrument to its slot, discard single-use items, and carry the closed cassette to the decontamination area in a rigid, lidded container.
What is on a basic dental tray?
A basic dental tray holds a mouth mirror, an explorer, cotton pliers and a periodontal probe, plus the single-use tips and cotton goods the examination needs. Some textbooks call the first three the basic setup and add the probe for any examination that includes the gums; in most practices today the probe is on every exam tray.
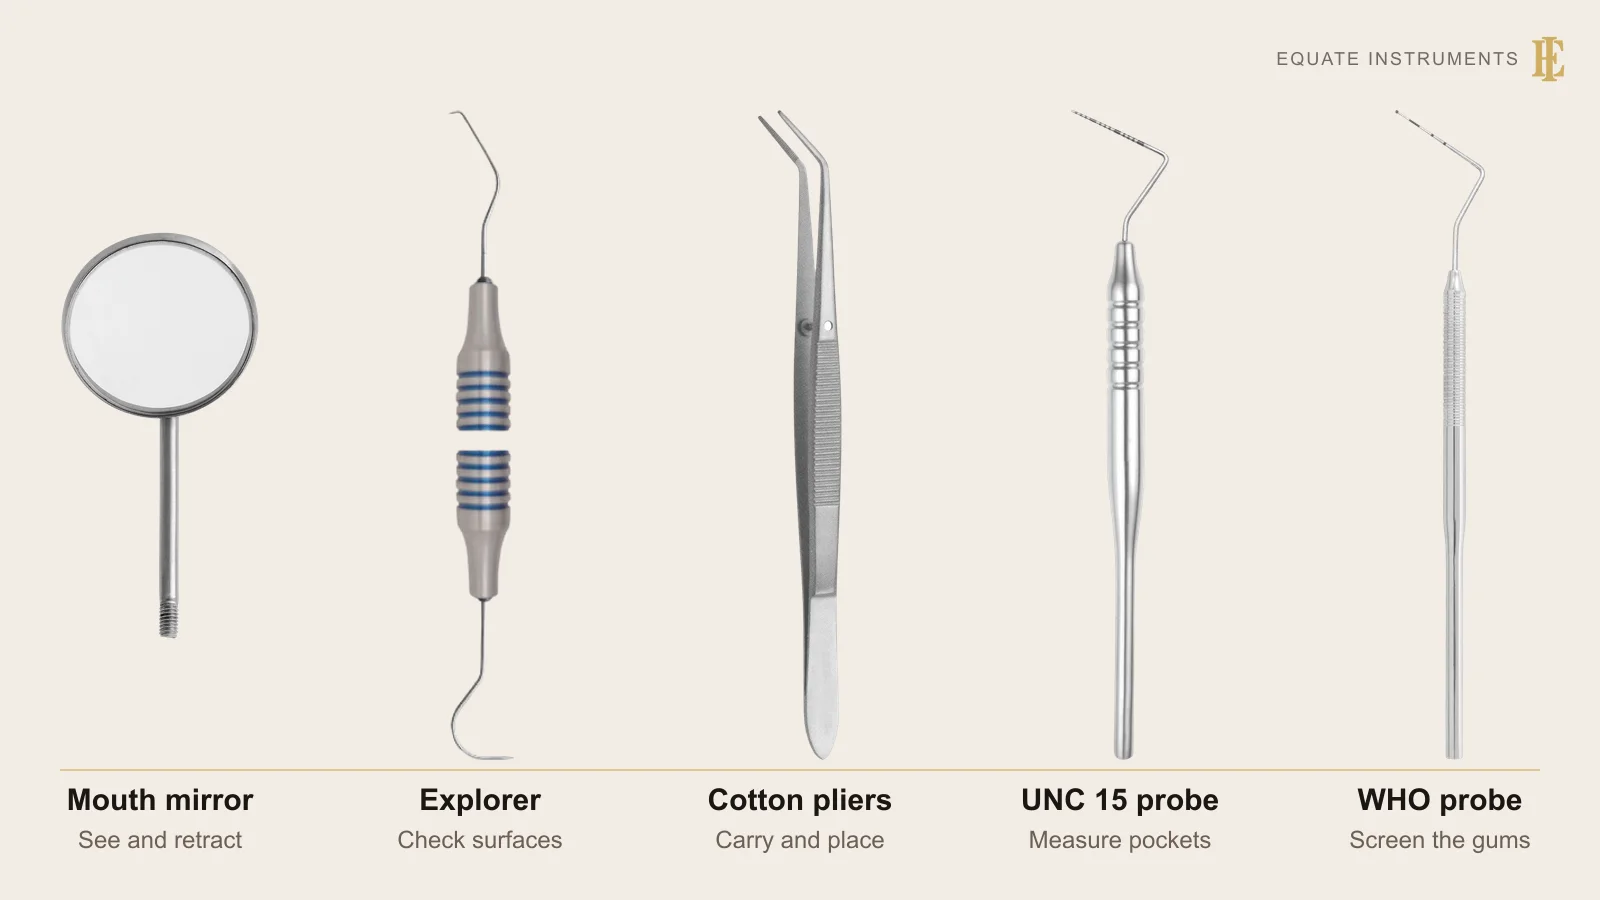
Each instrument does a different job. The mouth mirror gives indirect vision and light and holds the cheek or tongue away. The dental explorer feels tooth surfaces, restoration margins and calculus. Cotton pliers carry small items in and out of the mouth. The periodontal probe measures pocket depth, recession and bleeding. Together they start every other setup, from the composite tray to the hygiene tray.
Tray checklist
| Instrument | What it is for | Guide |
|---|---|---|
| Mouth mirror and handle | Indirect vision, reflected light, retracting cheek and tongue | Mouth mirrors |
| Explorer | Feeling surfaces, margins, sealants and calculus | Dental explorers |
| Cotton pliers (dental tweezers) | Placing and removing cotton pellets, rolls and small items | Cotton pliers |
| Periodontal probe | Pocket depth, recession, bleeding on probing | Periodontal probes |
| Instrument cassette | Holds the set together through use, cleaning and sterilisation | Instrument cassettes |
| Air/water syringe tip, saliva ejector or suction tip | Drying, rinsing and keeping the field clear | Single-use items |
| Cotton rolls, gauze, floss | Isolation, wiping instruments, checking contacts | Consumables |
In what order are the instruments set out?
The instruments go in the order they'll be picked up: top to bottom in a cassette, or left to right on a flat tray, so for a right-handed operator the mirror is on the far left, then the explorer, cotton pliers and probe. For a left-handed operator the tray is mirrored. Working ends usually point the same way, away from whoever passes the instruments, so a dental nurse can hand each one over handle first without turning it.
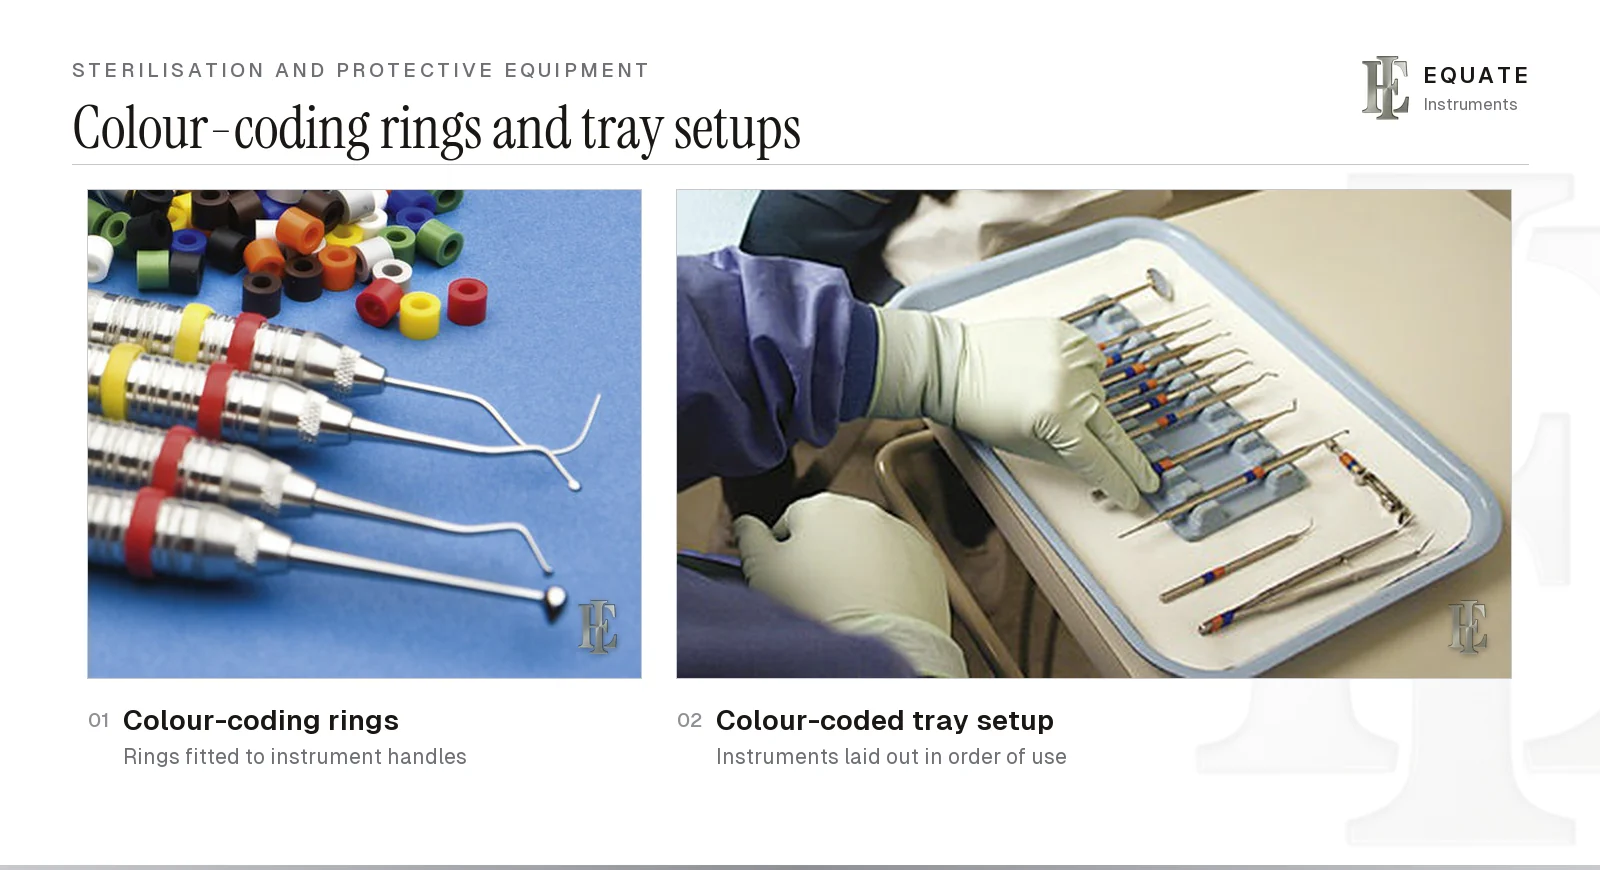
The rule that matters most is that each instrument goes back to the same place after use. A gap in the row shows at once that something is still in the mouth, on the bracket table or on the floor. Colour-coded rings or handles make the order easier to keep, and a cassette with a fixed rack holds it through cleaning as well, so the set comes back out of the steriliser already in sequence.
Which extra instruments does each kind of examination need?
The basic four cover a routine recall examination; other appointments add a few items to the same tray rather than starting a new one.
The British Society of Periodontology's 2019 BPE guidance asks for a BPE at every new-patient examination and at every routine examination for codes 0 to 2, with radiographs available for code 3 and 4 sextants. Implants are charted rather than BPE-scored, which is when a millimetre-marked probe earns its place on the tray.
| Appointment | Add to the basic four |
|---|---|
| Routine recall | Nothing extra; a WHO BPE probe (0.5 mm ball end, black band 3.5–5.5 mm) used at a light 20–25 g, about the force that blanches a fingernail |
| New patient or full periodontal charting | Every new patient has a BPE. A code 3 sextant gets a 6-point pocket chart after initial therapy and a code 4 anywhere means charting the whole mouth with bleeding on probing, so add a millimetre-marked probe such as a Williams or UNC 15, and a furcation probe for multi-rooted teeth |
| Restorative assessment | Floss and articulating paper with forceps to check contacts and the bite |
| Children | A smaller mirror head; under-18s are screened with the same WHO BPE probe using the simplified BPE |
| Emergency or pain visit | A spoon excavator for temporary dressings, and radiograph holders |
What else is needed besides the instruments?
Beside the instruments, a basic tray needs barriers and consumables: a patient bib, protective eyewear for the patient, gloves, a mask and eye protection for the clinical team, cotton rolls, gauze and floss. The air/water syringe tip and the saliva ejector or suction tip are single-use where possible, as HTM 01-05 recommends for items that are hard to clean.
The patient record and recent radiographs complete the setup. Anything that might be needed mid-examination, such as radiograph holders, is better on the tray from the start than fetched from a drawer with gloved hands.
How are basic exam instruments cleaned and sterilised?
Basic exam instruments touch mucous membrane but not bone, so they count as semicritical: the CDC's current summary gives mouth mirrors as its semicritical example, and periodontal scalers and surgical instruments, which penetrate soft tissue or bone, as critical ones. Either way, the CDC's 2003 Guidelines for Infection Control in Dental Health-Care Settings expect heat-tolerant items to be heat sterilised between patients. Cleaning always comes first, preferably in a washer-disinfector or ultrasonic cleaner rather than by hand, and every package carries an internal chemical indicator, whether the set goes into a pouch or the cassette is wrapped with indicator tape outside.
In UK practices, HTM 01-05 adds two rules that shape the tray (the wider workflow is covered under sterilisation and protective equipment). First, every instrument set out for a patient is regarded as contaminated afterwards, whether or not it was used, so unused mirrors and probes go back through the full cycle. Second, unwrapped instruments may be stored in the clinical area for no more than a day, and wrapped ones for no more than a year. Inspect each item under an illuminated magnifier after cleaning and follow the manufacturer's reprocessing instructions (ISO 17664). Replace a mirror head that's scratched or cloudy, and an explorer or probe whose tip is bent or blunt.
What are the common mistakes with a basic setup?
- Setting out instruments in a random order, so the team searches the tray and a missing item goes unnoticed.
- Opening the cassette before the patient is ready and leaving it uncovered while the chair is adjusted.
- Keeping only one probe pattern on every tray, so full charting is done with a screening probe.
- Putting unused instruments back in the drawer instead of sending them for reprocessing.
Build this tray with Equate
Every instrument on the basic tray is in the Equate diagnostic range: front-surface and rhodium mirror heads in sizes 3 to 6 on cone-socket or universal-thread fittings, solid, hollow and scaled mirror handles, shepherd's hook, pigtail and explorer-probe combinations, Flagg, Meriam, Perry and London college cotton pliers, some non-magnetic and one with a lock, and Williams and WHO probes from the periodontal range. Handle choice matters on a tray that is picked up all day: wider and lighter handles need less pinch force and tire the hand less, and knurling grips through wet gloves (see basic dental instruments).
Ready-made basic diagnostic sets come in plastic or stainless steel cassettes. The instruments are designed in Finland and made from passivated stainless steel, ultrasonically cleaned, shape-, boil- and performance-tested and individually packed. Clinics can request samples and a quote for a full exam-tray set.
The Equate difference
Equate lists 182 references across the 13 subcategories on this page: 23 mouth mirrors in sizes 3 to 6 and 9, 9 standard mirror handles, 94 explorers including 32 explorer-probe combinations, 23 cotton pliers and college tweezers, 24 Williams and WHO probes and 9 ready-made examination kits and sets.
Equate Basic Dental Tray Setup (Dental Exam Tray) options

Front Surface Mouth Mirror (SS) - No. 3
EI-0001
Standard Mouth Mirror (SS) - No. 3 (12 pcs)
EI-0002
Mouth Mirror No. 4 - Rhodium Front Surface, 22 mm, Universal Thread
EI-0003
Mouth Mirror No.4 Plain 22mm Universal (10 pcs)
EI-0004
Mouth Mirror No.4 Plain 22mm Universal (12 pcs)
EI-0005
Mouth Mirror No. 5 - Rhodium Front Surface, 24 mm, Universal Thread
EI-0006
Mouth Mirror No.5 Plain 24mm Universal (10 pcs)
EI-0007
Mouth Mirror No.5 Plain 24mm Universal (12 pcs)
EI-0008
Explorer 3A - Single-Ended Curved Hook
EI-0033
Shepherd's Hook Explorer No.23
EI-0035
Mouth Mirror Handle - Hollow 10 mm
EI-0037
Holst-Style Explorer - Double-Ended Hollow Handle
EI-0041Browse all diagnostic instruments Browse all accessories & supplies instruments Browse all periodontal & hygiene instruments
Buying in your market
Frequently asked questions
What instruments are on a basic dental tray?
The basic three, a mouth mirror, an explorer and cotton pliers, plus a periodontal probe, with a single-use air/water syringe tip, a saliva ejector or suction tip, cotton rolls and gauze.
How long can a sterilised exam set be stored?
Under HTM 01-05, a wrapped set can be stored for up to a year. Unwrapped instruments may be kept in the clinical area for no more than a day, dry and protected, for example in covered drawer inserts, not on open work surfaces. Many US facilities use event-related shelf life instead, but the CDC still expects each package to be dated.
In what order is a dental exam tray set out?
In order of use: mirror, explorer, cotton pliers, then probe. In a cassette they read top to bottom; on a flat tray they run left to right for a right-handed operator, mirrored for a left-handed one.
Do unused instruments on the tray need to be sterilised again?
Yes. Under HTM 01-05, every instrument set out for a patient counts as contaminated after the appointment, whether or not it was used, and goes back through cleaning and sterilisation.
Should a periodontal probe be on every exam tray?
In UK practice, yes. The British Society of Periodontology's 2019 guidance asks for a BPE for every new patient and at every routine examination for codes 0 to 2, so a WHO BPE probe is needed at almost every check-up.
What is the difference between cotton pliers and college tweezers?
In practice there is none: cotton pliers, cotton forceps, college tweezers and dental tweezers are names for the same angled, spring-action instrument (see cotton pliers). Locking versions keep hold of a pellet or small item without the hand having to squeeze.
References
- Kohn WG, Collins AS, Cleveland JL, Harte JA, Eklund KJ, Malvitz DM. Guidelines for Infection Control in Dental Health-Care Settings, 2003. MMWR 2003;52(RR-17). Centers for Disease Control and Prevention
- Department of Health (England). Health Technical Memorandum 01-05: Decontamination in primary care dental practices, 2013 edition
- ISO 17664-1:2021. Processing of health care products: information to be provided by the medical device manufacturer for the processing of medical devices, Part 1: critical and semi-critical medical devices. International Organization for Standardization
- Boyd LB. Dental Instruments: A Pocket Guide, 7th edition. Saunders/Elsevier, 2020. Chapters 1 and 18 (Basic Dental Instruments; Sterilization and Protective Equipment) (photographs used under licence)
- Bird DL, Robinson DS. Modern Dental Assisting. Elsevier (instrument transfer and tray setups)
- Newman MG, Takei HH, Klokkevold PR, Carranza FA (eds). Newman and Carranza's Clinical Periodontology. Elsevier (periodontal examination and probing)
- British Society of Periodontology. Basic Periodontal Examination (BPE), 2019
- Scottish Dental Clinical Effectiveness Programme. Prevention and Treatment of Periodontal Diseases in Primary Care: periodontal probing
- Centers for Disease Control and Prevention. Summary of infection prevention practices in dental settings: sterilization and disinfection of patient-care items
I am a…
Related
- Dental Mouth Mirrors
- Dental Explorers
- Dental Cotton Pliers (Dental Tweezers)
- Periodontal Probes
- Dental Hygiene Tray Setup: Scaling, Root Planing and Polishing
- Local Anaesthetic (Anesthetic) Tray Setup and How to Load a Dental Syringe
- Basic Dental Instruments: Mirror, Explorer, Cotton Forceps and Handles
- Dental Instrument Cassettes, Trays and Boxes
- Dental Sterilisation and Protective Equipment