Dental Sterilisation and Protective Equipment
Written by the Equate Instruments Technical Team · Reviewed by the Medical & Dental Board, Equate Instruments · Updated ·
Dental sterilisation and protective equipment covers two groups. Personal protective equipment (gowns, masks, eye protection and gloves) shields the dental team and patient from blood, saliva and spatter. Reprocessing equipment (ultrasonic cleaners, cassettes, pouches and wraps, chemical and biological indicators, and steam or dry-heat sterilisers) turns used instruments back into sterile, traceable packs for the next patient.
Key points
- Instruments must be cleaned before they are sterilised: debris left on a surface shields microbes from steam or heat.
- Tape and pouch indicators only show that a pack went through a cycle; an internal indicator in each pack and regular spore tests confirm the steriliser is working.
- A steriliser must match the load: steam cycles that only suit unwrapped solid instruments cannot process wrapped packs or hollow items such as handpieces.
What counts as sterilisation and protective equipment?
Infection control in a dental practice rests on two sets of equipment. The first is personal protective equipment, or PPE, worn by the team so that blood, saliva, aerosol and chemicals don't reach skin, eyes, mouth or clothing. The second is the reprocessing chain that takes a used instrument from the chair back to a sealed, sterile pack: cleaning, inspection, packing, sterilisation, monitoring and storage.
Boyd's Dental Instruments: A Pocket Guide (Elsevier) gives this equipment a chapter of its own, and every instrument in the other chapters depends on it: a Gracey curette or an extraction forceps is only as safe as the way it was reprocessed. The basic dental instruments guide shows the tray that most of this equipment is built around, and the basic tray setup shows it laid out in a cassette.
| Equipment | What it does | Single use or reusable |
|---|---|---|
| Gown or clinic jacket | Covers clothing and forearms against spatter | Disposable, or reusable and laundered by the practice |
| Mask or respirator | Covers nose and mouth against spatter and airborne particles | Single use, changed for each patient |
| Protective glasses, face shield, loupes | Protect the eyes; loupes add magnification | Reusable, cleaned and disinfected between patients |
| Examination and sterile gloves | Barrier for the hands during care | Single use |
| Overgloves | Worn over patient gloves to touch clean surfaces briefly | Single use |
| Utility gloves | Heavy-duty protection when cleaning instruments and handling chemicals | Reusable, decontaminated after use |
| Cassettes, parts boxes, colour-coding rings | Keep a tray setup together through cleaning, sterilisation and storage | Reusable |
| Pouches, wraps and indicator tape | Hold sterility after the cycle and show the pack was processed | Single use |
| Sterilisers and spore tests | Kill all microorganisms and prove the cycle works | Equipment is reusable; indicators are single use |
Which dental instruments must be sterilised?
The answer depends on what the instrument touches. CDC guidance sorts dental items into three risk classes, and the class sets the minimum treatment. Anything that cuts or enters soft tissue or bone is critical and is heat sterilised every time. Items that meet mucous membrane or broken skin, without entering tissue, are semicritical; most of them tolerate heat and are sterilised too, and only heat-sensitive ones fall back on high-level disinfection. Items that meet intact skin alone are noncritical and are cleaned, with low-level disinfection if soiled.
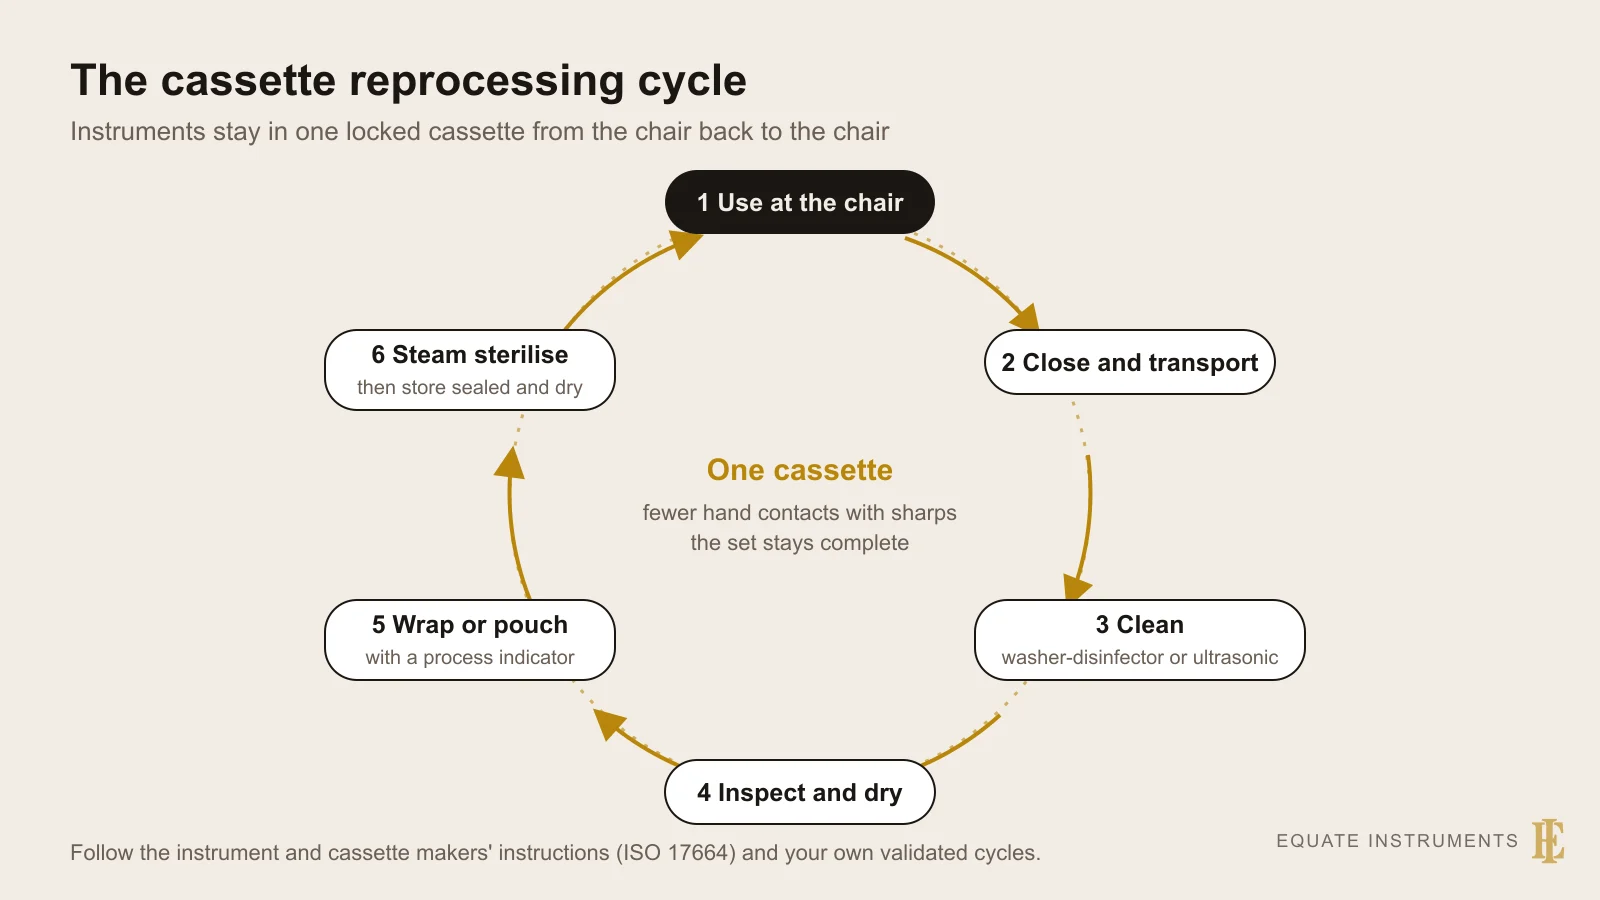
Whatever the class, the CDC reprocessing sequence is the same: carry used instruments in a covered, puncture-resistant container, clean and rinse them, dry and inspect them, pack them as the maker's instructions allow, label each pack with the steriliser, load and date, sterilise, then store packs in closed or covered cabinets away from water.
| Class | Contact | Dental examples | Minimum treatment |
|---|---|---|---|
| Critical | Penetrates soft tissue or bone, or reaches the bloodstream | Surgical instruments, periodontal scalers, scalpel blades, surgical burs | Heat sterilisation |
| Semicritical | Touches mucous membrane or non-intact skin | Mouth mirrors, amalgam condensers, reusable impression trays, handpieces (always heat sterilised) | Heat sterilisation; high-level disinfection only if the item cannot take heat |
| Noncritical | Touches intact skin only | X-ray tube head, blood-pressure cuff, facebow, pulse oximeter | Cleaning, plus low-level disinfection when soiled |
Protective clothing and masks
A gown or clinic jacket protects skin and everyday clothing from contaminated splashes. Look for long sleeves with knitted or elasticated cuffs, a closure high at the neck and fabric that resists fluid. Change a gown as soon as it is visibly soiled. Disposable gowns go in the waste; reusable ones are laundered daily, as your national regulations and practice policy require, and all protective clothing comes off before staff leave the clinical area. In England, HTM 01-05 notes that short sleeves let staff wash their forearms as part of hand hygiene, and that staff working in decontamination may add long-cuffed gloves or a disposable long-sleeved gown to protect their arms; clothing worn for decontamination is not worn outside the practice.
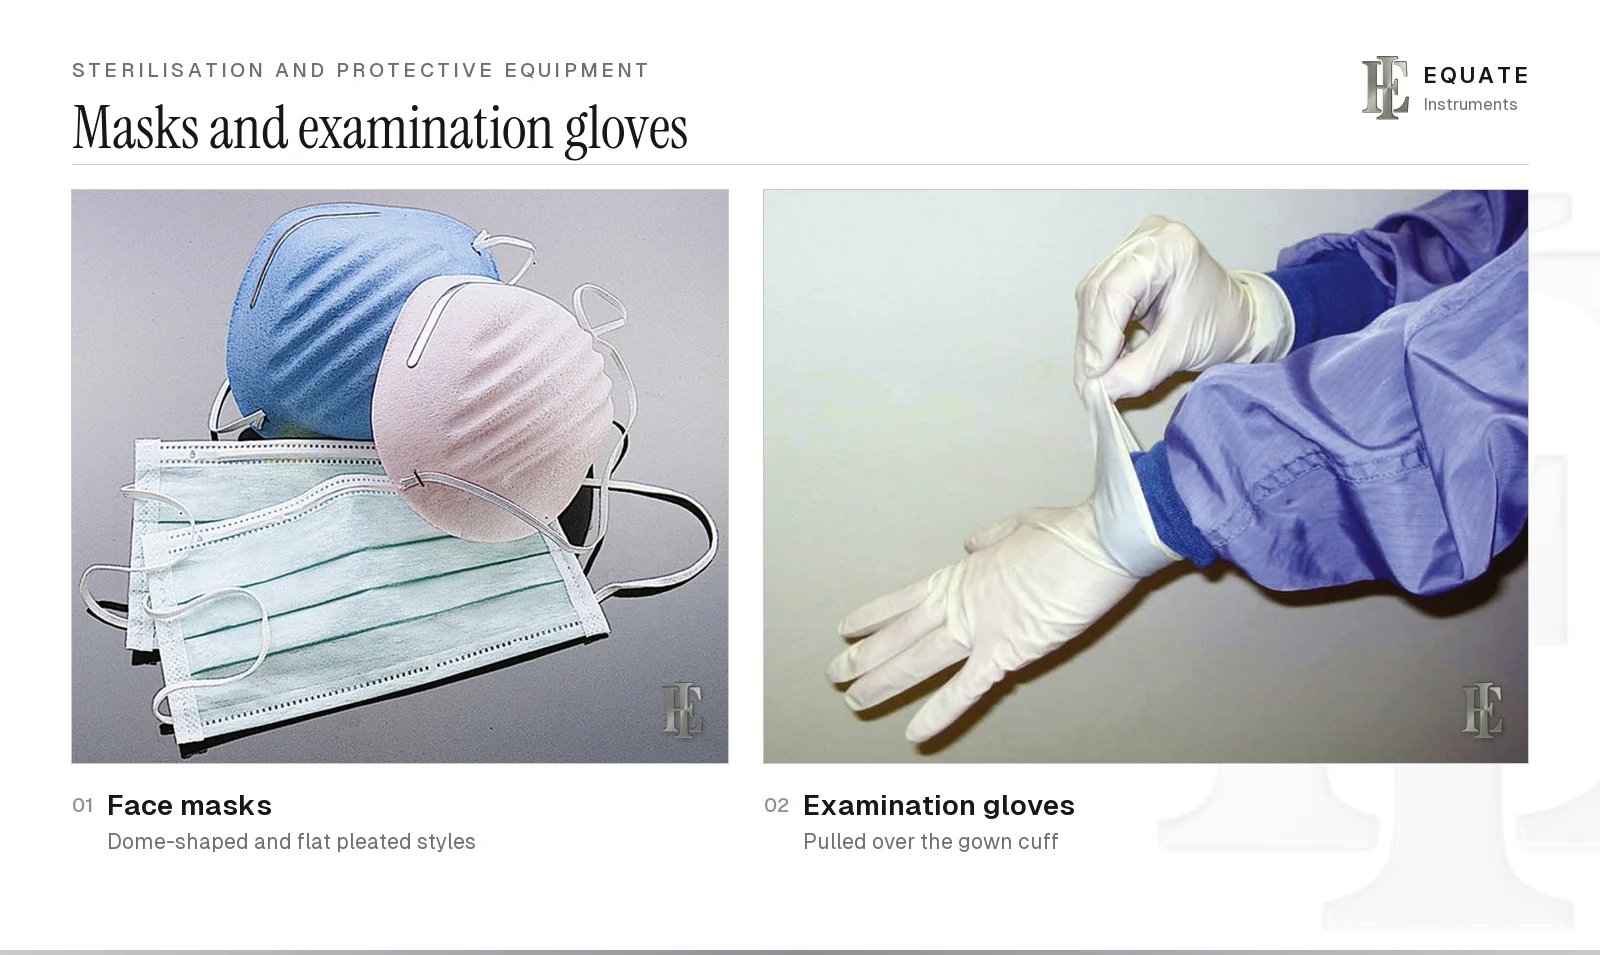
Masks come in two broad forms: flat pleated masks with ear loops or ties, and moulded dome-shaped masks. Both should cover the nose and mouth fully and sit snugly at the sides. CDC guidance asks for a fresh mask for every patient, and a change sooner if the mask becomes damp. Where national guidance calls for respiratory protection during aerosol-generating work, a fitted respirator (FFP2 or FFP3 in Europe, N95 in the US) gives a closer seal and higher filtration than a surgical mask.
Masks are worn during instrument cleaning too, because brushing and ultrasonic baths can splash.
Taking PPE off in the wrong order spreads contamination to the hands and face. HTM 01-05 sets this sequence: gloves first, peeled so they end up inside out; then the disposable apron, gathered by touching only its inside; then the mask, lifted off by its straps or loops and dropped straight into clinical waste, never left hanging round the neck; then eye protection, held away from its outer surface; and finally a thorough hand wash.
Eye protection and loupes
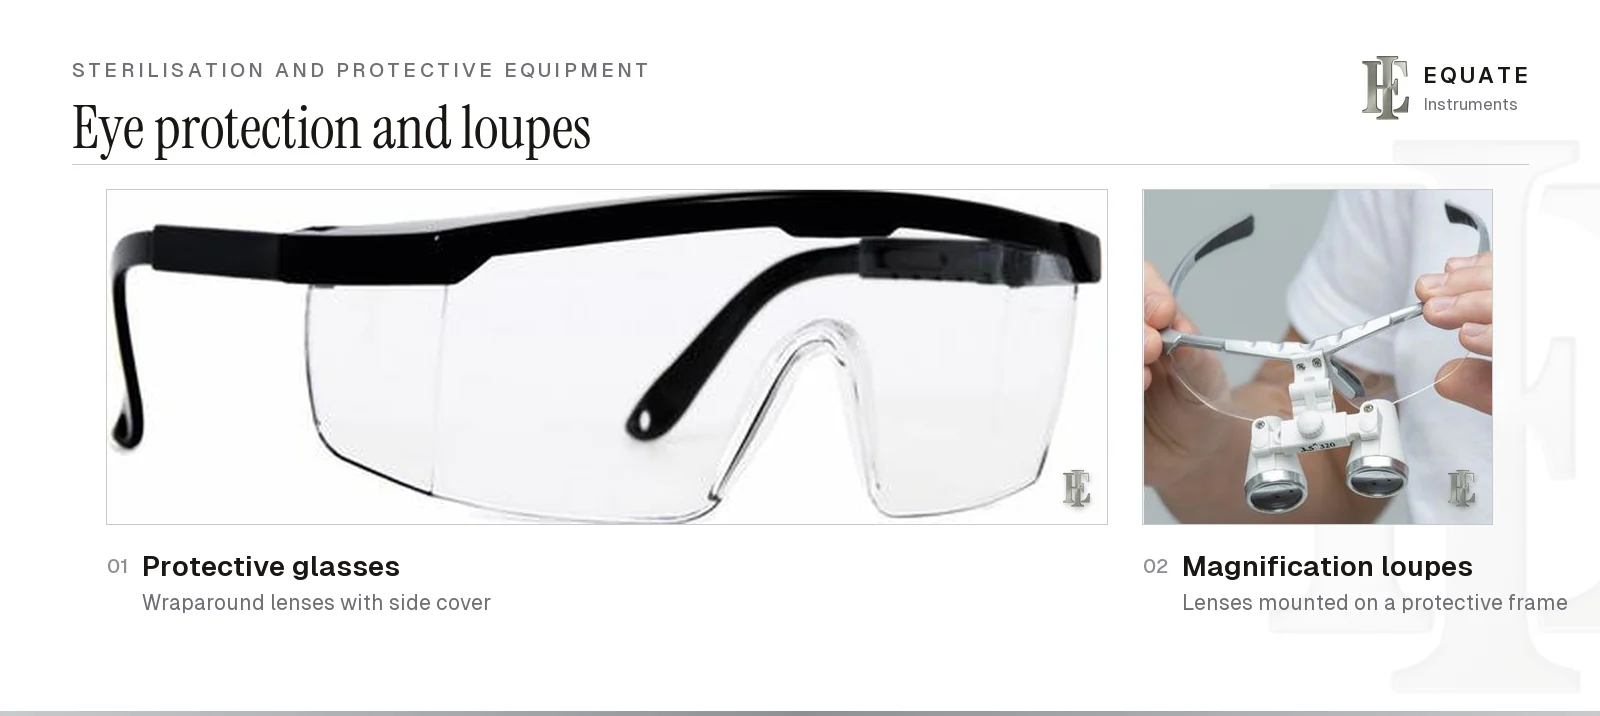
Spatter from rotary and ultrasonic instruments, debris from old restorations and splashes of disinfectant all reach the eyes easily. Protective glasses for the dental team should wrap around with solid side protection, and larger styles fit over prescription spectacles. A face shield covers more of the face but doesn't replace the mask beneath it. Patients should be given protective glasses as well.
Loupes are magnifying lenses fixed in or on a protective frame. Their main advantage is ergonomic: because the working field is magnified at a set working distance, the clinician can sit upright instead of leaning in, which reduces neck and back strain over a long session. Many have an attachable light, and an orange filter can be added when working with light-cured composite so the material doesn't set early.
Eyewear and loupes are reusable. Clean and disinfect them between patients following the maker's instructions, since some lens coatings are damaged by certain disinfectants.
Gloves: examination, overgloves and utility gloves
Three types of glove do three different jobs, and mixing them up is a common source of cross-contamination.
- Examination gloves: single-use latex, nitrile or vinyl gloves worn for patient care. Non-sterile gloves suit most procedures; sterile surgical gloves are used for oral surgery and implant work. Wash or sanitise the hands before putting them on and after taking them off, pull the cuff over the gown sleeve, and change them between patients or as soon as one tears. Gloves are never washed and reused. Nitrile is the usual choice where latex allergy is a concern.
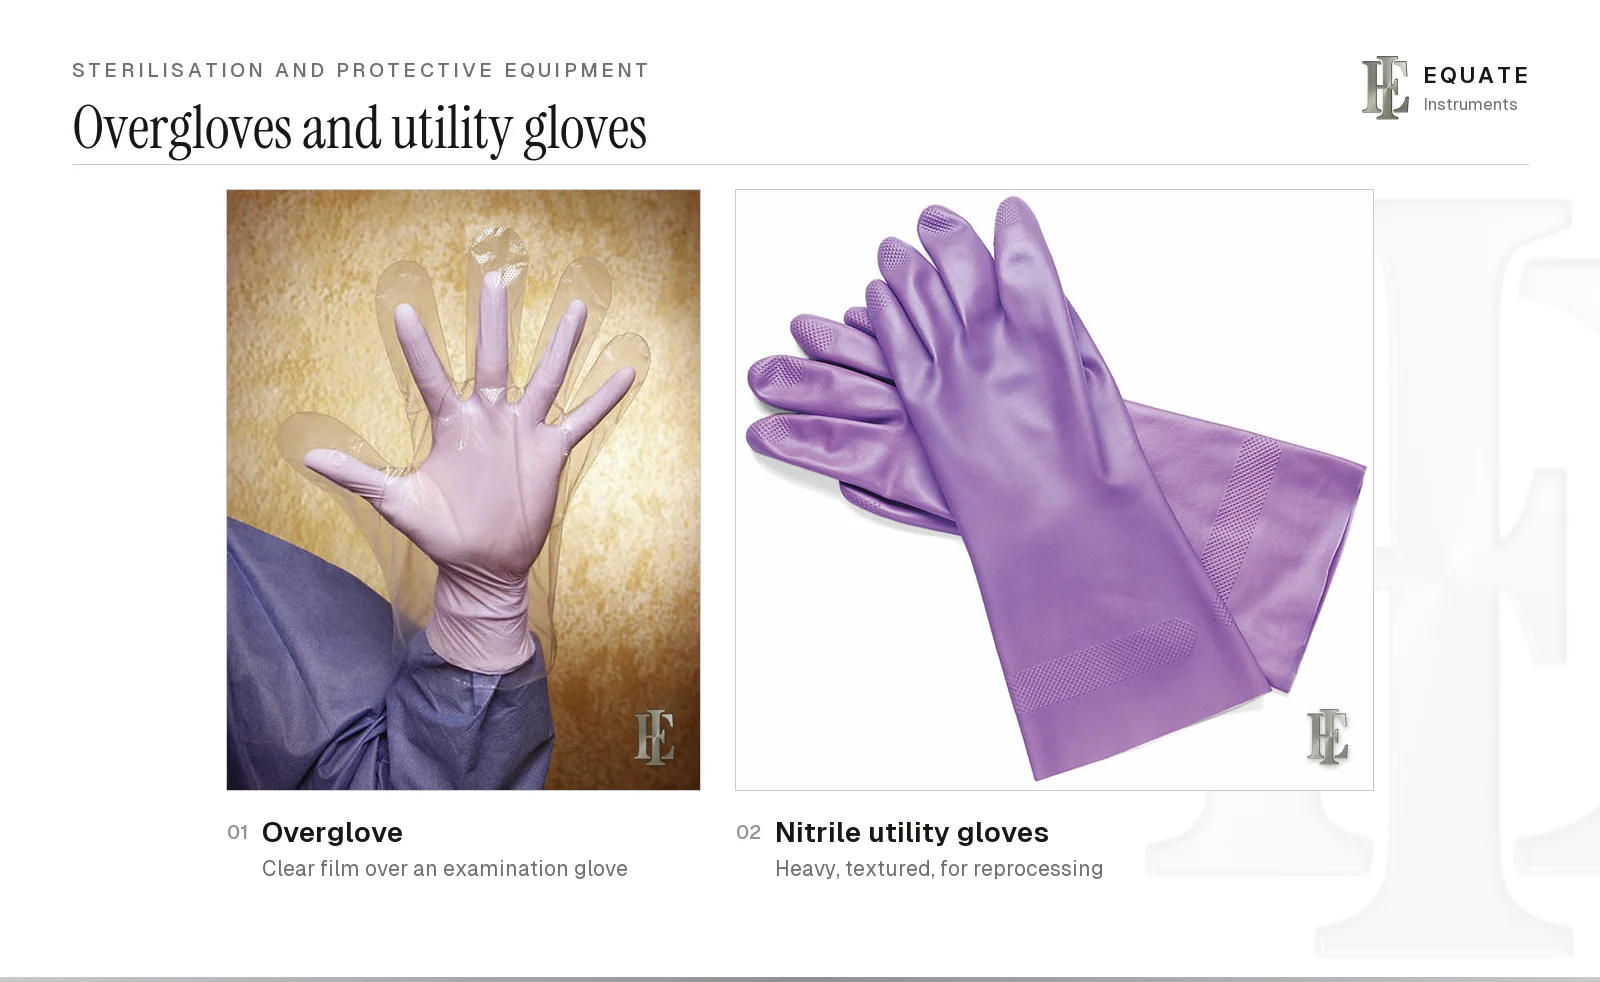
- Overgloves: thin, loose, clear film gloves slipped over examination gloves when the clinician briefly has to touch something outside the treatment field, such as a drawer or a patient record. They are not for clinical work. Keep them in a clean area of the surgery and use a new pair for each patient.
- Utility gloves: thick, puncture- and chemical-resistant nitrile gloves with a textured grip, worn when cleaning and packing instruments, carrying used cassettes to the decontamination room, mixing disinfectants and cleaning the surgery. They stay in the decontamination area, some can be autoclaved if the maker allows, and they are thrown away once cracked, thin or torn. HTM 01-05 asks for household-type gloves to be washed in hot water and detergent and left to dry after every use, and replaced weekly, or sooner if they are worn or torn or no longer come clean.
Cassettes, colour coding and parts boxes
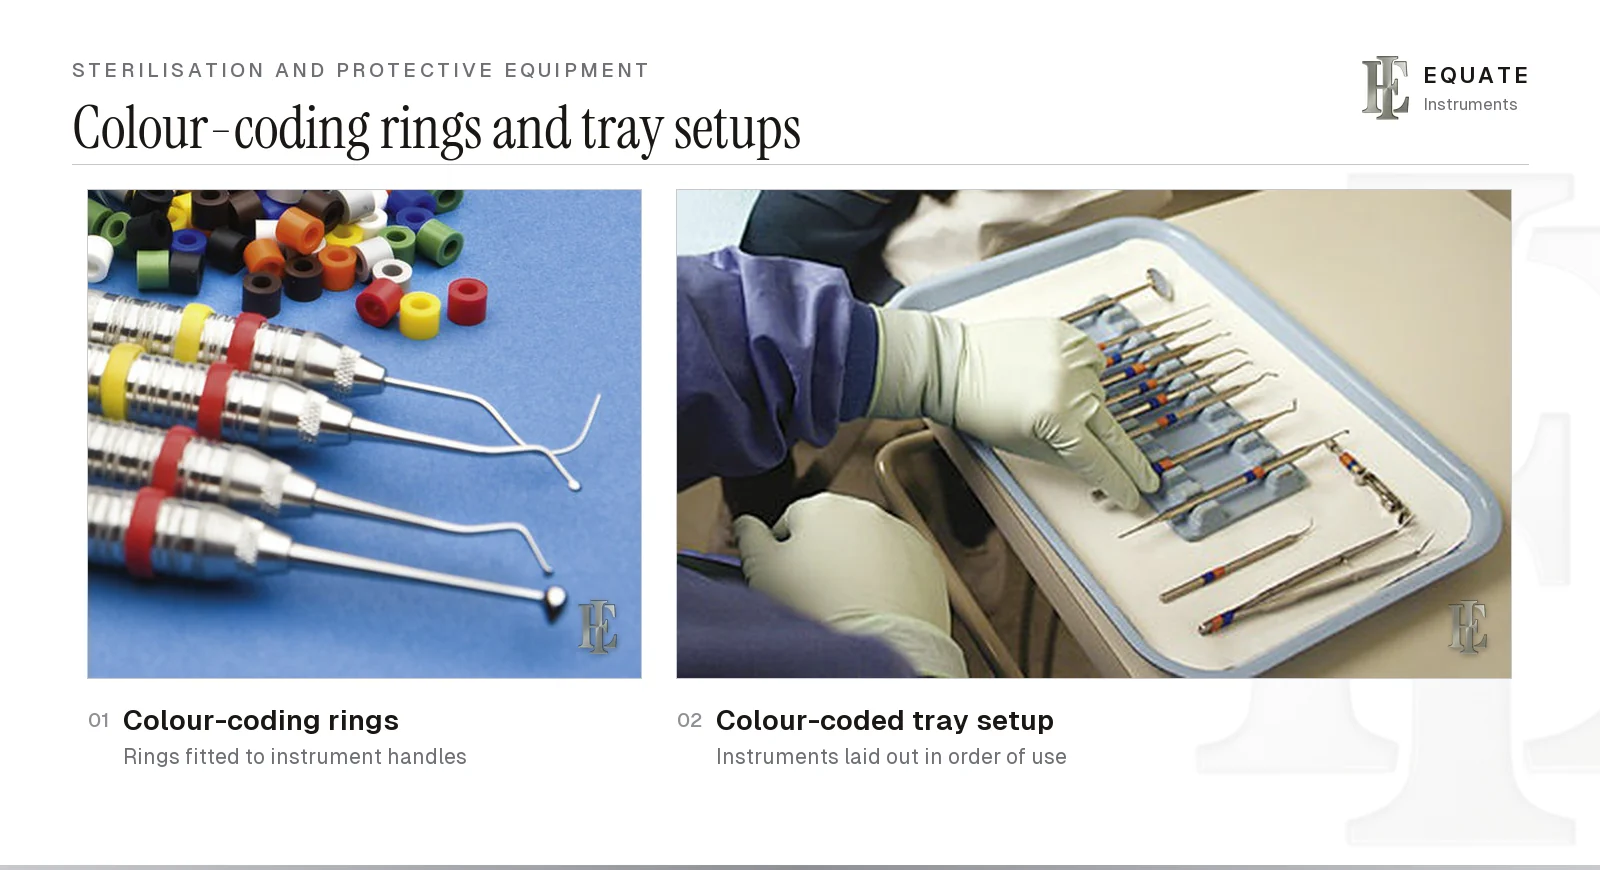
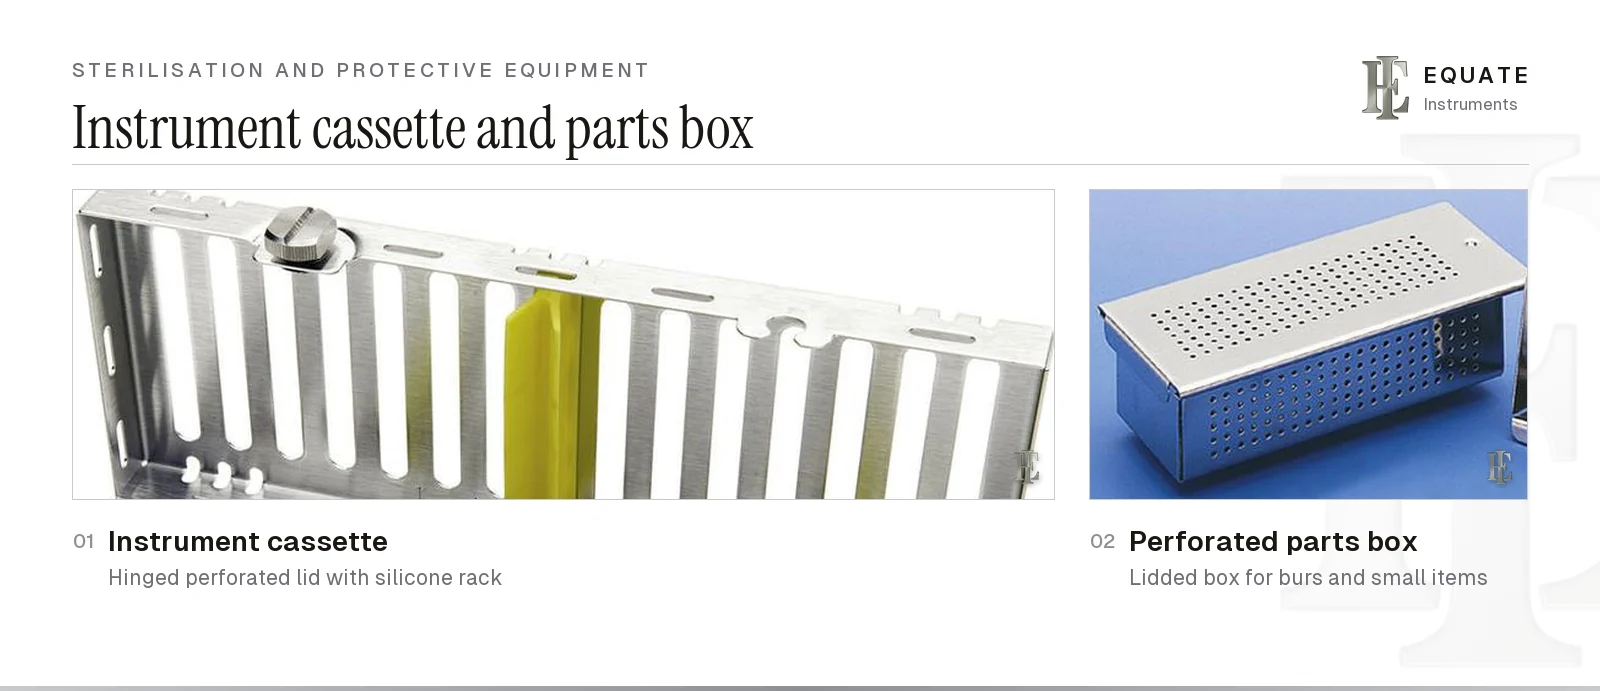
An instrument cassette is a perforated stainless steel or resin box with racks that hold each instrument apart. The whole setup moves as one unit from the chair to the ultrasonic bath or washer-disinfector, then into the pouch or wrap, through the steriliser and back to the surgery. Staff don't have to sort loose sharp instruments by hand, which cuts the risk of sharps injuries, and the tray arrives complete and in order.
Colour coding makes the system quicker to check: rings or coloured handles on instruments such as mouth mirror handles and periodontal probes show at a glance which cassette an instrument belongs to.
Small items that slip through cassette racks, such as burs, rubber dam clamps or matrix bands, go in perforated parts boxes or bur blocks so steam can reach every surface. See the dental burs guide and the dental dam instruments guide for what typically goes in them.
Packaging: wraps, pouches and process indicators
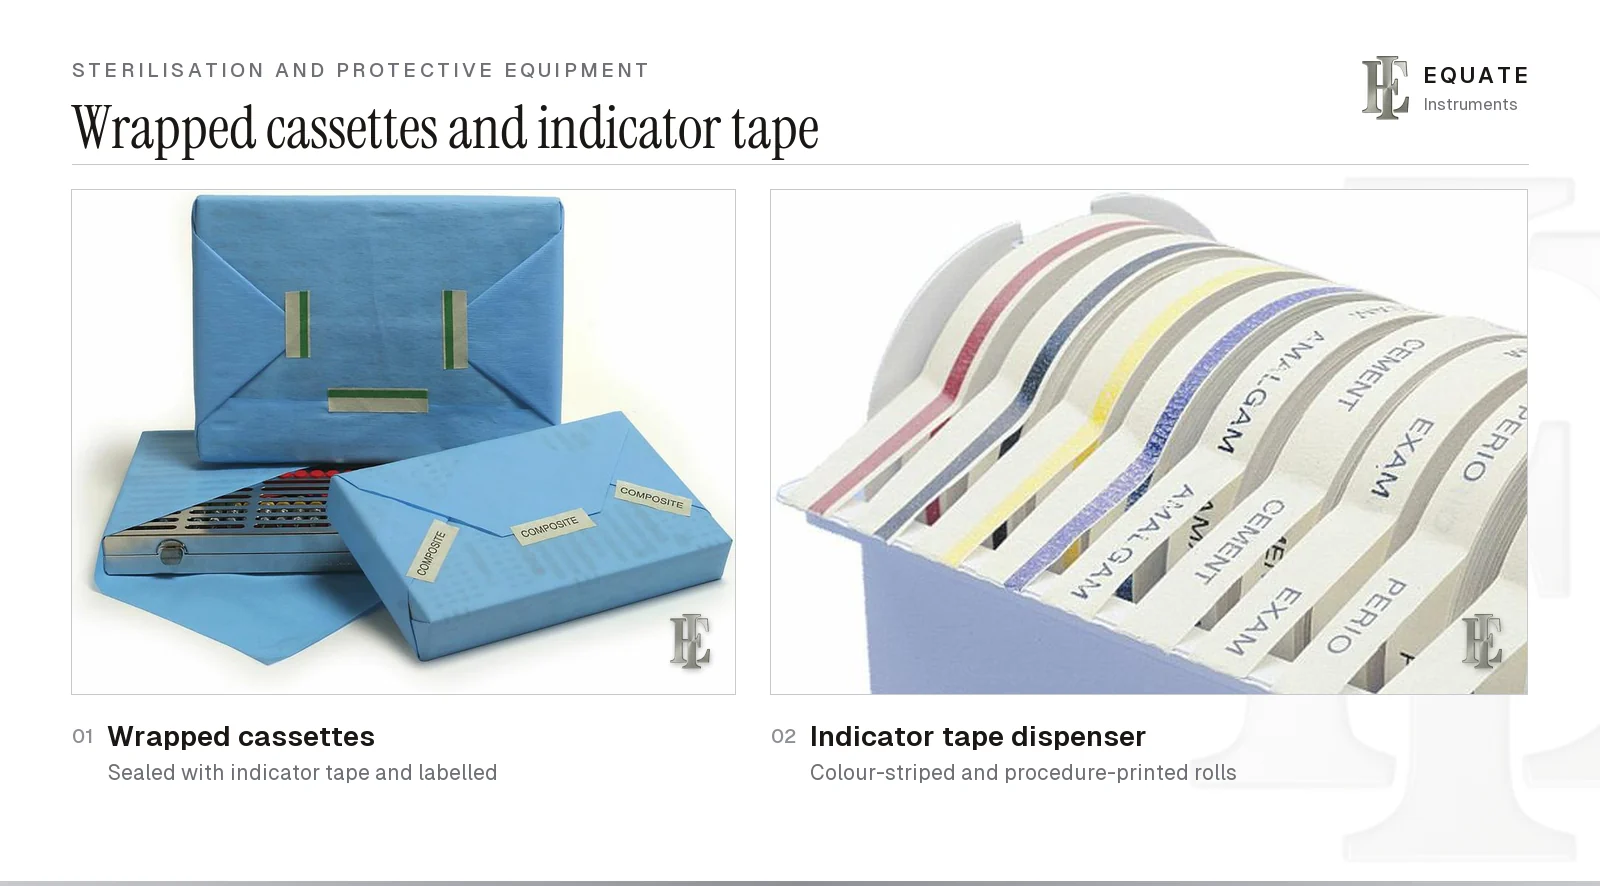
Packaging keeps instruments sterile after the cycle until the pack is opened in front of the patient. Cassettes are usually wrapped in medical-grade sterilisation wrap or sealed in a large pouch; single instruments and small kits go in self-sealing or heat-sealed pouches made of paper on one side and clear film on the other. Wraps and pouches should be sterile barrier systems made to ISO 11607-1.
Indicators are built into this step. Indicator tape secures a wrap and changes colour when exposed to the cycle; pouches usually carry a printed indicator that does the same. These external indicators only prove that a pack was processed. CDC guidance also asks for an internal chemical indicator inside every pack, which is read when the pack is opened at the chair; an unwrapped load still needs an internal indicator placed in the tray or cassette. If either indicator has not changed, the pack is reprocessed.
Write the date, the steriliser and the cycle or load number on each pack so it can be traced back if a later test fails, and keep packs closed until the patient is seated. Store them dry, clean and off the floor; a pack that is wet, torn or dropped is treated as unsterile. For how long a wrapped or unwrapped set may be stored under HTM 01-05, and how the US event-related approach differs, see storage times for wrapped and unwrapped cassettes.
Sterilisers: steam autoclaves and dry heat
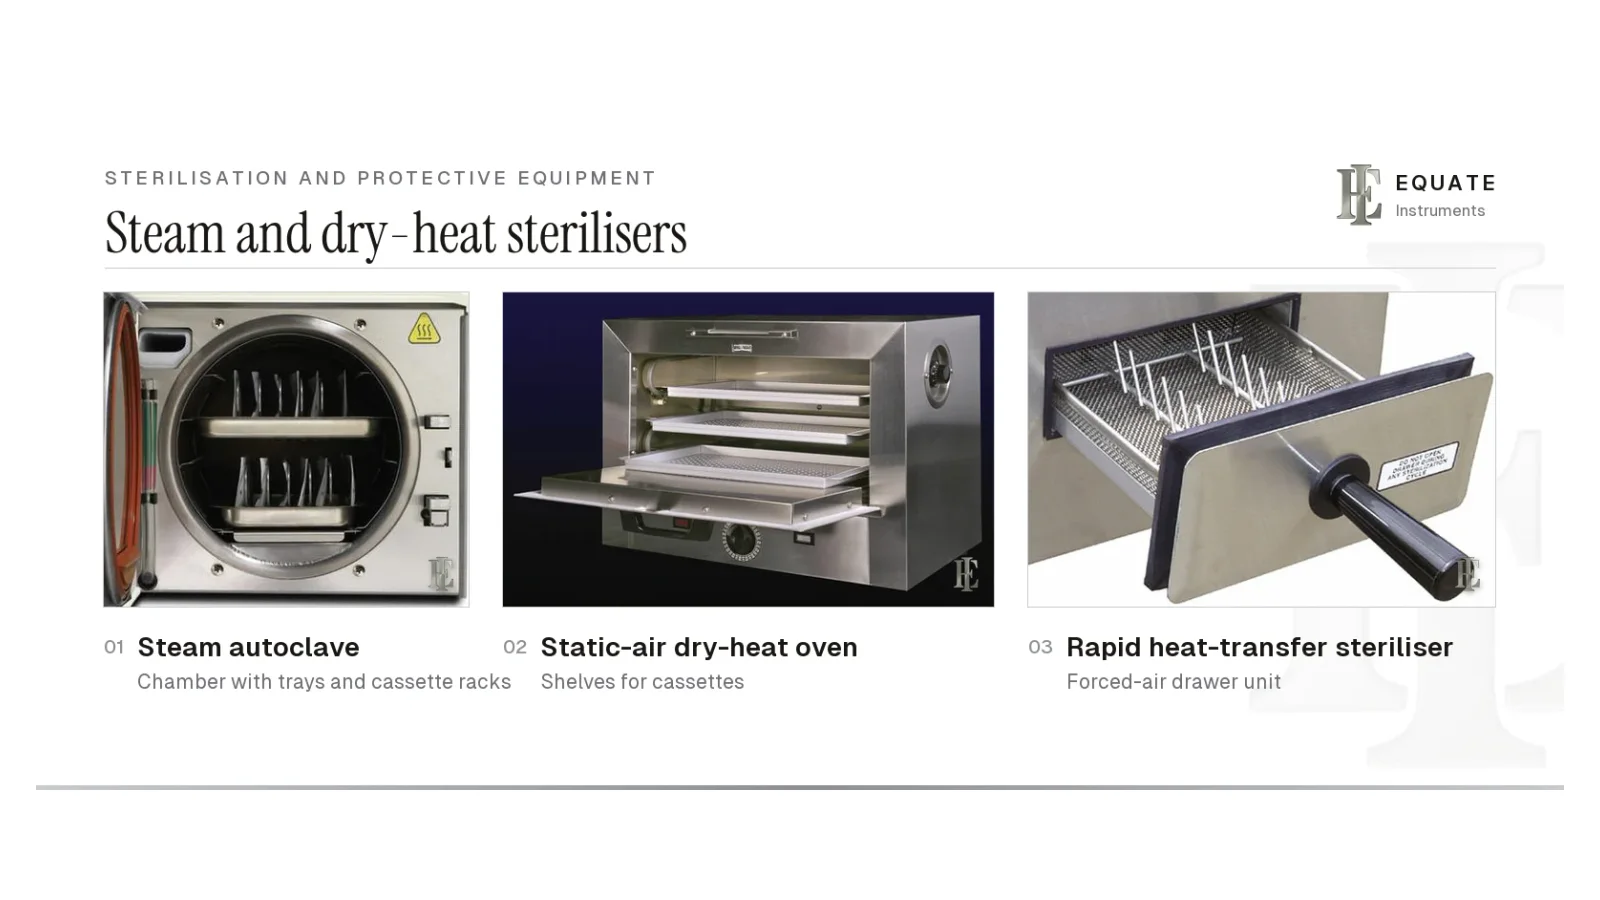
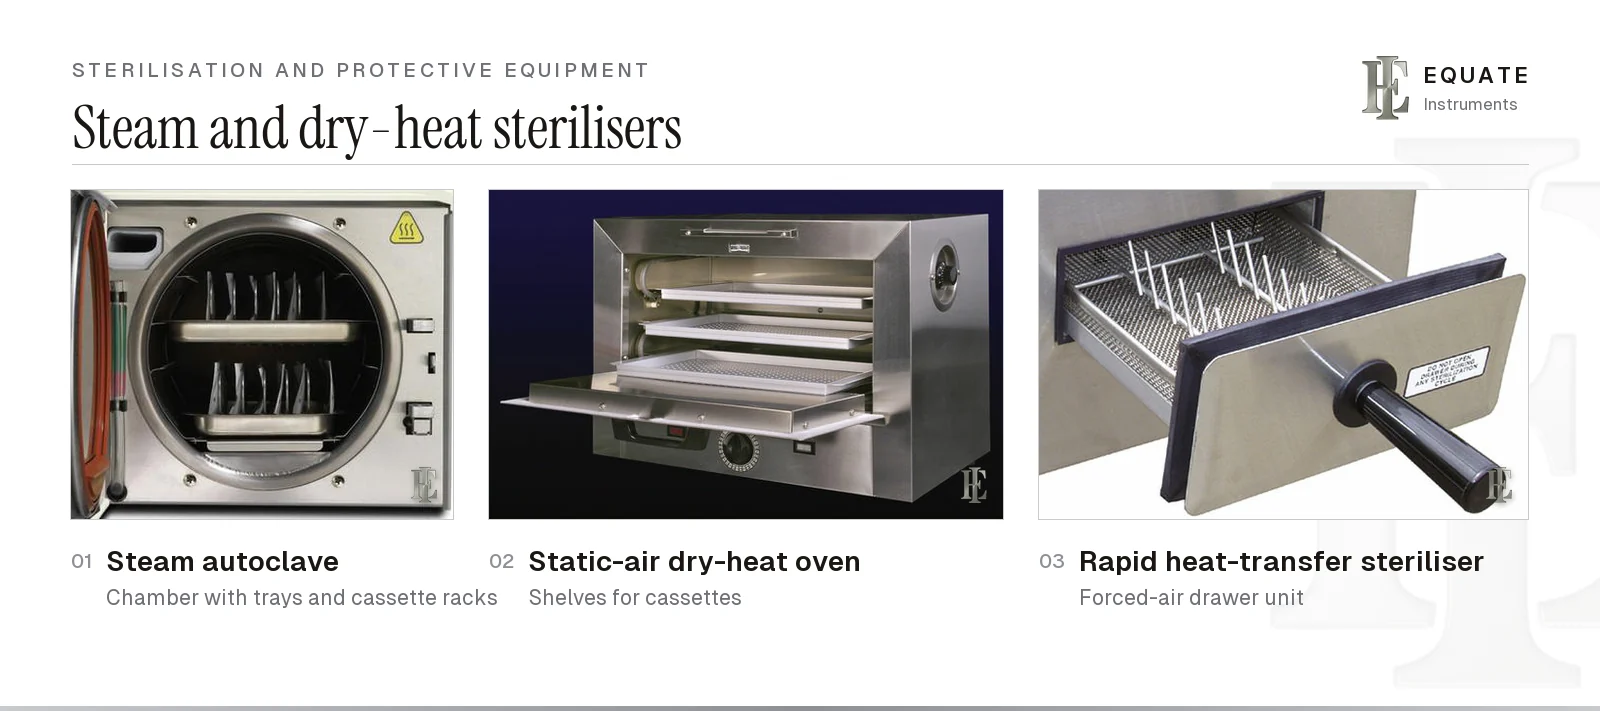
Sterilisation kills all microorganisms, including bacterial spores. In dentistry this is almost always done with steam under pressure. Dry-heat ovens are described in US textbooks, but European decontamination guidance such as HTM 01-05 is written around steam sterilisation, and most practices use steam.
European small steam sterilisers are classified under EN 13060. Type B cycles remove air with a vacuum before steam enters, so they can process wrapped packs and hollow or porous items such as handpieces. Type N cycles rely on steam pushing the air out and are only suitable for unwrapped solid instruments; because these leave the chamber unwrapped, they are no longer sterile once exposed, so follow national rules on using them promptly or reprocessing them. Type S cycles cover whatever loads the manufacturer specifies. Before buying, match the class to what you actually process: a practice that wraps cassettes or sterilises handpieces needs a vacuum cycle.
| Steriliser | Typical cycle | Strengths | Limits |
|---|---|---|---|
| Steam autoclave (chamber) | 134–138 °C for at least 3 minutes (the HTM 01-05 range), plus drying; US textbooks also give 121 °C for about 20 minutes | Fast, reliable, standard in dental practice; vacuum models handle wrapped and hollow loads | Can dull or corrode poor-quality carbon steel; loads must be dry before storage |
| Cassette-type steam steriliser | Short cycles for small loads | Quick turnaround for handpieces and single cassettes | Small capacity; check which cycles suit wrapped loads |
| Static-air dry-heat oven | 160 °C for one to two hours | No moisture, so no rust on carbon steel | Slow; heat can damage handpieces, plastics and some packaging |
| Rapid heat-transfer (forced-air) dry heat | About 190 °C for 6 minutes unwrapped or 12 minutes wrapped | Faster than a static oven | Packaging and instruments must tolerate high heat; door cannot be opened mid-cycle |
Proving it works: chemical and biological monitoring
A steriliser can look as if it is working while failing to sterilise, because of overloading, a faulty seal, poor air removal or a wrong cycle. Monitoring has three layers: mechanical (the steriliser's own readout or printout of time, temperature and pressure for every cycle), chemical (the internal and external indicators on every pack) and biological.
A biological indicator, or spore test, contains highly heat-resistant bacterial spores. It is run through a normal cycle and then either incubated in the practice in a small dry-block incubator, with a result in about a day, or posted to a laboratory. If the spores don't grow, the cycle reached sterilising conditions. CDC guidance, echoed by the American Dental Association and the Organization for Safety, Asepsis and Prevention (OSAP), asks dental settings to spore test each steriliser at least weekly, with a control from the same batch, and to test every load that contains an implantable device.
Rules outside the US differ. In England, HTM 01-05 sets the benchtop routine shown in the table: daily and weekly tests run by the user, quarterly and annual thermometric tests by a Competent Person (Decontamination) or service engineer, and a record of every cycle kept for at least two years. It lists a microbiological test only as an optional type test. Scotland has its own SHTM 01-05, published by NHS National Services Scotland in April 2024 in three parts (management, equipment and test methods, and process), which replaced SDCEP's withdrawn Decontamination into Practice guidance. Follow the routine your national regulations require and log every result, because the log is what tells you which packs to recall if a test fails.
| How often | Test (HTM 01-05) | Steriliser types | Carried out by |
|---|---|---|---|
| Daily | Automatic control test | B, N and S | User, or an operator by delegation |
| Daily | Steam penetration test with a Helix or Bowie-Dick device | B and S | User, or an operator by delegation |
| Weekly | Air leakage test | B and S | User, or an operator by delegation |
| Weekly | Residual air test | S and N | User, or an operator by delegation |
| Quarterly | Thermometric tests (or as the manufacturer advises) | B, N and S | CP(D) or service engineer |
| Annually | Thermometric and steam generator overheat cut-out tests, as part of revalidation | B, N and S | CP(D) or service engineer |
| Annually | Small-load and large-load dryness tests | B and S | CP(D) or service engineer |
Cleaning before sterilisation and sharps disposal
Cleaning comes first because sterilisation can't get through blood, cement or tissue left on an instrument. An ultrasonic cleaner fills a tank with a cleaning solution made for the unit and passes high-frequency sound through it. The sound produces millions of tiny bubbles that collapse against the instrument surfaces and lift debris off, including from serrations and hinges a brush would miss. Run it with the lid closed to contain aerosol, put cassettes in on a rack, change the solution at least daily, then rinse and dry the instruments before packing. Hinged instruments such as haemostats and extraction forceps go through cleaning and the steriliser open and unlocked, as CDC 2003 recommends, so detergent and steam reach the joint.
Both CDC guidance and HTM 01-05 prefer automated cleaning (an ultrasonic bath or, better still, a validated washer-disinfector) to hand scrubbing, because it means less handling of sharp, contaminated instruments. If hand cleaning is unavoidable, wear utility gloves, eye protection and a mask, and use a long-handled brush below the water line.
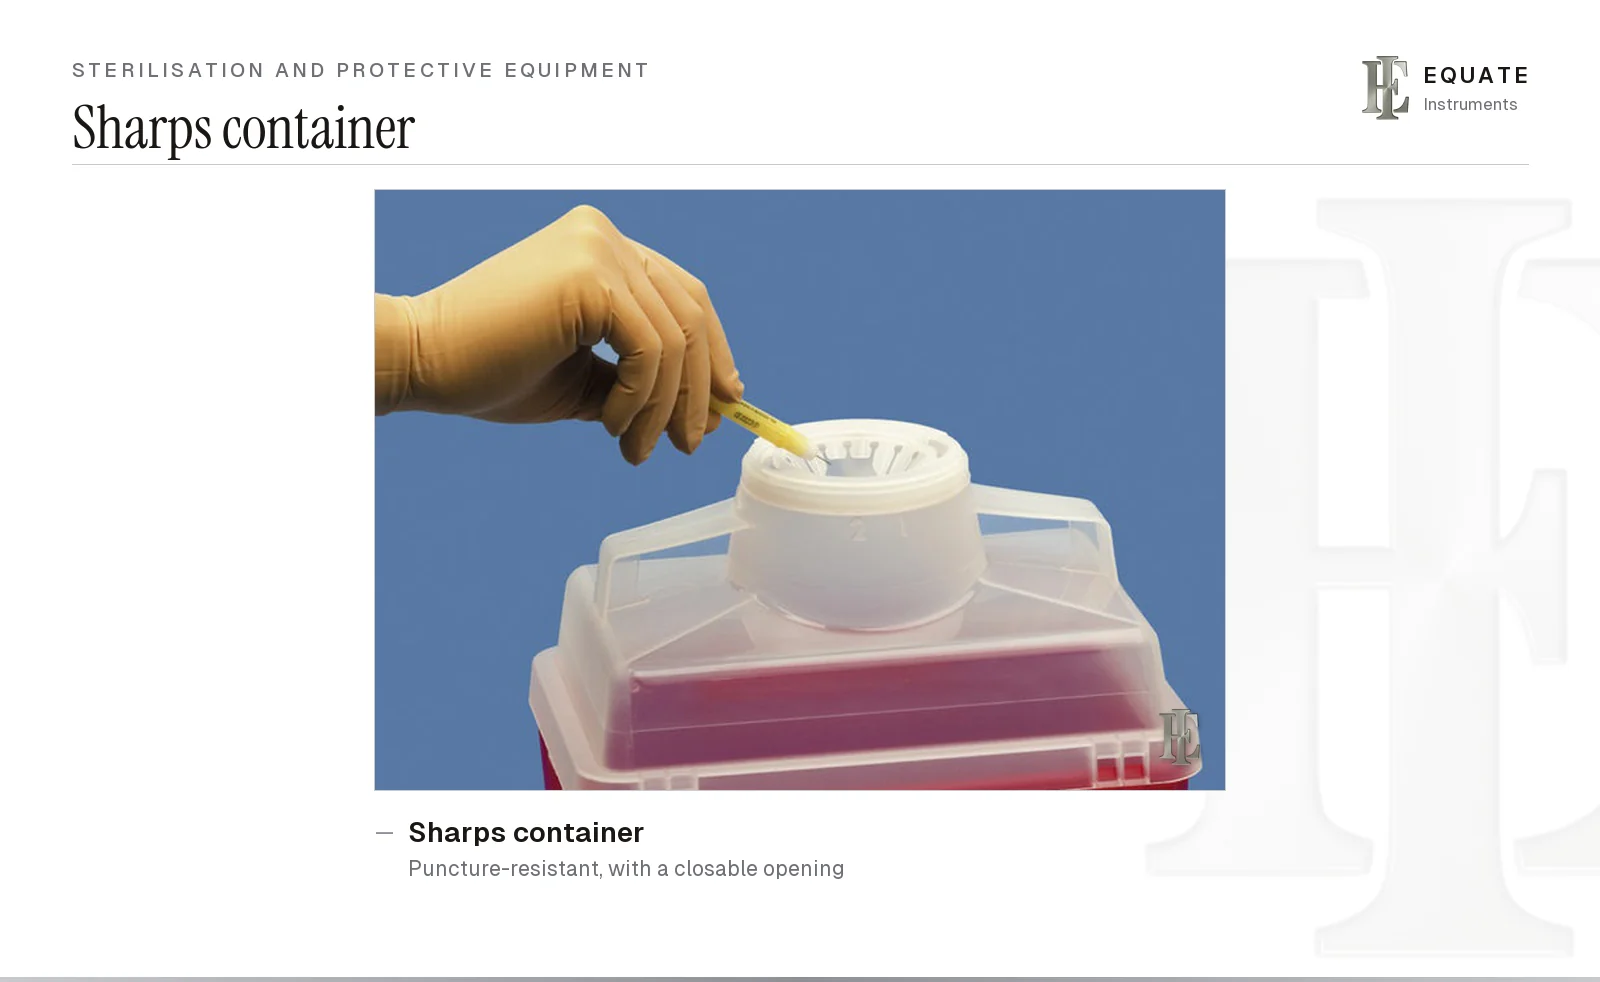
Disposable sharps go straight into a sharps container at the point of use: needles,scalpel blades, worn burs, endodontic files, orthodontic wire offcuts and broken instruments. The container must be rigid, puncture-resistant and leak-proof, carry the biohazard symbol and have a lid that closes for disposal. Don't fill it past the marked line, and never recap a needle with two hands. In the EU, Council Directive 2010/32/EU sets employers' duties for preventing sharps injuries. Full containers are collected by a licensed clinical waste contractor, and the paperwork is kept as national regulations require. For needle handling see the local anaesthetic equipment guide.
Buying sterilisation equipment: what to check
- Steriliser class: a vacuum (Type B) cycle if you wrap packs or process handpieces; check chamber size against your largest cassette.
- Cassettes: sized for the setups you use (5, 10, 15 or 20 instruments), with racks that hold instruments apart and secure latches; stainless steel for long life, resin if weight matters. Process them to the maker's instructions for use, in cycles your practice has validated for that load.
- Compatibility: every cassette, parts box, ring and pouch must be rated for your steriliser's temperature and cycle.
- Instruments: passivated stainless steel that tolerates repeated steam cycles, and reprocessing instructions from the maker under ISO 17664.
- Packaging: wraps and pouches made to ISO 11607-1 and rated for your steriliser's cycle, with room to write the date, steriliser and load number.
- Indicators: internal indicators for every pack, external tape or pouch indicators, and a spore-test system with a clear logbook routine.
- PPE: gloves in a full size range and in non-latex materials, masks that fit, and eyewear that fits over prescription glasses.
- Sharps: containers sized for each surgery and placed within reach of the chair.
- See the surgical instruments guide and the hygiene instruments guide for the instruments these systems are built to carry.
The Equate difference
Equate's catalogue has 27 sterilisation cassettes and cassette trays (19 in stainless steel for 5 to 20 instruments, and 8 plastic cassettes in blue, yellow, red and black), 12 colours of colour-coding rings, 33 colour-coded diagnostic handles, 22 colour-coded periodontal probes, 4 perforated sterilisation trays, 18 procedure trays, 3 bur holders for 4, 8 or 12 burs, 3 stainless instrument boxes, 5 benchtop waste containers, 5 dressing drums and lidded boxes, and sterilisation transfer tongs. Equate does not sell gloves, masks, pouches, indicators or sterilisers.
Equate Dental Sterilisation and Protective Equipment options

Sterilization Transfer Tongs - 20 cm
EI-2261
Sterilization Cassette for 5 Instruments - 182 x 72 x 34 mm
EI-0229
Medium Sterilization Cassette with Removable Top - 10 Instruments, 192 x 144 x 34 mm
EI-0230
Sterilization Cassette for 20 Instruments - 288 x 182 x 34 mm
EI-0231
Sterilization Cassette for 5 Instruments
EI-0232
Sterilization Cassette for 7 Instruments
EI-0233
Sterilization Cassette for 10 Instruments
EI-0234
Sterilization Cassette for 20 Instruments
EI-0235
Multi-Instrument Sterilization Tray with Clips - Small
EI-0236
Multi-Instrument Sterilization Tray with Clips - Large
EI-0237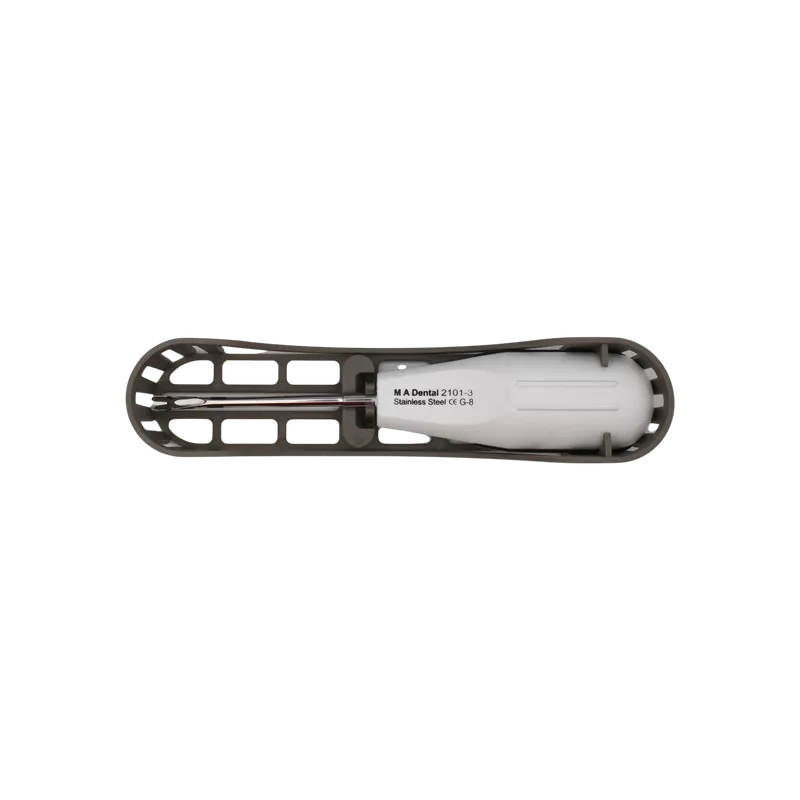
Autoclavable Plastic Tray for Luxating Elevators
EI-0266
Kidney Tray 20 cm
EI-0513Browse all sterilization & organization instruments
Buying in your market
Frequently asked questions
What is the difference between a Type B and a Type N dental autoclave?
Under EN 13060, a Type B steriliser removes air with a vacuum before steam enters, so it can sterilise wrapped packs and hollow items such as handpieces. A Type N steriliser only suits unwrapped solid instruments, which are no longer sterile once exposed, so national rules on prompt use apply.
How often should a dental steriliser be spore tested?
CDC guidance asks for a biological indicator (spore test) in each steriliser at least once a week, plus every load that contains an implant. European countries set their own routines, so check your national regulations and record every result.
Does indicator tape prove that instruments are sterile?
No. Tape and pouch indicators only show that a pack was exposed to a sterilising cycle. An internal chemical indicator inside each pack, the steriliser's cycle record and regular spore tests together show that sterilising conditions were reached.
Why are instruments cleaned before they go in the autoclave?
Blood, saliva and dental materials left on an instrument shield microorganisms from steam or heat. Instruments are cleaned in an ultrasonic bath or washer-disinfector, rinsed, dried and inspected before they're packed and sterilised.
Which gloves should be worn to clean dental instruments?
Heavy-duty, puncture- and chemical-resistant utility gloves, not thin examination gloves. They are kept in the decontamination area, washed and left to dry after each use, and replaced weekly or sooner if worn or torn, as HTM 01-05 advises.
What should a practice do if a spore test fails?
Stop using the steriliser, check how it was loaded and run, and repeat the spore test at once on the same cycle. Quarantine any implantable items from the suspect loads. If the repeat also grows, keep the steriliser out of use until it is repaired and passes three spore-tested full loads in a row, and recall items processed since the last clean result where you can.
In what order should dental PPE be taken off?
HTM 01-05 gives the order as gloves, then the disposable apron, then the mask, then eye protection, followed by a thorough hand wash. Touch only the inside or the straps of each item, and never leave a used mask hanging round the neck.
References
- Boyd LB. Dental Instruments: A Pocket Guide, 7th edition. Saunders/Elsevier, 2020 (photographs used under licence)
- Kohn WG, et al. Guidelines for Infection Control in Dental Health-Care Settings, 2003. MMWR 52(RR-17), Centers for Disease Control and Prevention
- Centers for Disease Control and Prevention. Best Practices for Sterilization Monitoring in Dental Settings
- Centers for Disease Control and Prevention. Dental infection prevention and control FAQs: sterilization
- Department of Health. Health Technical Memorandum 01-05: Decontamination in primary care dental practices (NHS England)
- NHS National Services Scotland. SHTM 01-05: Management, equipment and process of the decontamination of dental instruments in a Local Decontamination Unit (LDU) in NHSScotland, version 1, April 2024
- World Health Organization and Pan American Health Organization. Decontamination and Reprocessing of Medical Devices for Health-care Facilities, 2016
- EN 13060:2014+A1:2018 Small steam sterilizers (CEN)
- ISO 11607-1:2019 Packaging for terminally sterilized medical devices, part 1: requirements for materials, sterile barrier systems and packaging systems
- Council Directive 2010/32/EU of 10 May 2010 implementing the Framework Agreement on prevention from sharp injuries in the hospital and healthcare sector concluded by HOSPEEM and EPSU
I am a…
Related
- Basic Dental Instruments: Mirror, Explorer, Cotton Forceps and Handles
- Dental Handpieces: Types, Attachments and Reprocessing
- Dental Hygiene Instruments: Curettes, Sickle Scalers, Ultrasonic Inserts and Sharpening
- Universal Surgical Instruments for Oral and Periodontal Surgery
- Oral Surgery and Extraction Instruments
- Dental Burs and Rotary Instruments: Types, Shanks and Uses
- Dental Instrument Cassettes, Trays and Boxes
- Basic Dental Tray Setup (Dental Exam Tray)
- Dental Hygiene Tray Setup: Scaling, Root Planing and Polishing
- Periodontal Instruments Explained: Probes, Hoes, Knives and Files