Dental Hygiene Tray Setup: Scaling, Root Planing and Polishing
Written by the Equate Instruments Technical Team · Reviewed by the Medical & Dental Board, Equate Instruments · Updated ·
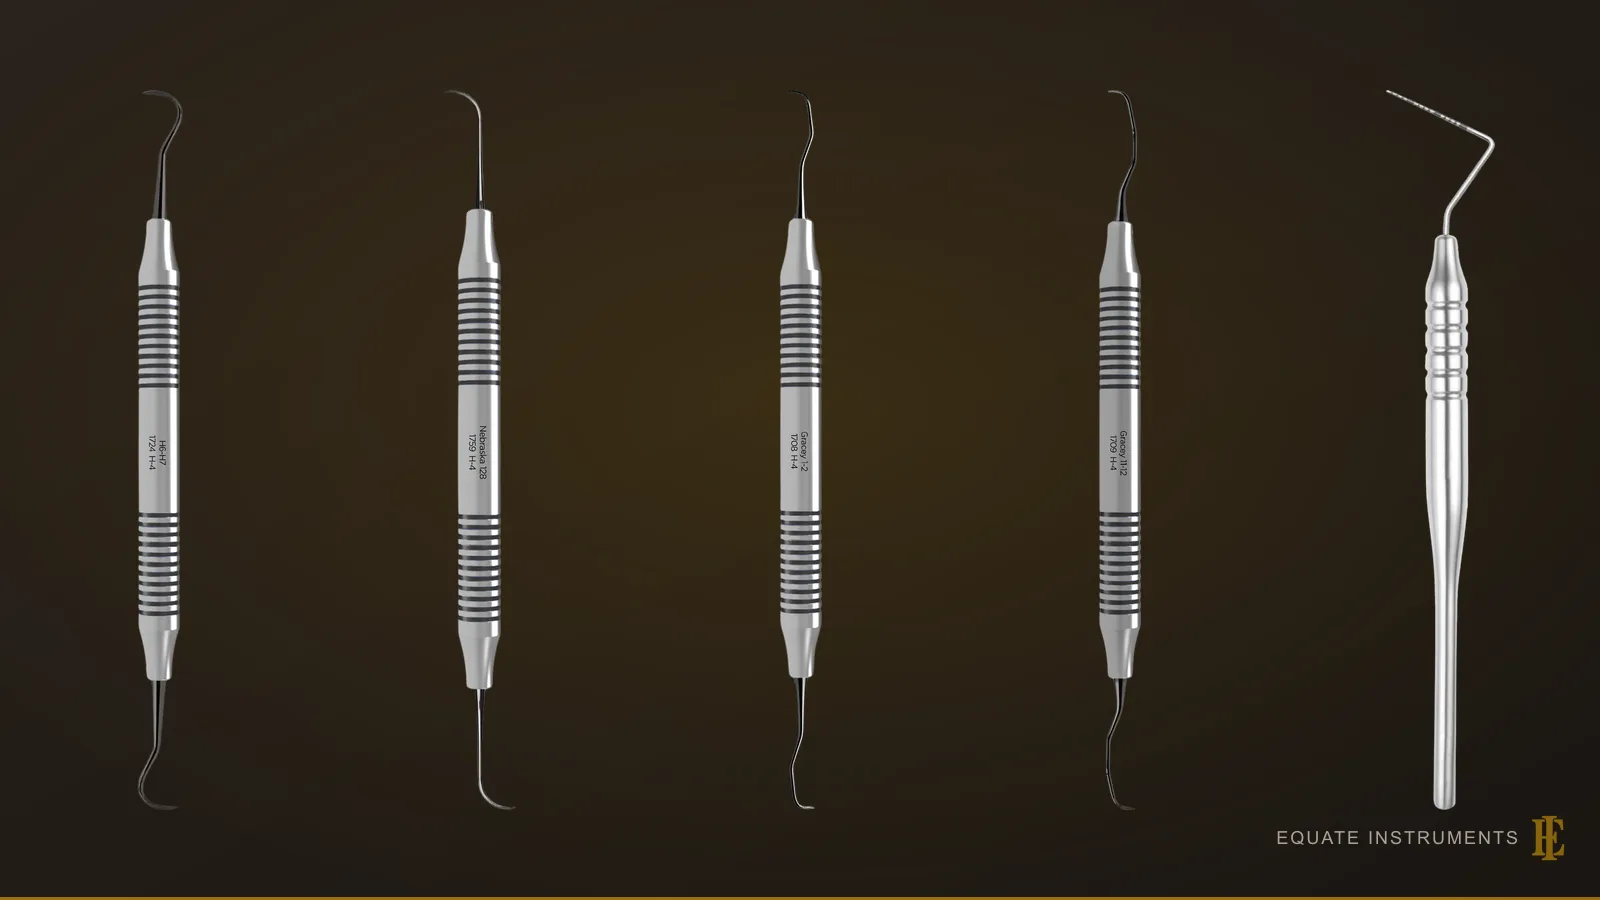
A dental hygiene tray setup holds a mouth mirror, an explorer, a periodontal probe and cotton pliers, followed by a sickle scaler, a universal curette and area-specific Gracey curettes. A root planing tray swaps the sickle for a full Gracey series, and a polishing tray keeps only the mirror, explorer and cotton pliers beside a prophy angle, paste and floss.
Key points
- There are three hygiene trays: scaling, root planing and polishing, each built on the same assessment instruments.
- Set out instruments in the order of use: assess, remove supragingival calculus, then work subgingivally with curettes.
- Blades wear with every sharpening, so sharpen little and often and retire thin blades before they break.
Step by step
- 1
Review and assess
Check the medical history and previous charts, then examine with the mirror and explorer and record pocket depths, bleeding and recession with the probe.
- 2
Plan the instrument sequence
Decide which areas need supragingival scaling only and which need subgingival debridement, and whether local anaesthesia is needed for root planing.
- 3
Remove supragingival calculus
Use a sickle scaler on enamel above the gum, with a modified pen grasp, a firm finger rest and short pull strokes towards the occlusal surface.
- 4
Debride with a universal curette
Use a universal curette for light subgingival deposits; both cutting edges work, so one instrument reaches most surfaces.
- 5
Root plane with Gracey curettes
Carry out subgingival instrumentation (subgingival PMPR) sextant by sextant with the matching Gracey, keeping the terminal shank parallel to the root surface and using overlapping strokes.
- 6
Check with the explorer
Explore every treated root surface for remaining calculus, and re-instrument where you feel roughness.
- 7
Polish selectively
Polish stained surfaces with a prophy cup and paste at low speed, and floss to remove paste from the contacts.
- 8
Advise and record
Give home-care advice, record findings and the recall interval, and send the closed cassette for reprocessing.
What are the three hygiene tray setups?
Hygiene work uses three related trays, all starting with the basic exam instruments. Each instrument is explained in the dental hygiene instruments guide, and the prophy angle, paste and fluoride items in the guide to the prophylaxis polishing tray.
The trays follow the stepwise approach in UK periodontal guidance. In SDCEP's implementation of the BSP guideline, Step 1 removes plaque biofilm and calculus above and just below the gum margin, including accessible root calculus; Step 2 is further, targeted subgingival instrumentation where Step 1 hasn't cleared the calculus, which is when the root planing tray comes out. The guide explains why the BSP now calls this work subgingival PMPR, though the tray keeps its familiar name.
| Tray | Instruments beyond the basics | Used for |
|---|---|---|
| Hygiene (scaling) | Sickle scaler, universal curette, a few Graceys | Routine scaling and debridement |
| Root planing | A full series of Gracey curettes, sometimes mini versions | Targeted subgingival PMPR in deeper pockets, often under anaesthetic |
| Polishing | Prophy angle with cup and brush, paste, floss | Stain removal after scaling |
Tray checklist
| Instrument | What it is for | Guide |
|---|---|---|
| Mouth mirror | Indirect vision, light and retraction | Mouth mirrors |
| Explorer | Detecting subgingival calculus and checking root surfaces | Dental explorers |
| Periodontal probe | Charting pocket depth, bleeding and recession | Periodontal probes |
| Cotton pliers | Handling cotton, gauze and small items | Cotton pliers |
| Sickle scaler (anterior and posterior) | Removing supragingival calculus | Dental scalers |
| Universal curette | Light subgingival deposits on all surfaces | Dental curettes |
| Gracey curettes | Area-specific root planing | Dental curettes |
| Ultrasonic scaler insert (supra/subgingival, furcation) | Bulk calculus and biofilm removal | Hygiene instruments guide |
| Implant scaler (implant patients) | Non-scratching debridement of implant crowns | Hygiene instruments guide |
| Air/water syringe tip, saliva ejector, HVE tip | Rinsing, drying and suction | Evacuation guide |
| Cassette | Keeping the sequence through use and reprocessing | Instrument cassettes |
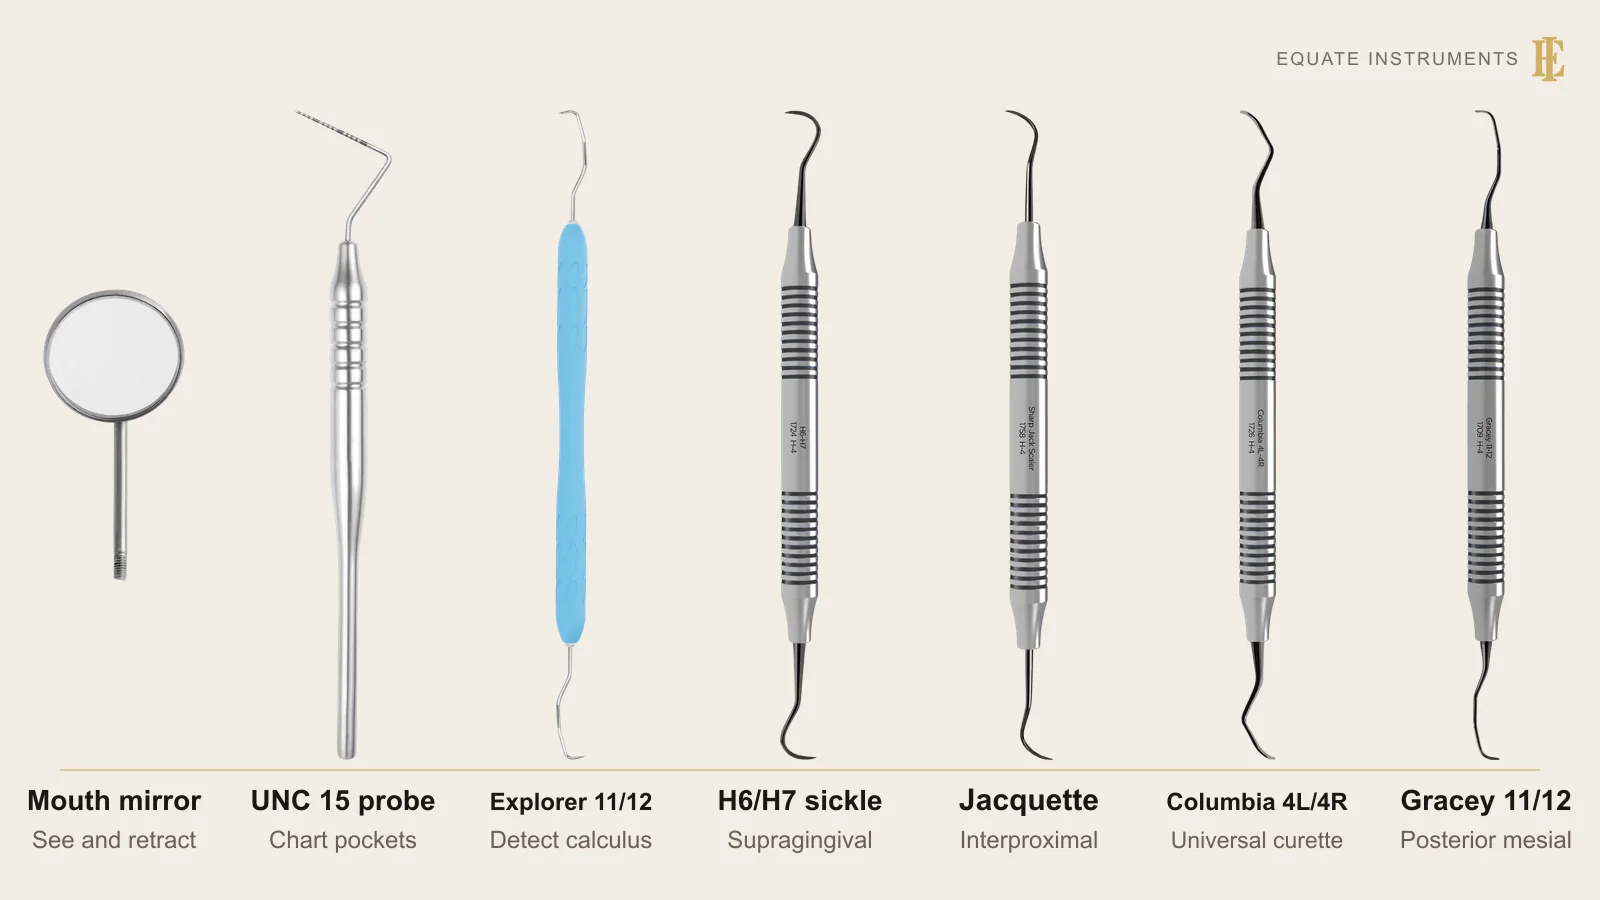
In what order are hygiene instruments set out?
Lay the instruments out left to right in the order they'll be used. On Boyd's hygiene tray the mirror, explorer, probe and cotton forceps sit first; next come a curved sickle, a 4L-4R universal curette, a Langer 1-2, a Ratcliff 3-4, a Gracey 7-8 and two posterior Graceys (usually 11-12 and 13-14); the air/water syringe tip, saliva ejector and high-volume evacuation tip finish the row. Her root planing tray drops the sickle and the universals and carries Graceys in number order instead, from 1-2 and 3-4 through 7-8 to the posterior pairs. Supragingival work comes before subgingival work, so the bulk of the calculus is gone before the finer curettes go under the gum.
Keeping the Graceys in number order also makes it obvious which area each one belongs to. Which Gracey suits which teeth and surfaces is covered on the curettes guide; on the tray the point is simply that they come out and go back in sequence.
How do you keep scalers and curettes sharp?
Sharpen scalers and curettes as soon as an edge feels dull, rather than after a blade has gone round, because a dull blade burnishes calculus instead of removing it and needs more force. Remove as little metal as possible and keep the original angle between face and lateral surface; Gehrig's Fundamentals of Periodontal Instrumentation sets out the technique, and stone choice and angles are covered in the hygiene instruments guide. Test the finished edge on a plastic (acrylic) test stick.
Sharpening has a cost. In a 2022 laboratory study by Liu and colleagues in the International Journal of Dental Hygiene, 184 of 592 new Gracey working ends broke during repeated cycles of sharpening and scaling, after an average of about 14 cycles. Sharpening caused about half of all wear, and the 11-12 curettes were most likely to break. Retire a blade that has become noticeably thinner or narrower.
What else is needed besides the hand instruments?
A hygiene appointment also needs a saliva ejector and high-volume suction tip, an air/water syringe tip, gauze, cotton rolls, floss, disclosing solution, polishing paste, a prophy angle with cups and brushes, and topical or local anaesthetic for root planing. An ultrasonic scaler is often added, with broad supragingival, slim subgingival, ball-ended furcation or universal inserts, and patients with implants need an implant scaler with a resin, plastic or coated tip so the implant surface isn't scratched. Protective eyewear for the patient and aerosol precautions for the team, including high-volume evacuation, are part of the setup.
How are hygiene instruments reprocessed?
Scalers and curettes are critical items in CDC guidance, which lists periodontal scalers with surgical instruments as items that penetrate soft tissue or bone, so they're heat sterilised after every patient. The CDC asks for automated cleaning in an ultrasonic cleaner or washer-disinfector to remove debris; where manual cleaning can't be avoided, its 2003 guidelines call for work practices that keep the scrubbing hand away from sharp edges, such as a long-handled brush and heavy-duty utility gloves. Keeping the set in a cassette means the blades go through cleaning without being handled one by one and come back in order, and colour-coding rings, one colour per setup, make a missing instrument easy to spot. Packaging and steam sterilisation are covered in the sterilisation guide.
HTM 01-05 asks for every instrument to be inspected after any cleaning process, a washer-disinfector cycle included, to confirm it is clean, working and in good condition; it recommends an illuminated magnifier and discarding any instrument that is blunt, bent or corroded. Single-use items such as saliva ejectors, suction tips and three-in-one tips are discarded after each patient, and the manufacturer's reprocessing instructions (ISO 17664) apply to each instrument.
What are the common mistakes on a hygiene tray?
- Starting subgingival work before the supragingival calculus has been removed.
- Setting out Graceys in random order, so the wrong one is used on a surface.
- Working with dull blades, which burnish calculus and tire the operator.
- Sharpening so much that the blade becomes thin enough to break.
- Polishing every surface routinely rather than only stained areas.
Build this tray with Equate
Every reusable instrument on the three trays is in the Equate periodontal and hygiene range: H6/H7, Nebraska 128, 204S and Jacquette sickle scalers, Gracey curettes from 1-2 to 17-18 in standard, mini and extended-shank versions, Columbia, Langer, McCall and Barnhart universal curettes, Williams, UNC, WHO, colour-coded and Nabers probes, and hygiene kits of five to twelve instruments in plastic or stainless steel cassettes.
The instruments are designed in Finland and made from passivated stainless steel, ultrasonically cleaned, shape-, boil- and performance-tested and individually packed. Clinics can request samples and a quote for a complete hygiene set.
The Equate difference
Equate lists 326 hygiene references in the 20 subcategories on this page: 66 sickle and Jacquette scalers, 148 Gracey curettes in standard, mini, extended-shank and rigid versions from 1-2 to 17-18, 46 Columbia, Langer, McCall and Barnhart universal curettes, 55 periodontal probes and 11 ready-made hygiene and periodontal kits.
Equate Dental Hygiene Tray Setup: Scaling, Root Planing and Polishing options

Sickle Scaler 204S
EI-0009
Gracey Curette 11-14 - Hollow Handle
EI-0010
Gracey Curette 12-13 - Hollow Handle
EI-0012
WHO CPI Probe CP 11.5 Ball-End - Hollow Handle
EI-0038
Periodontal Probe CP 18 - Titanium-Coated
EI-0039
UNC Periodontal Probe CP 15 - Hollow Handle
EI-0040
Crane-Kaplan Sickle Scaler - Hollow Handle
EI-0054
Sickle Scaler Fig. 204SD - Solid Knurled Handle
EI-0073
Universal Implant-Maintenance Curette M23 - Titanium-Coated
EI-0074
M23 Sickle Scaler
EI-0075
Periodontal Probe CP12/#23 - Solid Knurled Handle
EI-0081
Universal Curette Fig. 413/414 - Solid Knurled Handle
EI-0092Browse all periodontal & hygiene instruments
Buying in your market
Frequently asked questions
What instruments are on a dental hygiene tray?
A mouth mirror, explorer, periodontal probe and cotton pliers, then a sickle scaler, a universal curette and Gracey curettes, with suction tips, gauze and floss.
What is the difference between a hygiene tray and a root planing tray?
A hygiene tray covers routine scaling with a sickle and a few curettes. A root planing tray carries a full Gracey series for deeper subgingival work.
What goes on a polishing tray?
A mirror, explorer and cotton pliers, a prophy angle with cup and brush, polishing paste, floss and suction.
Should the ultrasonic or the hand instruments be used first?
Guidance sets no fixed order: SDCEP's guidance on the UK periodontal guideline says hand and powered instruments can be used alone or in combination. A common practical approach, rather than a guideline rule, is to clear bulk deposits with the ultrasonic insert first, then finish with curettes and check the roots with an explorer, keeping the tray's supragingival-before-subgingival order.
How often should scalers and curettes be sharpened?
Whenever the edge starts to feel dull, using a few light strokes that preserve the original angles. Sharpening lightly and often takes off less metal than an occasional heavy regrind, so the blade lasts longer.
When should a curette be replaced?
When the blade is noticeably thinner or narrower after sharpening, bent, or corroded, because worn blades are more likely to break.
References
- Liu G, Liu X, Li N, Gao C, Cui T, Luan Q, Wang J. Wear and fracture of curettes due to sharpening and scaling processes. International Journal of Dental Hygiene 2022;20(3):564-570
- Gehrig JS, Sroda R, Saccuzzo D. Fundamentals of Periodontal Instrumentation and Advanced Root Instrumentation. Wolters Kluwer (instrument sequence and sharpening)
- Newman MG, Takei HH, Klokkevold PR, Carranza FA (eds). Newman and Carranza's Clinical Periodontology. Elsevier (scaling and root planing)
- Kohn WG, Collins AS, Cleveland JL, Harte JA, Eklund KJ, Malvitz DM. Guidelines for Infection Control in Dental Health-Care Settings, 2003. MMWR 2003;52(RR-17). Centers for Disease Control and Prevention
- Department of Health (England). Health Technical Memorandum 01-05: Decontamination in primary care dental practices, 2013 edition
- Boyd LB. Dental Instruments: A Pocket Guide, 7th edition. Saunders/Elsevier, 2020. Chapter 12, Hygiene Instruments
- Centers for Disease Control and Prevention. Sterilization and Disinfection: Dental Infection Prevention and Control summary
- Scottish Dental Clinical Effectiveness Programme (SDCEP). Prevention and Treatment of Periodontal Diseases in Primary Care: instrument choice for PMPR
- Scottish Dental Clinical Effectiveness Programme (SDCEP). Prevention and Treatment of Periodontal Diseases in Primary Care: stepwise approach to treatment
- British Society of Periodontology. BSP UK Clinical Practice Guidelines for the Treatment of Periodontitis (UK version of the EFP S3 guideline)
I am a…
Related
- Dental Curettes
- Dental Scalers (Hand Scalers)
- Periodontal Probes
- Basic Dental Tray Setup (Dental Exam Tray)
- Periodontal Surgery Tray Setup
- Dental Hygiene Instruments: Curettes, Sickle Scalers, Ultrasonic Inserts and Sharpening
- Preventive, Sealant and Whitening Tray Instruments
- Dental Instrument Cassettes, Trays and Boxes
- Dental Explorers