Rubber Dam (Dental Dam) Tray Setup and Placement
Written by the Equate Instruments Technical Team · Reviewed by the Medical & Dental Board, Equate Instruments · Updated ·
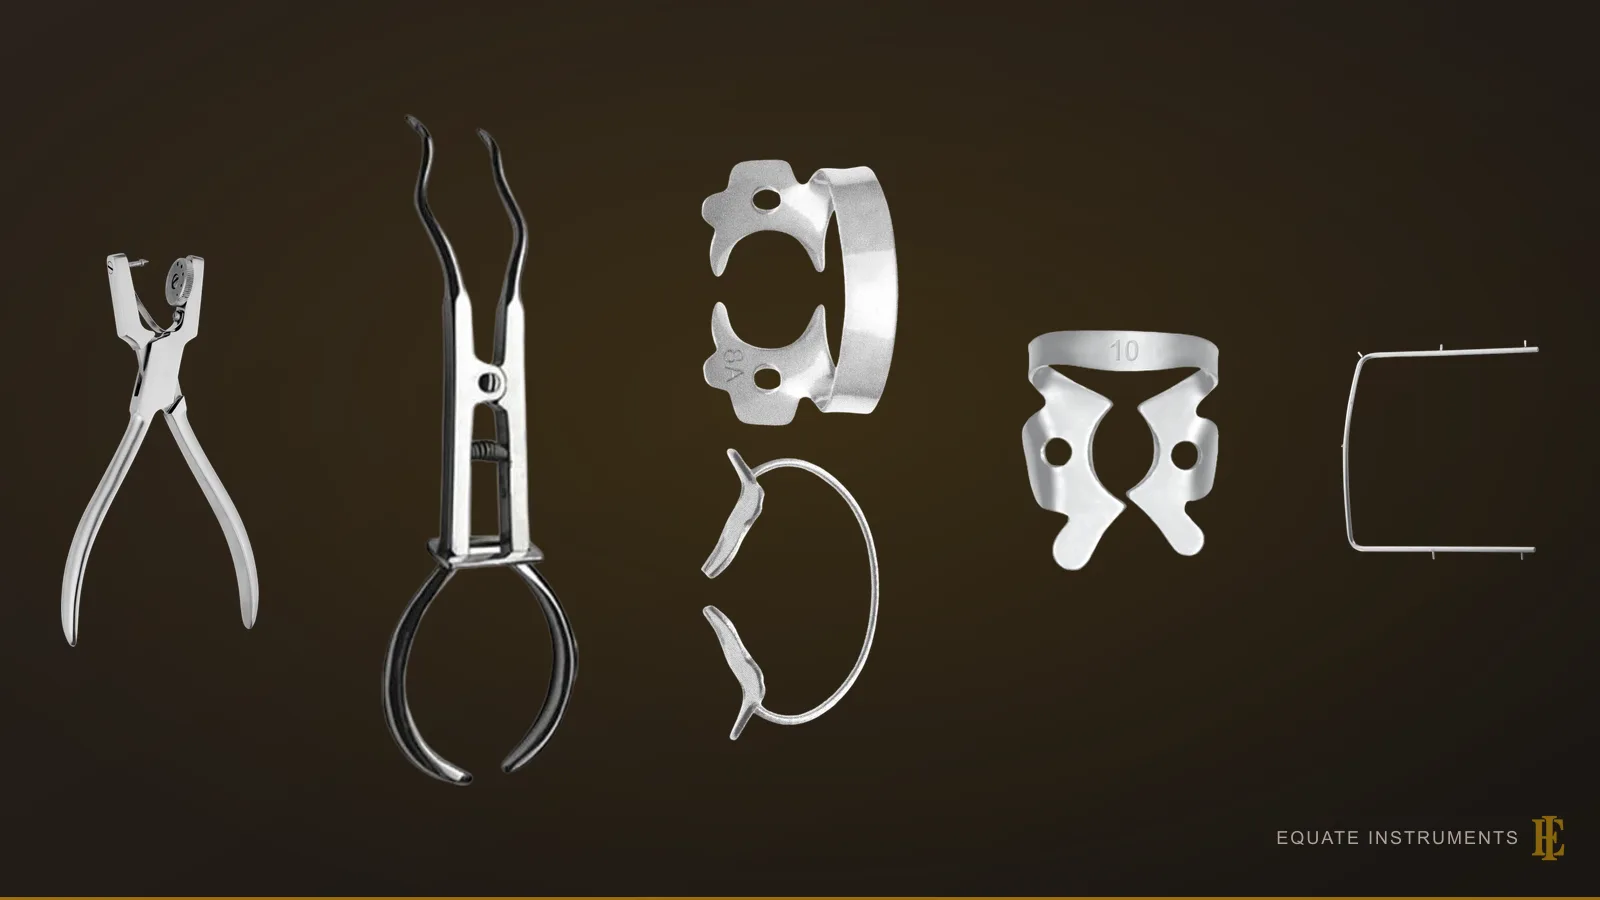
Choose and try the clamp with a floss ligature, then punch the sheet with the largest hole for the clamped tooth, seat the clamp lingual jaw first, stretch the dam over it, fit the frame, floss the dam through the contacts and invert the edges. The tray holds a punch, clamps, clamp forceps, a frame, floss, a burnisher and scissors.
Key points
- Choose the clamp, and try it on with a floss ligature, before the dam goes in.
- Punch holes that match the teeth to be isolated, spaced to the arch, with the largest hole for the clamped tooth.
- A 2021 Cochrane review found low-certainty evidence, from two trials of cervical composite fillings, that rubber dam may improve six-month restoration survival compared with cotton rolls.
Step by step
- 1
Choose and try the clamp
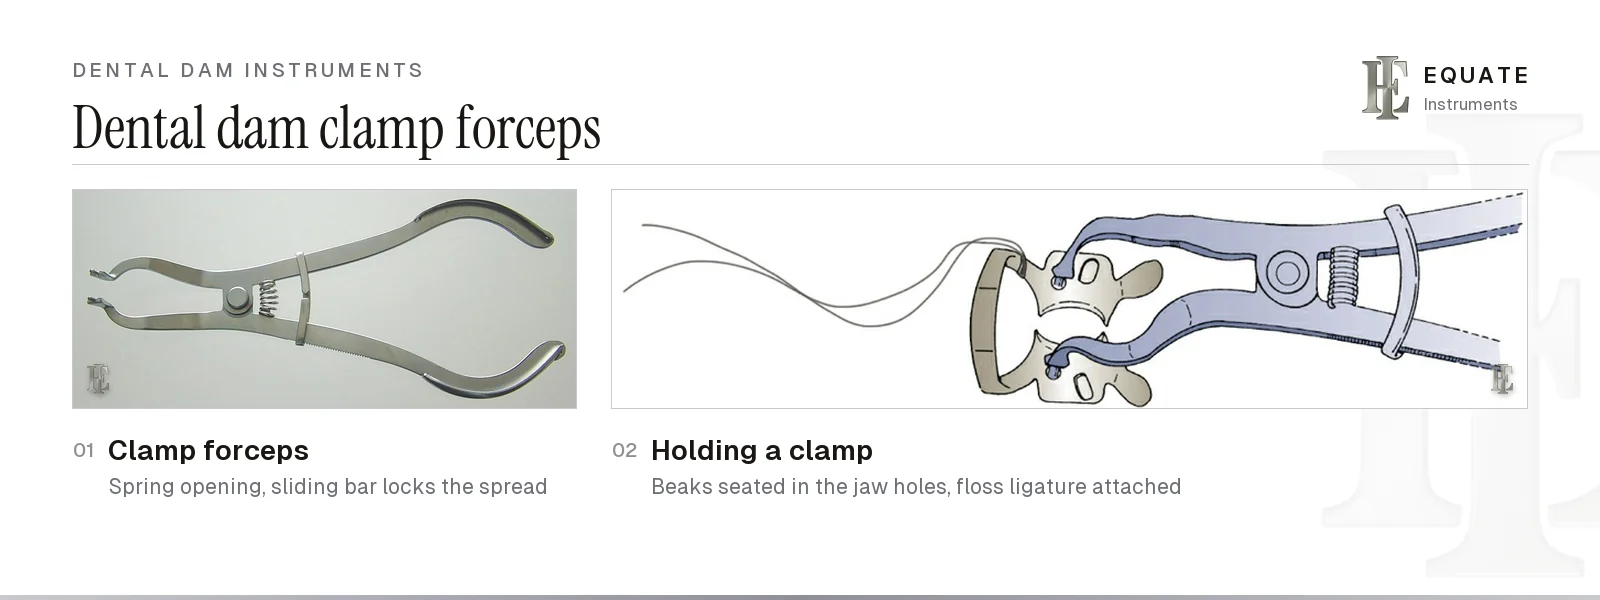
Pick a clamp for the anchor tooth and tie a length of floss to its bow. For multi-tooth isolation the anchor is usually one tooth distal to the one being treated; for single-tooth endodontic isolation the clamp goes on the treated tooth itself. Try it on with the clamp forceps to check that all four jaw points rest on the tooth below the height of contour.
Rubber Dam Clamps, Forceps, Punches and Frames: Which to Choose
- 2
Mark and punch the dam
Mark the teeth on the sheet with a template or by eye, and punch a clean hole for each one with the punch, using the largest hole for the clamped tooth.
Rubber Dam Clamps, Forceps, Punches and Frames: Which to Choose
- 3
Place the clamp
Spread the clamp with the forceps, seat the lingual jaws first and then the buccal, and keep a finger on the bow until it's stable. Leave the floss ligature outside the mouth.
Rubber Dam Clamps, Forceps, Punches and Frames: Which to Choose
- 4
Stretch the dam over the clamp
Stretch the anchor hole over the bow and jaws, or place clamp and dam together with a winged clamp (or a wingless clamp with the dam already stretched over its bow), and pull the floss through the hole. A little water-soluble lubricant on the tissue side helps the dam slide; avoid petroleum jelly, which does not rinse off the teeth.
- 5
Fit the frame
Attach the dam to the frame's pins so the sheet is taut without pulling the clamp off, with the frame's curve away from the patient's nose.
Rubber Dam Clamps, Forceps, Punches and Frames: Which to Choose
- 6
Floss the dam through the contacts
Knife each septum of dam through easy contacts. For tight ones, loop waxed floss to carry the dam through, then pull both floss ends out to the buccal side so the dam stays between the teeth.
- 7
Invert the edges
Tuck the edge of each hole into the gingival sulcus with a beavertail burnisher or plastic instrument while drying with air, so the dam seals round the neck of each tooth.
Dental Burnishers: Ball, Football, Acorn, T-Ball and Beavertail
- 8
Remove the dam
After treatment, stretch the dam away from the teeth and cut each septum with crown scissors, remove the clamp with the forceps, then lift away dam and frame. Check the sheet to be sure no fragment is left between the teeth.
Dental Surgical ScissorsRubber Dam Clamps, Forceps, Punches and Frames: Which to Choose
Why use a rubber dam?
A rubber dam isolates the teeth being treated from saliva, the tongue and the cheeks, gives a dry, clear field, and stops small instruments, files and debris falling into the throat. It's the standard for the endodontic tray and for adhesive work on the composite tray, which needs a dry field to bond. The instruments are explained one by one in the dental dam instruments guide.
The evidence on outcomes is limited. A 2021 Cochrane review by Miao and colleagues (six trials, 1,342 participants, all at high risk of bias) found low-certainty evidence, from two trials with 192 participants, that rubber dam may improve the six-month survival of composite fillings in non-carious cervical lesions compared with cotton rolls; the 12- and 18-month and primary-molar results were very low certainty. On time, one composite trial found little or no difference, fissure sealing was about 12% quicker with dam, and an illuminated suction isolation device was quicker than dam. None of the trials reported adverse effects.
Tray checklist
| Instrument | What it is for | Guide |
|---|---|---|
| Rubber dam punch | Punching holes of the right size for each tooth | Rubber dam instruments |
| Rubber dam clamps | Anchoring the dam on the most distal tooth | Rubber dam instruments |
| Clamp forceps | Spreading, placing and removing the clamp | Rubber dam instruments |
| Rubber dam frame | Holding the sheet taut outside the mouth; a plastic frame if radiographs are taken with the dam on | Rubber dam instruments |
| Beavertail burnisher or plastic instrument | Inverting the dam edge into the sulcus | Burnishers |
| Crown and bridge or surgical scissors | Cutting the septa to remove the dam | Surgical scissors |
| Dam sheet, floss, template, water-soluble lubricant | The barrier, the safety ligature and passing contacts | Dental dam guide |
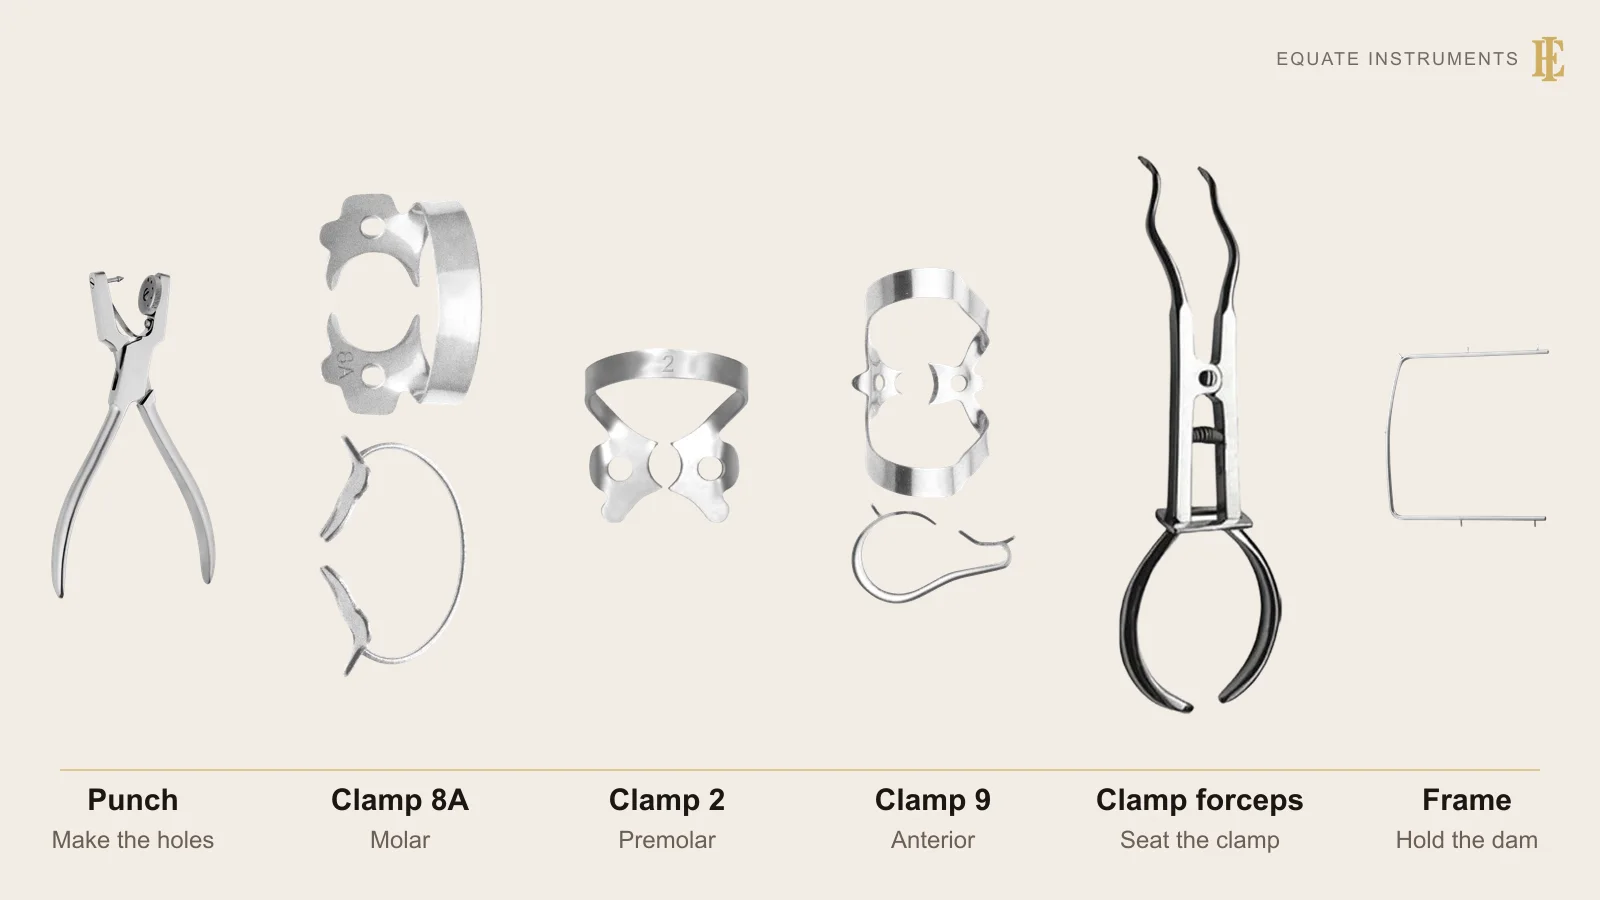
How do you choose a rubber dam clamp?
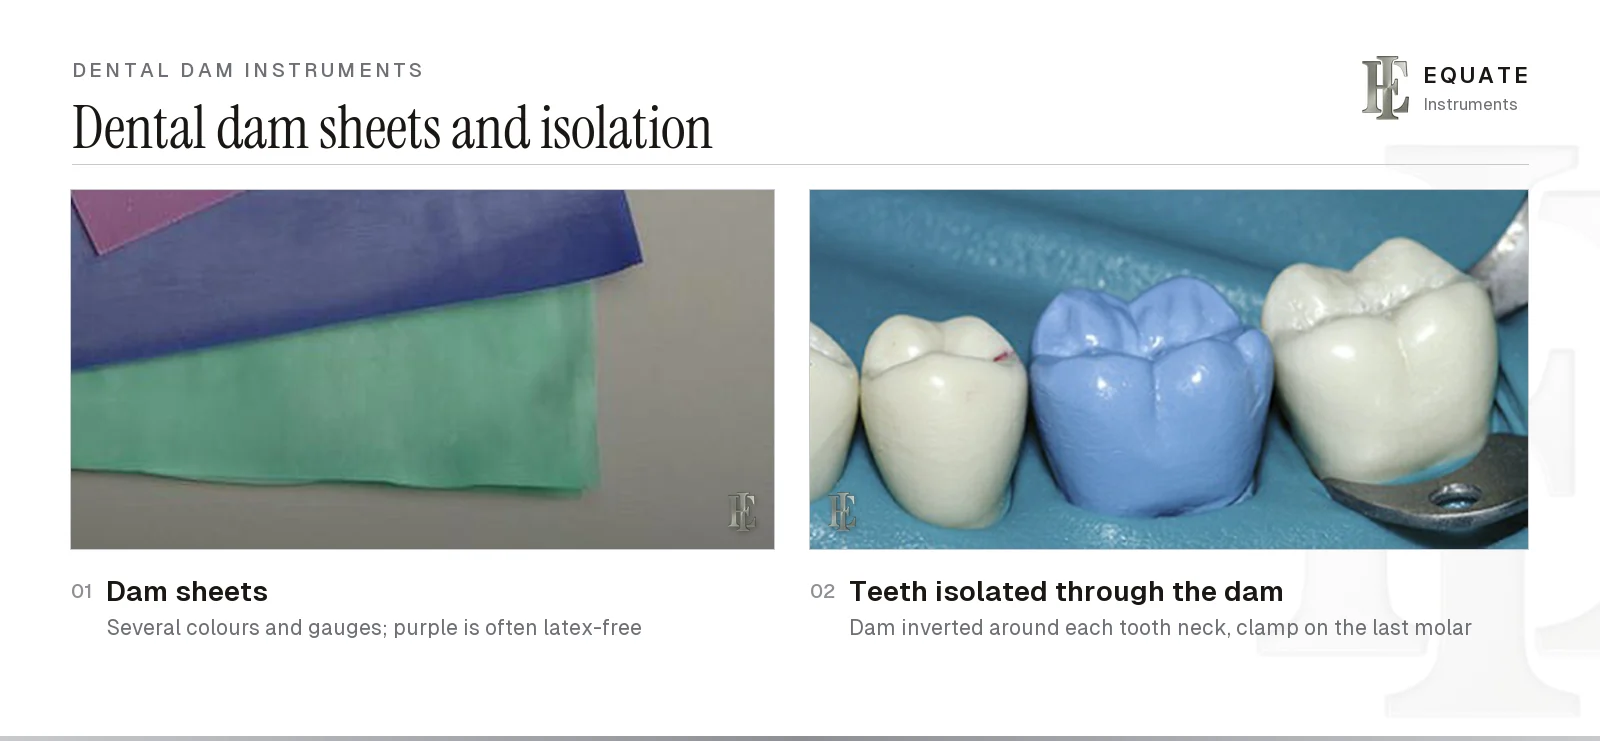
Choose the rubber dam clamp by tooth type and by how much of the crown is above the gum. Winged clamps hold the dam on their wings so clamp, dam and frame can go on in one move; wingless clamps leave more room and are usually placed before the dam, or carried in with the dam already stretched over the bow. Festooned or deeply curved jaws reach below the gum on partly erupted or broken-down molars.
| Tooth or situation | Typical clamp |
|---|---|
| Lower incisors and canines | Small anterior clamp, or no clamp with floss ligatures or stabilising cord |
| Upper anterior teeth | Anterior or butterfly-type clamp with a double bow |
| Premolars | Premolar clamp such as a 2 or 2A pattern |
| Fully erupted molars | Molar clamp for that arch: 8 (upper), 7 (lower), or 56 for large molars of either arch |
| Partly erupted or broken-down molars | Festooned clamp with downward-angled jaws, such as an 8A or 14A pattern |
| Endodontic access with little crown left | Wingless clamp, placed first with the dam stretched over, or with the dam stretched over its bow beforehand |
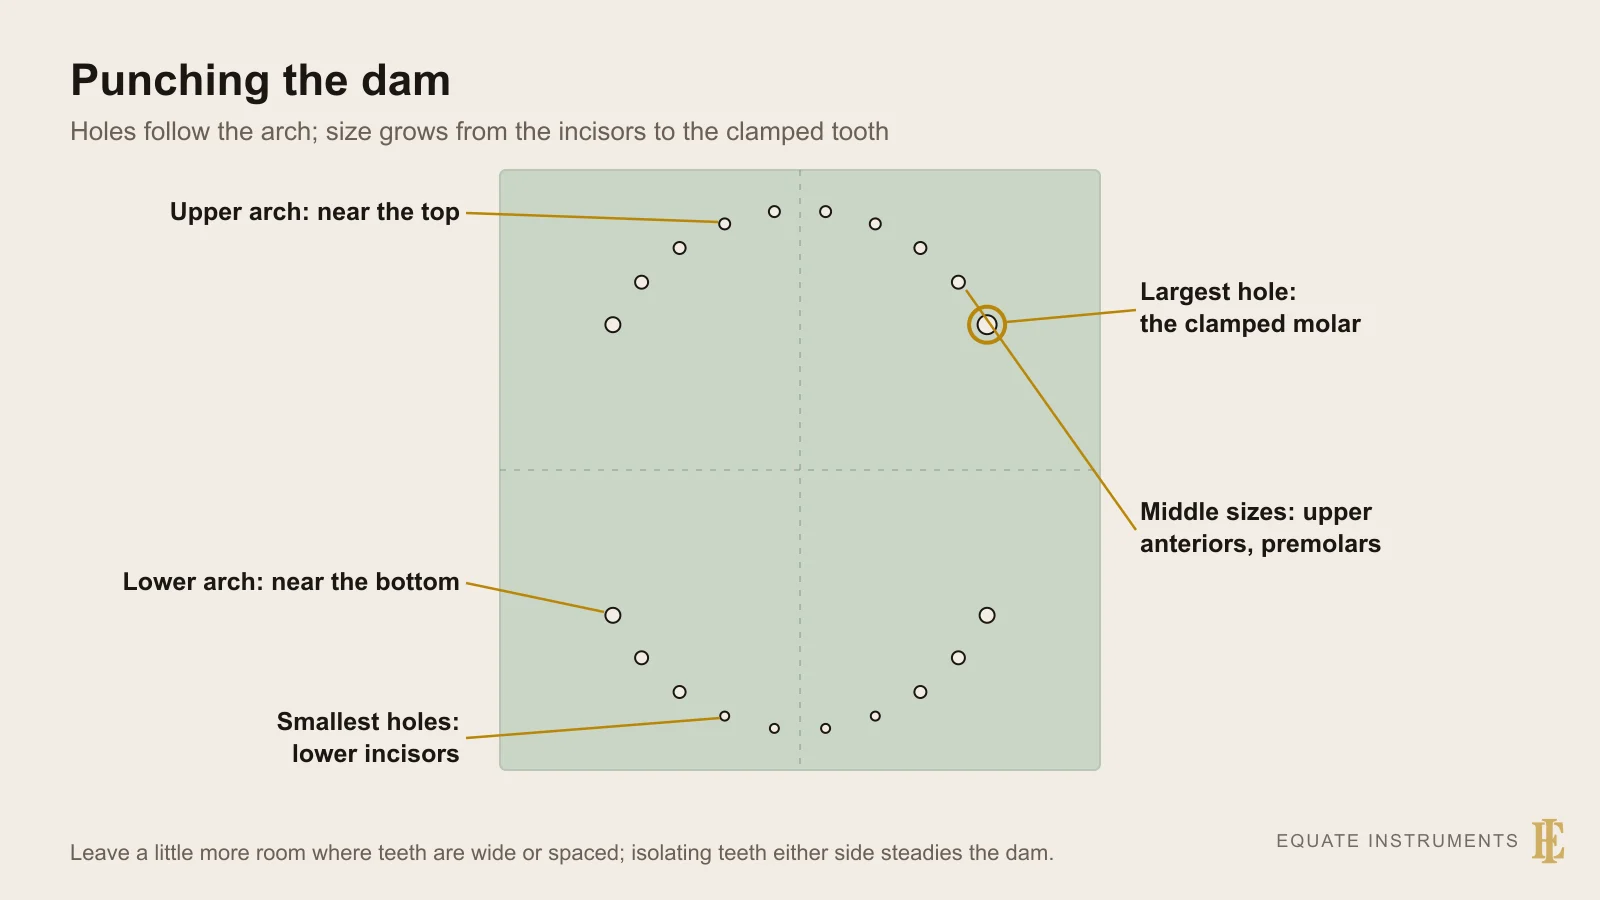
How are the holes punched and spaced?
The rubber dam punch has a rotating table of holes from small to large: the smallest for lower incisors, the next size for upper incisors and both upper and lower canines, a medium hole for premolars, a large one for molars and the largest for the clamped tooth. Manufacturer charts vary: one maker puts the canines with the premolars at No. 3. Too small a hole tears when stretched; too large a hole leaks round the neck of the tooth.
Space the holes to match the arch, with slightly more room where teeth are wide or spaced, and place them so the sheet sits evenly round the mouth: upper arch holes nearer the top of the sheet, lower arch holes nearer the bottom. A printed template or a stamp speeds this up. For restorations, isolating teeth beyond the one being treated, on one or both sides, gives better access and a steadier dam; a single-tooth dam for root canal treatment or a sealant is the exception. The guide also covers choosing the sheet's gauge and colour, and confirming latex-free status from the label rather than the colour. How many teeth to include depends on the job:
| Treatment | Teeth to isolate |
|---|---|
| Posterior restorations | From one tooth distal to the treated tooth forward to the midline |
| Anterior restorations | Premolar to premolar |
| Single tooth (root canal treatment, sealants) | Only the tooth being treated |
| Children | One tooth either side of the tooth or teeth being treated |
How is rubber dam equipment cleaned and sterilised?
Dam sheets, floss and lubricant are single-use. Clamps, forceps, punches and metal frames are reprocessed between patients: they're semicritical items under the CDC's 2003 guidelines, cleaned first and then heat sterilised, in pouches or a wrapped cassette (see the sterilisation guide). Open hinged forceps and punches for cleaning, and follow the manufacturer's instructions (ISO 17664) for each item.
HTM 01-05 asks for inspection after cleaning under an illuminated magnifier and for stiff hinged instruments to be lubricated with a non-oil-based lubricant. Check clamps after every cycle and discard any with a crack at the bow, a sprung bow or prongs that no longer meet evenly, because a fatigued clamp can snap in the mouth. Check that the punch's pin still meets the table centrally and cuts a clean hole, and replace a dull pin from the maker's spare parts rather than forcing it.
What are the common mistakes with rubber dam?
- Placing a clamp without a floss ligature, so it can't be retrieved if it springs off.
- Punching holes too close together, which leaves the dam bunched and leaking.
- Seating the clamp jaws on the gum instead of on the tooth.
- Pulling the frame so tight that it lifts the clamp.
- Forgetting to check the removed sheet for torn pieces left between the teeth.
- Lubricating the dam with petroleum jelly, which leaves a film on the teeth; use a water-soluble lubricant.
Build this tray with Equate
The Equate range covers the whole rubber dam tray. Clamps in the prosthodontic and laboratory range include universal, anterior, premolar and molar patterns such as 10, 11, 18, 24, 25, 56, 8A, W8A, W14 and W14A, in sets of 13 or in complete kits, from a 4-piece punch and clamp forceps kit to 12- and 17-piece kits with punch, forceps and frame. Brewer and Stocks pattern clamp forceps and Ainsworth-pattern punches are in the oral surgery range, with adult and small frames, and beavertail burnishers in the restorative range.
Counted by catalogue line, that's 71 single clamps across universal, anterior, premolar and upper and lower molar patterns (9 of them named as wingless), 3 clamp sets, 5 complete kits, 11 clamp forceps, 4 punches, 5 frames and 3 beavertail burnishers.
The instruments are designed in Finland and made from passivated stainless steel, ultrasonically cleaned, shape-, boil- and performance-tested and individually packed. Clinics can request samples and a quote for a complete kit.
The Equate difference
Equate's rubber dam kits run from a 4-piece punch and clamp forceps kit to 12- and 17-piece sets, alongside three 13-piece clamp sets and three burnishers from the beavertail range for inverting the dam edge: 102 tray references in all.
Equate Rubber Dam (Dental Dam) Tray Setup and Placement options

Bennet Burnisher - Solid Handle
EI-2011
Fig 3 Serrated Modelling Burnisher - Solid Handle 6mm
EI-2033
Fig. NYU/B2 Solid Handle 6mm
EI-2124
Ainsworth Rubber Dam Punch 17cm
EI-0724
Ivory-Pattern Rubber Dam Punch 16cm
EI-0725
Rubber Dam Clamp Forceps 17cm
EI-0727
Rubber Dam Clamp Forceps, Stocks Pattern - 17 cm
EI-0728
Brewer Rubber Dam Clamp Forceps 17cm
EI-0729
Brewer Rubber Dam Forceps
EI-0730
Rubber Dam Clamp Forceps, Stocks Pattern - 17 cm
EI-0731
Rubber Dam Clamp Forceps - Straight Beaks
EI-1504
Rubber Dam Punch Plier, New Design, 17 cm
EI-2372Browse all prosthodontic & laboratory instruments Browse all oral surgery instruments Browse all restorative & operative instruments
Buying in your market
Frequently asked questions
How long does it take to place a rubber dam?
Only a minute or two with practice. In a Czech study, dentists took about 1.6 minutes on average to place a rubber dam and dental students about 4.1 minutes. It is often placed while the local anaesthetic takes effect, so it adds little to the appointment.
Which goes on first, the clamp or the dam?
Either works. With a wingless clamp the clamp usually goes on first and the dam is stretched over it, or the dam can be stretched over the clamp's bow before both go in together; with a winged clamp, clamp, dam and frame can be placed together.
Why tie floss to a rubber dam clamp?
The floss ligature lets you retrieve the clamp quickly if it slips or breaks, so it can't be swallowed or inhaled.
What is the difference between a rubber dam and a dental dam?
They're the same thing. Dental dam is the more general name, used because many sheets are now latex-free.
Does a rubber dam improve fillings?
Possibly, but the evidence is thin. A 2021 Cochrane review found low-certainty evidence, from two small trials, that rubber dam may improve the six-month survival of composite fillings in non-carious cervical lesions compared with cotton rolls; longer-term results were very low certainty and all the trials were at high risk of bias.
When is rubber dam not suitable?
Some patients find it hard to tolerate. One dental materials textbook lists claustrophobia, severe asthma or difficulty breathing through the nose, teeth not erupted far enough for a stable clamp, and patients who cannot tolerate a clamp without local anaesthetic. Discuss alternatives with the patient rather than forcing it.
References
- Miao C, Yang X, Wong MCM, Zou J, Zhou X, Li C, Wang Y. Rubber dam isolation for restorative treatment in dental patients. Cochrane Database of Systematic Reviews 2021;5:CD009858
- Kohn WG, Collins AS, Cleveland JL, Harte JA, Eklund KJ, Malvitz DM. Guidelines for Infection Control in Dental Health-Care Settings, 2003. MMWR 2003;52(RR-17). Centers for Disease Control and Prevention
- Department of Health (England). Health Technical Memorandum 01-05: Decontamination in primary care dental practices, 2013 edition
- Boyd LB. Dental Instruments: A Pocket Guide, 7th edition. Saunders/Elsevier, 2020 (photographs used under licence)
- Coltene/Hygenic. Dental Dam Procedures: Basic Techniques (technique booklet 40002739H)
- Kapitan M, Hodacova L, Jagelska J, Kaplan J, Ivancakova R, Sustova Z. The attitude of Czech dental patients to the use of rubber dam. Health Expectations 2015;18(5):1282–1290
- Thomas R. Application and Removal of the Rubber Dam. In: Stewart M(G), Bagby M. Clinical Aspects of Dental Materials, 5th edition. Jones & Bartlett Learning, 2020 (chapter 24)
- Ritter AV, Boushell LW, Walter R (eds). Sturdevant's Art and Science of Operative Dentistry. Elsevier (isolation of the operating field)
- Bird DL, Robinson DS. Modern Dental Assisting. Elsevier (placing and removing the dental dam)
I am a…
Related
- Rubber Dam Clamps, Forceps, Punches and Frames: Which to Choose
- Dental Burnishers: Ball, Football, Acorn, T-Ball and Beavertail
- Endodontic Tray Setup: Opening and Sealing a Tooth
- Composite Restoration Tray Setup (Class I to V)
- Amalgam Restoration Tray Setup
- Dental Dam Instruments Explained, from Sheet to Frame
- Endodontic Instruments for Root Canal Treatment