Dental Dam Instruments Explained, from Sheet to Frame
Written by the Equate Instruments Technical Team · Reviewed by the Medical & Dental Board, Equate Instruments · Updated ·
Dental dam instruments are the tools used to place a thin latex or latex-free sheet that isolates one or more teeth, which pass through punched holes, from saliva, the tongue and the cheeks. A dam punch cuts the holes, clamp forceps spread and seat a metal clamp that anchors the sheet, and a frame stretches the dam away from the face.
Key points
- A complete dam setup is sheet, stamp or template, punch, clamp forceps, a clamp chosen for the anchor tooth, a frame, floss, an inverting instrument and scissors.
- Clamps are picked by tooth and design: anterior, premolar or molar, winged or wingless, and every clamp carries a floss ligature so it can be retrieved if it slips.
- Punches, forceps, clamps and metal frames are heat sterilised between patients; sheets and preframed dams are single use.
What are dental dam instruments?
A dental dam (rubber dam) is a stretchy sheet with holes punched in it. Each tooth to be treated pokes through its own hole, so the working field is cut off from saliva, the tongue and the cheeks. The idea is old: the dam is credited to the American dentist Sanford Christie Barnum, who introduced it in 1864, and the instruments that place it have changed surprisingly little since.
Linda Bartolomucci Boyd's Dental Instruments: A Pocket Guide (Elsevier) treats the dam as its own instrument family, separate from the restorative tray it usually supports. That makes sense in practice: the same dam kit serves amalgam and composite restorations, bonding, and almost all root canal treatment.
Isolation has three practical payoffs. It keeps the tooth dry, which bonded materials need; it stops small instruments, files and irrigants from reaching the throat; and it gives a clean, retracted view, which also reduces how much the evacuation system has to do. The restorative evidence is thinner than the endodontic consensus: a 2021 Cochrane review (Miao and colleagues) found low-certainty evidence that dam isolation may improve the short-term survival of composite restorations in non-carious cervical lesions compared with cotton rolls. For root canal treatment there is also large-scale observational data: in Taiwan's national records of 517,234 root-filled teeth, Lin and colleagues (2014) found that 90.3% of teeth treated under dam were still present after a mean of 3.43 years, against 88.8% without it.
| Item | What it does | Reusable? |
|---|---|---|
| Dam sheet | Isolates the teeth that pass through its holes | No, single use |
| Stamp or template | Marks where each hole should go | Yes, disinfected as the maker directs |
| Dam punch | Cuts round holes of five sizes | Yes, heat sterilised |
| Clamp forceps | Spreads, carries, seats and removes the clamp | Yes, heat sterilised |
| Clamp (retainer) | Grips the anchor tooth and holds the dam down | Yes, heat sterilised |
| Frame | Stretches the dam away from the lips and face | Metal and autoclavable plastic frames, yes |
| Floss, burnisher, scissors | Pass the dam through contacts, tuck its edge, cut it free | Floss no; instruments yes |
Dental dam sheets: size, thickness and latex-free options
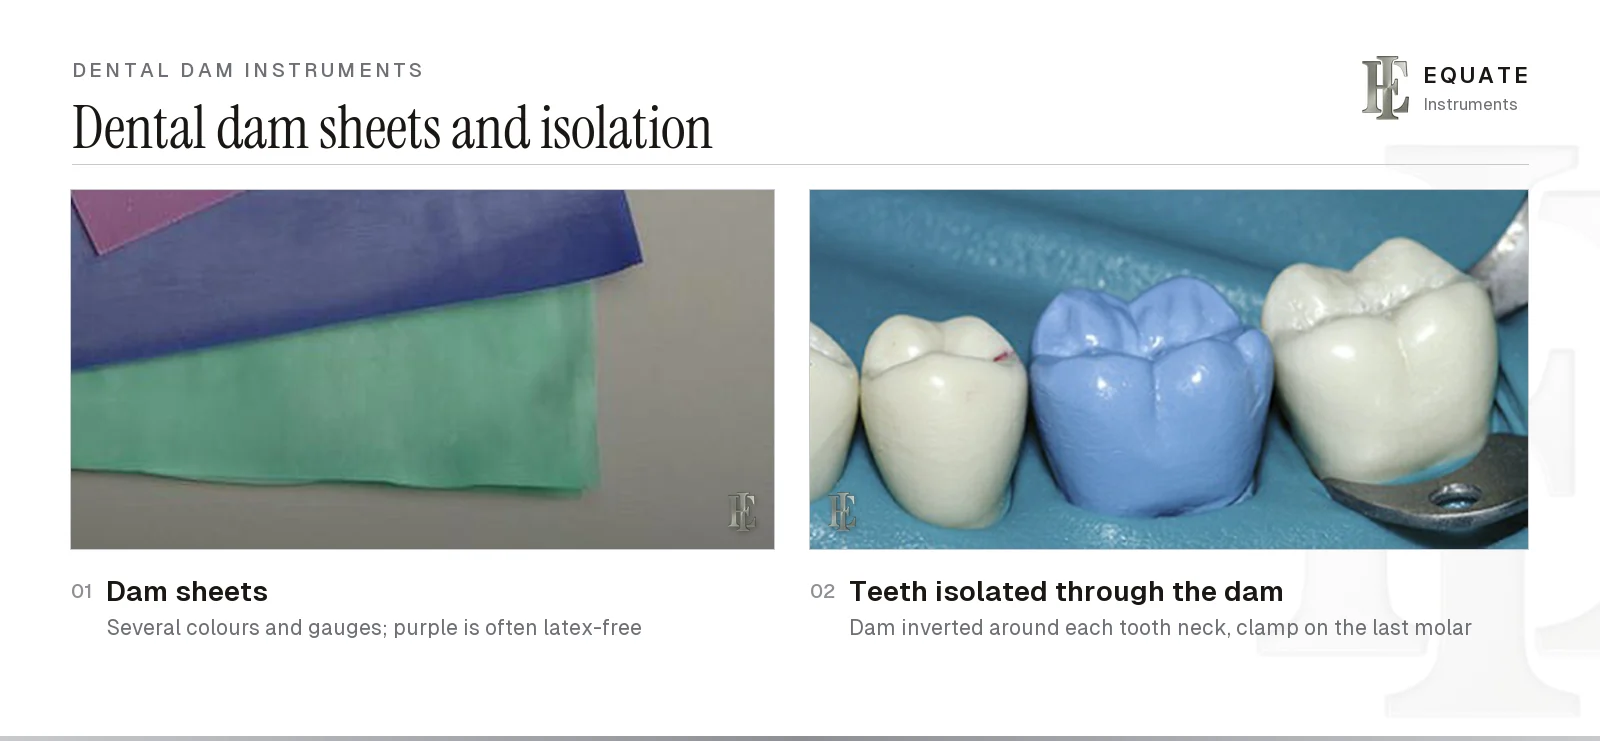
Sheets come pre-cut as squares, most often 6 × 6 inch (about 152 mm) for adults and 5 × 5 inch (about 127 mm) for children or anterior teeth, with a 4 × 4 inch size as well, or as a roll that is cut to length. A larger square covers more of the face and suits posterior isolation; a smaller one is quicker for a single front tooth.
Thickness is sold as a gauge. Thin dam stretches easily and slips through tight contacts, which is why many clinicians like it for endodontics, where usually only one tooth is isolated. Medium is the all-round choice. Heavy and extra-heavy dam grips the neck of the tooth harder and pushes the gingiva back further, which helps with cervical restorations, but it is harder to stretch over a clamp. One maker sells four gauges, listed in the table below, each to a tolerance of ±0.002 in, in 5 × 5 and 6 × 6 inch squares and on rolls.
Colour is mostly about contrast. Dark shades such as blue, green or grey make the tooth stand out and cut glare from the operating light, while pale shades let more light through. Patients and staff with a latex allergy need a latex-free sheet, usually made from nitrile or a synthetic polymer. Manufacturers often colour latex-free dam differently (purple is common), but always confirm latex-free status on the packet rather than by colour, and record any allergy in the medical history before the appointment.
Natural latex dam perishes with age and warmth, so store it somewhere cool (one maker advises below 26 °C) and use it before the date printed on the box. Non-latex dam copes better with temperature but still keeps best at ordinary room temperature.
| Gauge | Nominal thickness | Typical choice |
|---|---|---|
| Thin | 0.006 in (about 0.15 mm) | Tight contacts; single-tooth endodontic isolation |
| Medium | 0.008 in (about 0.20 mm) | General restorative work |
| Heavy | 0.010 in (about 0.25 mm) | Firmer grip and more gingival retraction, for example cervical restorations |
| Extra heavy | 0.012 in (about 0.30 mm) | Maximum retraction; hardest to stretch over a clamp |
Marking and punching the holes
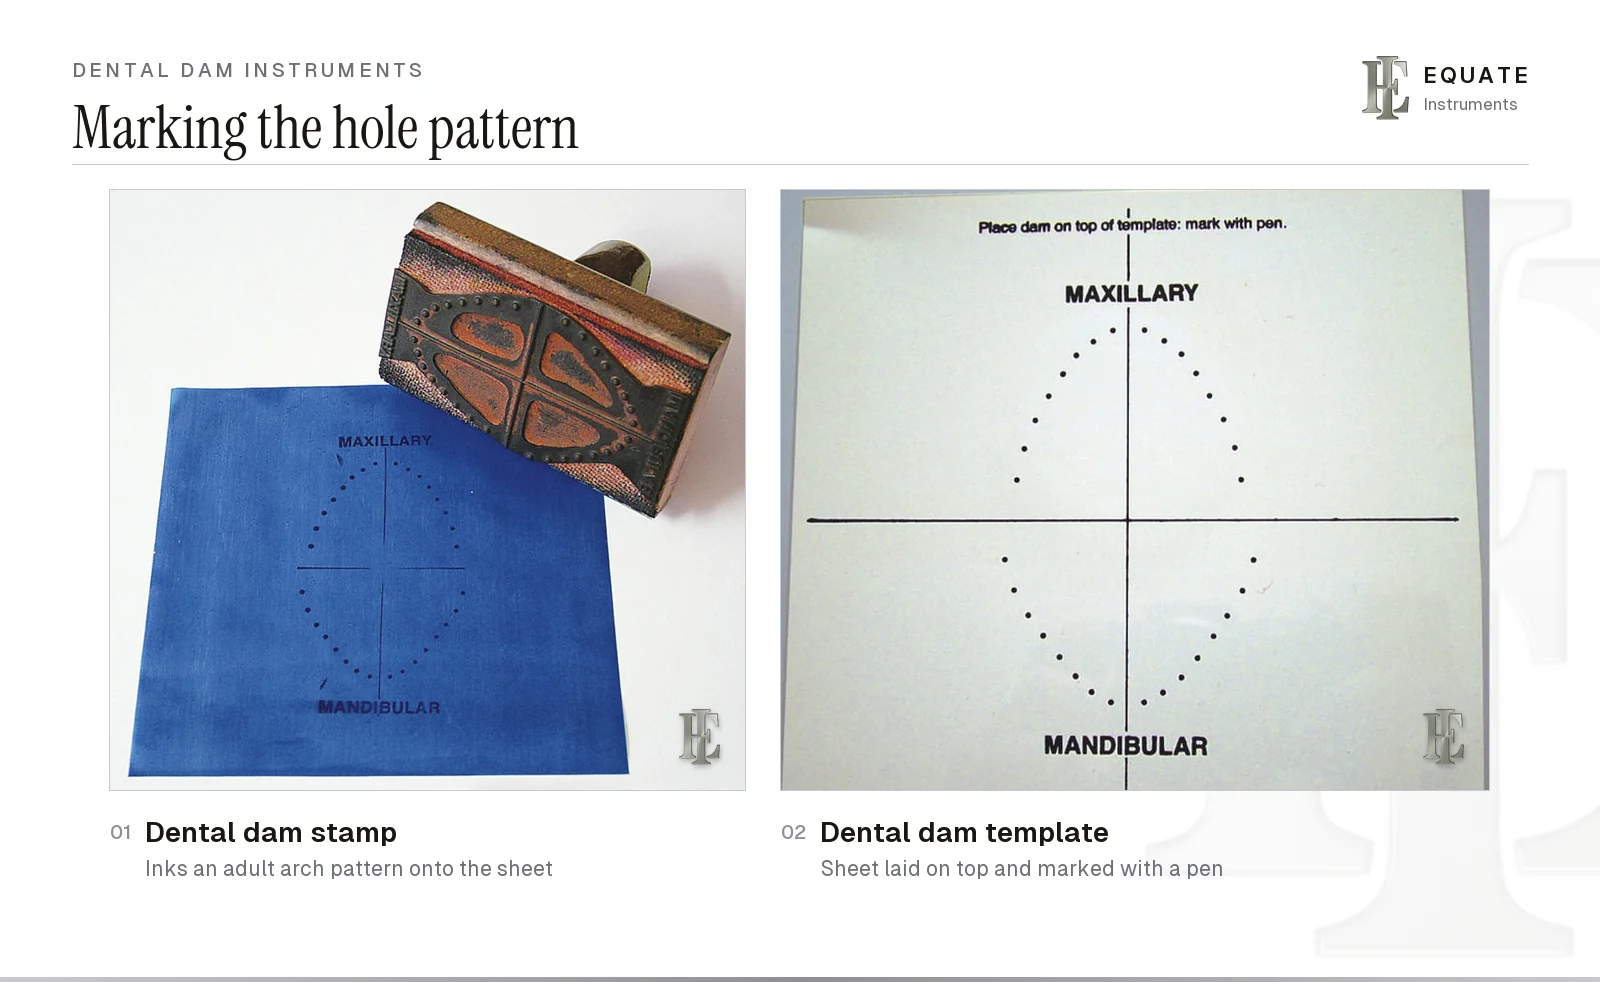
Hole position decides whether a dam seals. Before marking, check the mouth: missing, crowded, rotated or tilted teeth all move where the holes need to be. A rubber stamp prints an ink pattern of the adult dentition straight onto the sheet. A template is a stiff plastic or card guide with the same pattern of dots; the sheet is laid over it and the chosen positions are marked with a pen. Neither touches the patient, so both are cleaned and disinfected as their maker directs rather than sterilised.
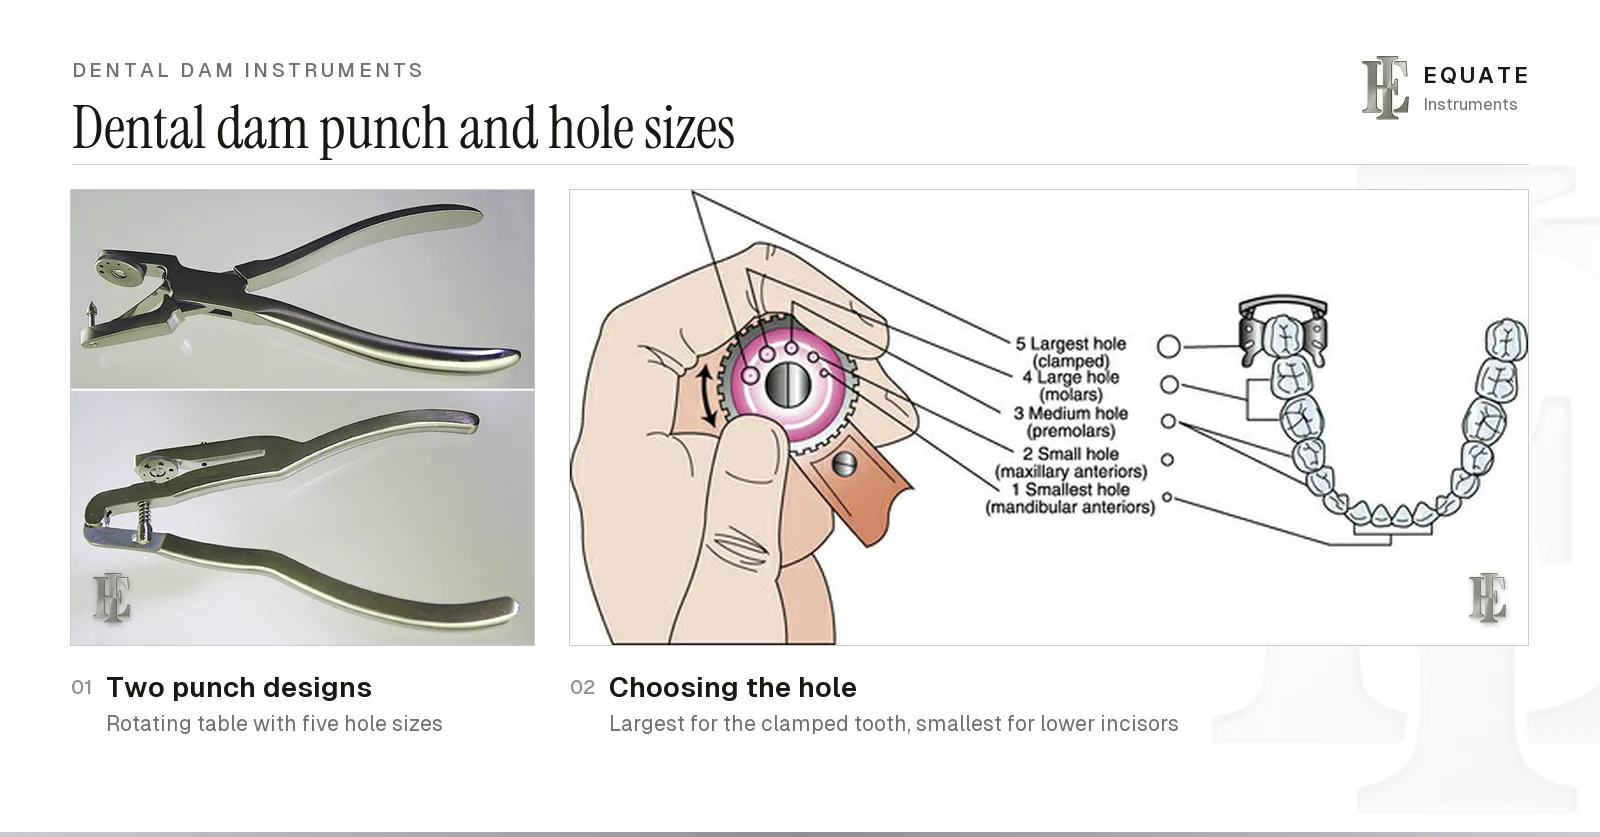
The punch is a plier with a rotating table (sometimes called the wheel or disc) carrying five holes of different diameters, and a pointed punch pin on the other jaw. The table is turned until the right hole sits under the pin, and squeezing the handles drives the pin through the dam into the hole, giving a clean round cut. Ragged or incomplete holes are the main reason a dam leaks or tears, and they usually mean the pin has been dulled or is landing off-centre on the table. Equate's range includes both Ainsworth and Ivory-pattern punches, and both work this way.
Leave a septum of roughly 3 mm (up to 3.5 mm) of dam between neighbouring holes. A thinner septum tears when it is stretched through the contacts; a wider one bunches between the teeth and lets fluid through. Upper teeth are punched towards the top edge of the sheet and lower teeth towards the bottom edge, so the dam hangs evenly around the mouth. Non-latex dam behaves differently when stretched, and one maker suggests punching it one hole size smaller than the chart gives for latex. Charts also vary between manufacturers: some group the canines with the premolars at No. 3.
| Punch hole | Size | Typical tooth (adult dentition) |
|---|---|---|
| No. 5 | Largest | The clamped anchor tooth |
| No. 4 | Large | Molars |
| No. 3 | Medium | Premolars |
| No. 2 | Small | Upper central and lateral incisors, upper and lower canines |
| No. 1 | Smallest | Lower central and lateral incisors |
Dental dam clamp forceps
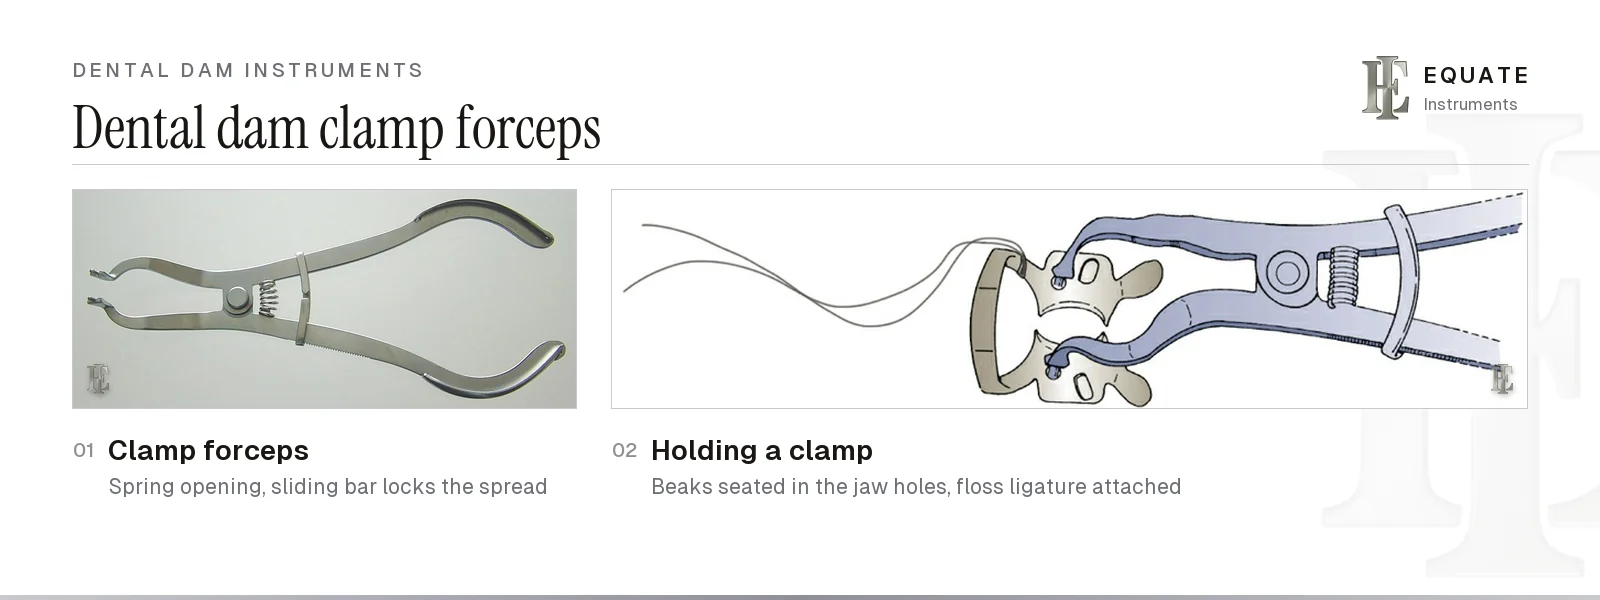
Clamp forceps spread a clamp open, carry it into the mouth, seat it on the tooth and lift it off again at the end. Their beaks are small, angled points that drop into the two holes in the clamp's jaws. Squeezing the handles opens the beaks against a spring, and a sliding bar or ratchet between the handles holds them at that spread, so the clamp can be positioned without the clinician having to keep a full grip.
Several named patterns exist, the Brewer and Stocks patterns among them, and they differ mainly in beak angle, handle length and spring design. Some have smooth tips and others serrated tips, which are designed to grip the clamp holes more securely. Whatever the pattern, the beak tips must fit the clamp holes snugly: worn or spread tips let a loaded clamp spring off. Some forceps are designed to open sectional-matrix rings as well, though not every dam forceps spreads a ring far enough (matrix band retainers).
At removal the forceps reopen the clamp so it can be lifted clear of the tooth together with the dam, or after the septa have been cut. Keep the forceps on the tray beside the basic tray instruments for the whole procedure, so the clamp can be taken off quickly if it loosens or the dam has to come out.
Dental dam clamps: parts, winged and wingless
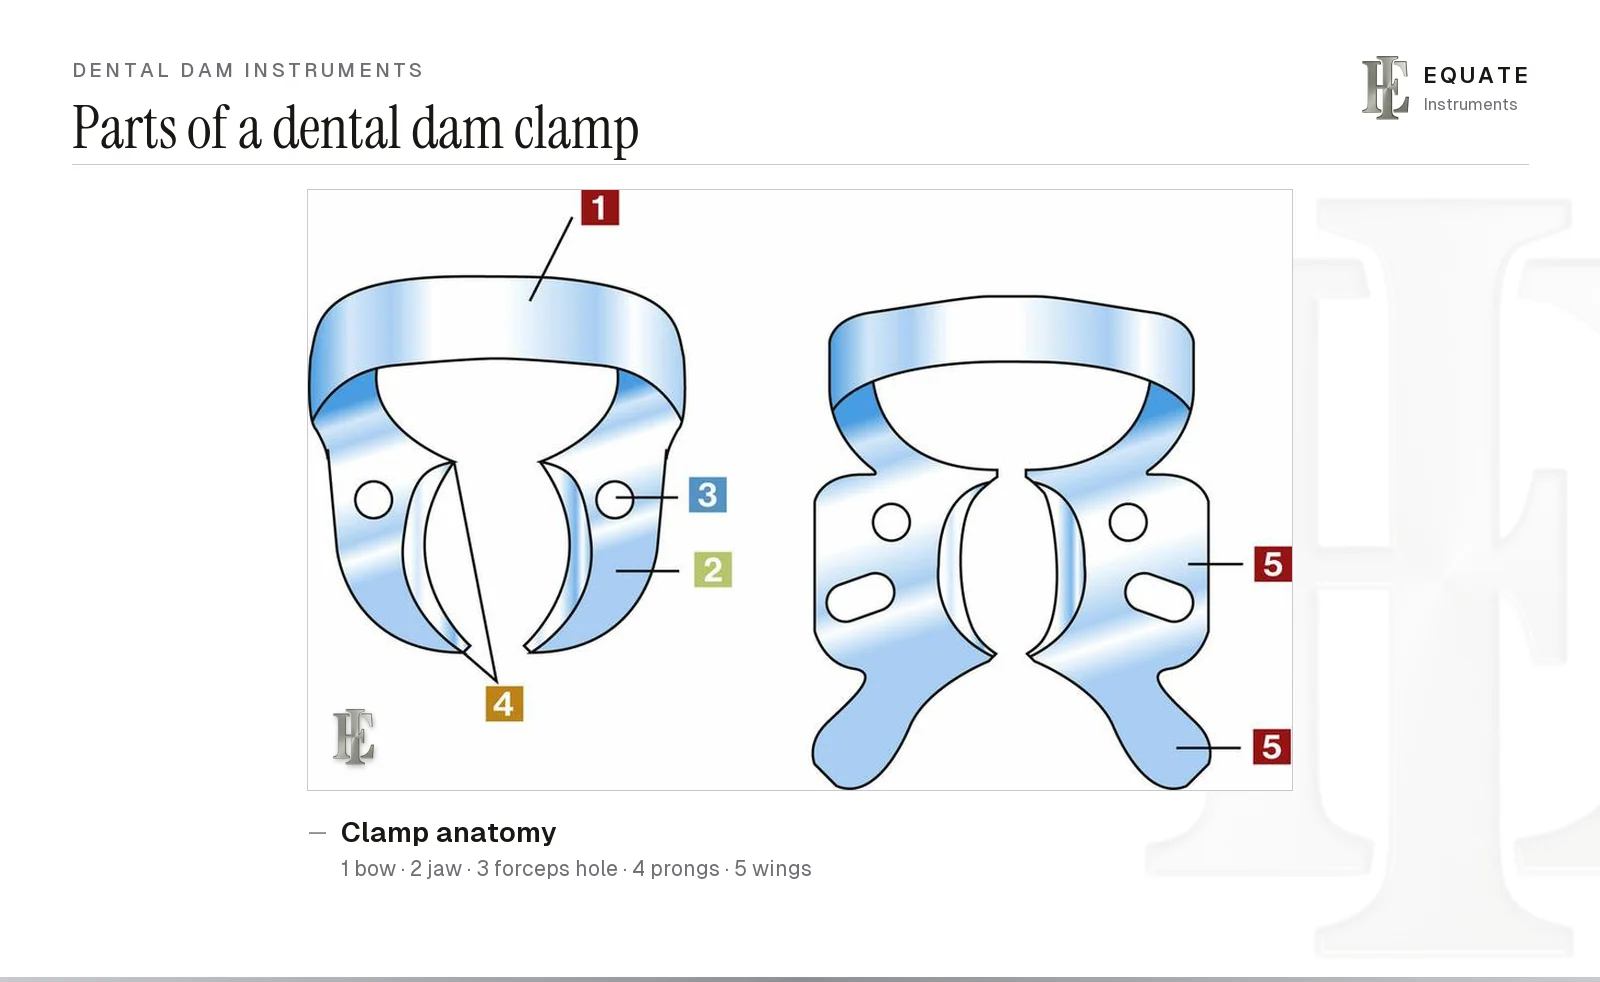
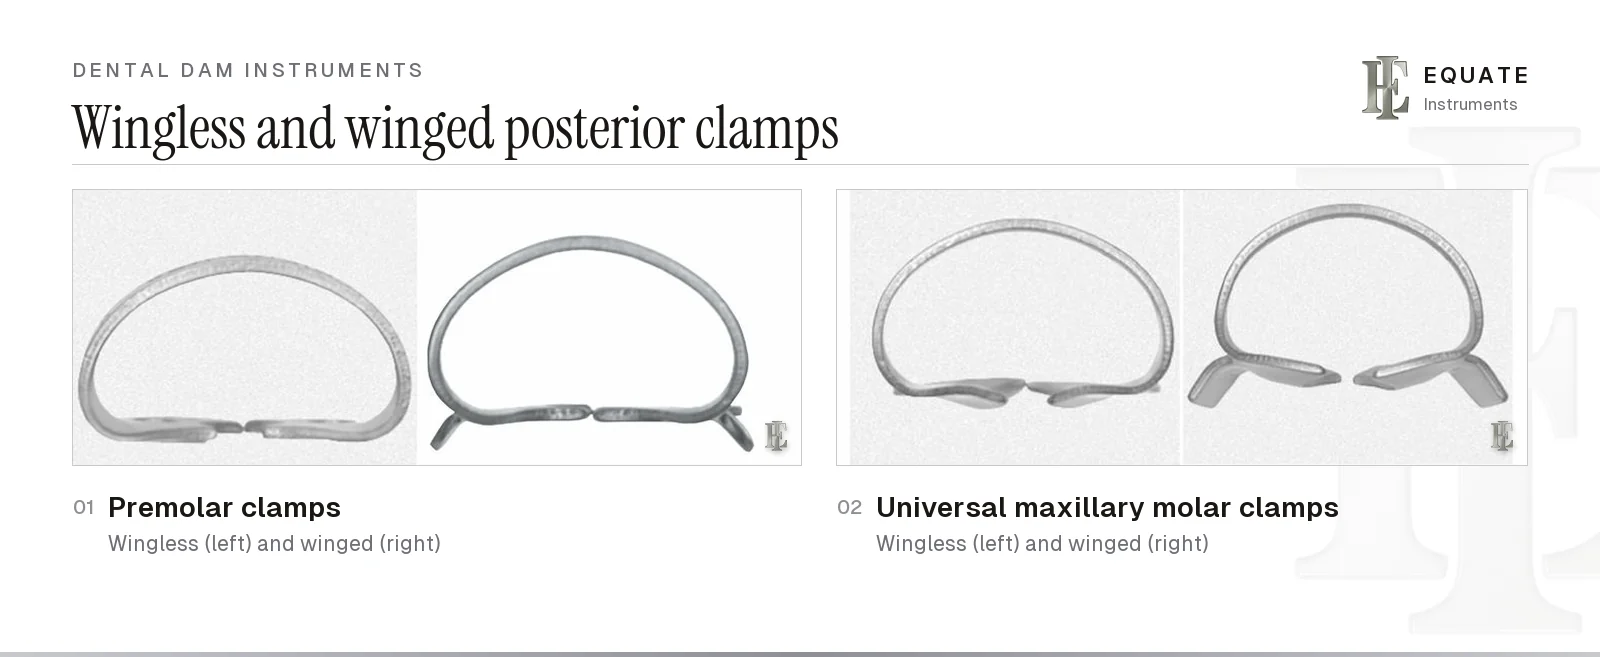
A clamp (also called a retainer) has a curved spring bow joining two jaws. Each jaw has a hole for the forceps beak and ends in two prongs, so four prongs in all grip the tooth. The prongs are meant to sit on the root side of the tooth's widest point (below the height of contour) so the clamp cannot ride up. The bow normally faces distally, away from the working area, so it does not get in the way of the handpiece or matrix.
Winged clamps carry an extra flange of metal on each side of the jaws. The wings hold the dam away from the tooth for a better view, and they allow the clamp, dam and sometimes the frame to be carried to the tooth together, with the sheet then flicked off the wings with a plastic instrument. Wingless clamps have no flange; they are smaller and easier to fit on short or partly erupted teeth, and either the clamp is seated first and the dam stretched over it, or the dam goes on first and the clamp is placed over it.
Every clamp needs a length of floss tied to the bow before it goes near the mouth. If the clamp breaks or springs off, the floss lets it be retrieved before it can be swallowed or inhaled. This is one of the few steps on any dental tray that is non-negotiable.
Choosing a clamp by tooth
Clamps are sized by tooth group and shaped by jaw design. A good fit is stable: when gently rocked with a finger, a well-chosen clamp stays put without the prongs pinching the gingiva. Try the clamp on the tooth, tied with floss, before the dam goes on. Common figure numbers include 9 or 212 for front teeth, 2 for lower premolars, 8 for upper and 7 for lower molars, and 14A for partly erupted molars; figure numbers by tooth are listed in the rubber dam clamp chart.
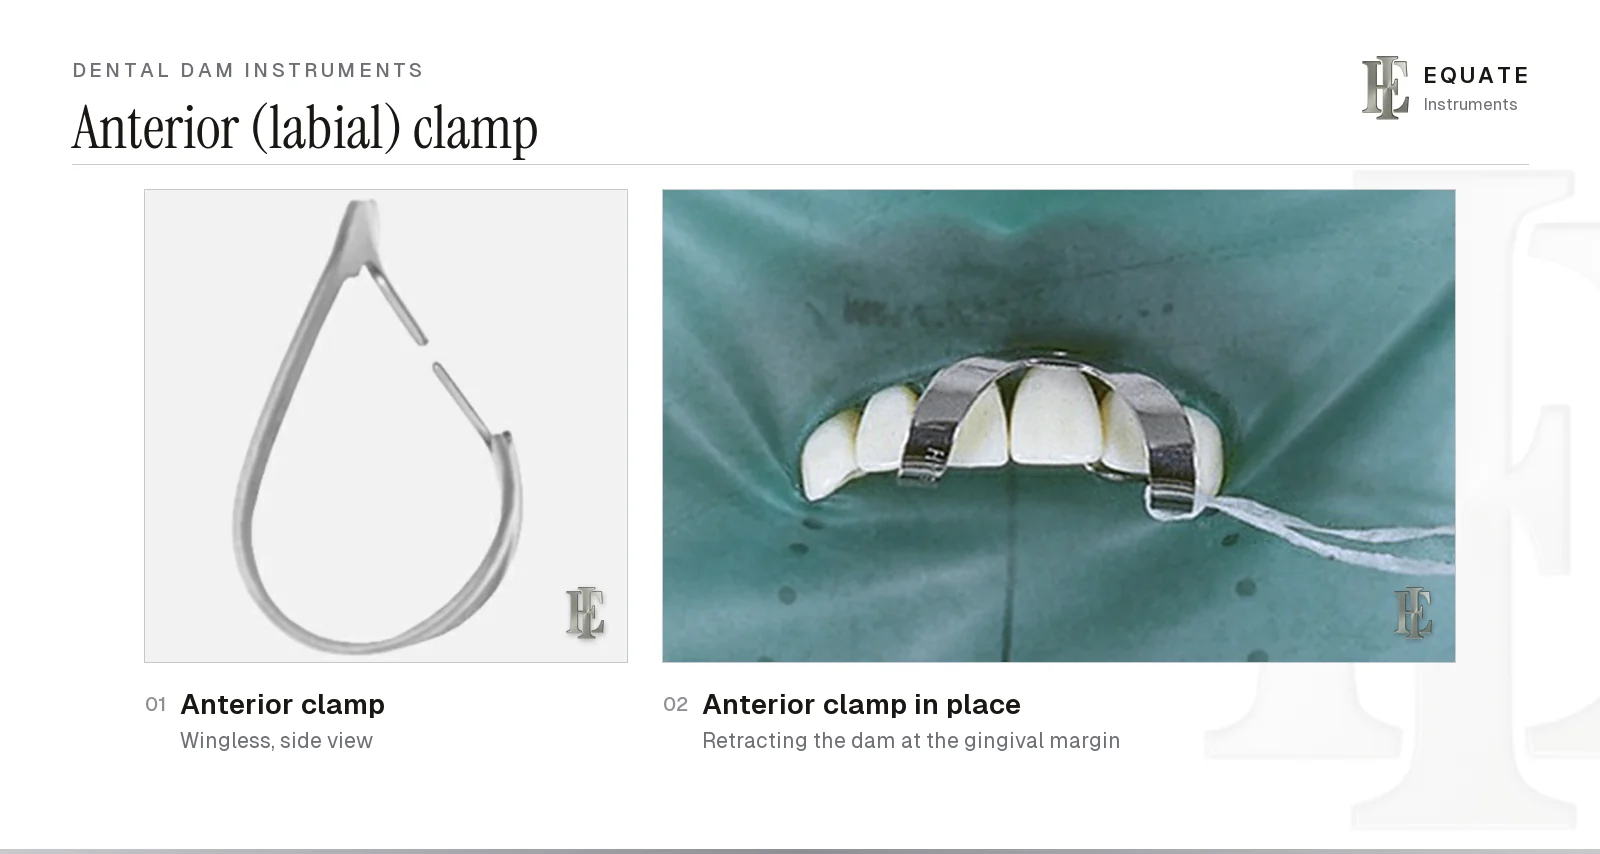
Anterior clamps are usually wingless and many have a double bow that arches over the neighbouring teeth, while the labial jaw pushes the dam and the gingiva back so cervical lesions can be reached. Premolar clamps are smaller with narrower jaws. Universal molar clamps fit either side of the arch; maxillary and mandibular patterns differ in jaw shape to match upper and lower crown forms. Clamps with deeply festooned or sharply angled jaws reach further down a broken-down or partly erupted tooth, at the cost of more gingival pressure.
When seating a clamp, open it only as far as it needs to pass the widest part of the crown, because overspreading tires the bow, and put the lingual jaw on first before rolling the buccal jaw down into place. The whole placement sequence is on the rubber dam tray setup page.
| Clamp group | Where it is used | Common features |
|---|---|---|
| Anterior (labial) | Incisors and canines, often for cervical work | Wingless; often a double bow over the adjacent teeth; labial jaw retracts the gum |
| Premolar | Upper and lower premolars | Small jaws; winged or wingless |
| Universal molar | Left or right molars of one arch (maxillary and mandibular versions) | Flat or festooned jaws; winged or wingless |
| Upper or lower molar | Molars of one jaw, sometimes one side only | Jaw curvature matched to that arch |
| Deep or serrated jaw | Broken-down, short or partly erupted teeth | Prongs angled down to grip below the gum line |
Dam frames and preframed dams
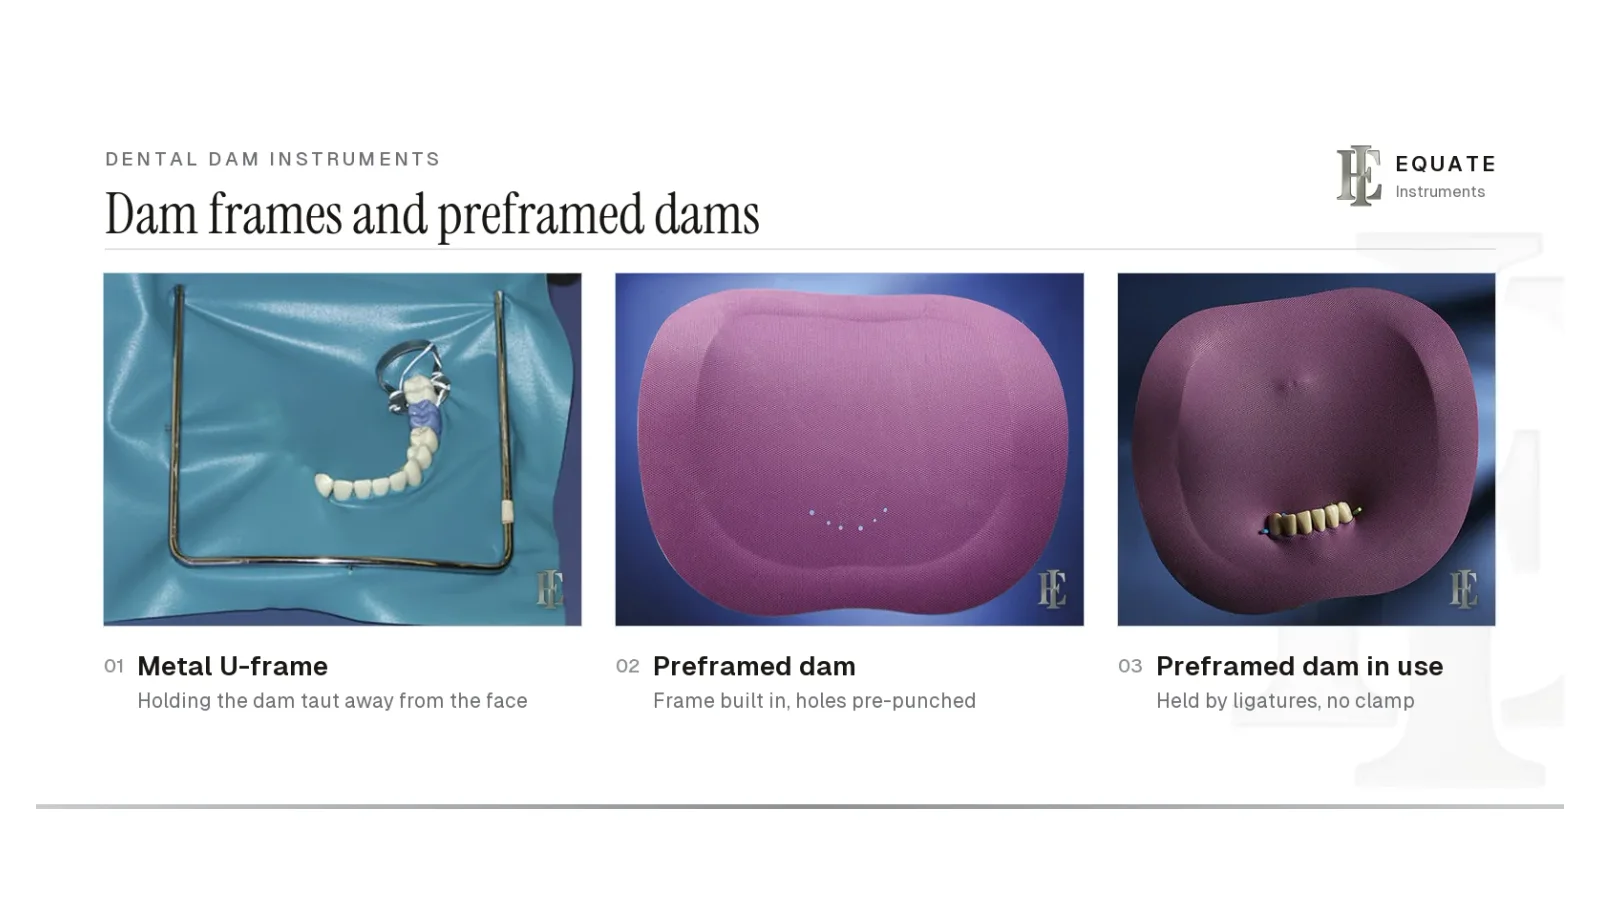
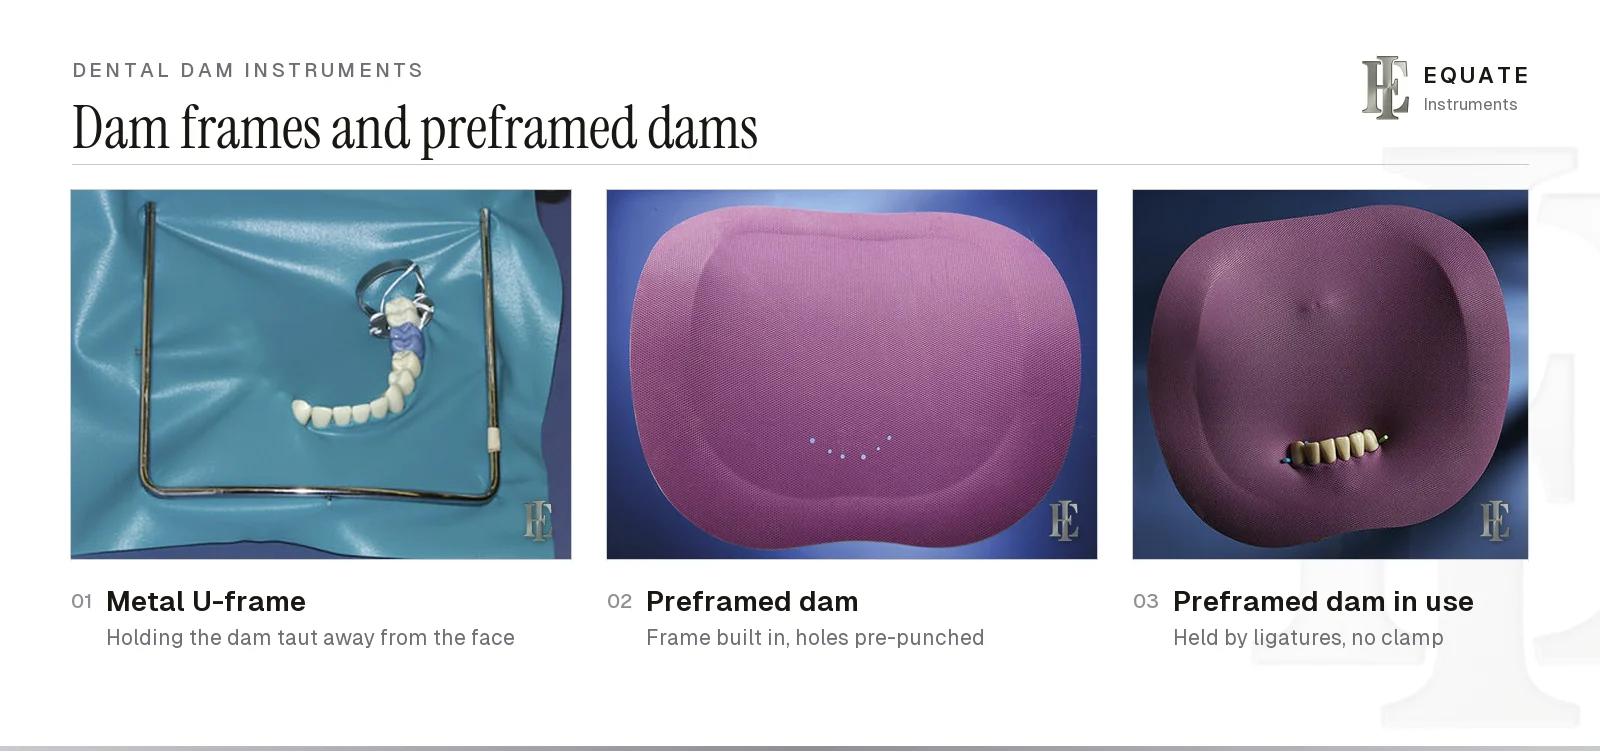
A frame holds the dam taut and away from the patient's face, opening up the field and keeping the sheet off the lips. Metal U-shaped frames, such as the Young frame, have small pins along their arms that hook through the edge of the dam. The Nygaard-Østby frame is an oval design made in both plastic and metal. Only plastic frames are radiolucent, so they can stay in place while radiographs are taken, which is particularly handy for working-length films in endodontics; a metal frame shows on the image. The frame goes on the outside of the dam, with the open end of the U towards the nose.
Preframed dams combine sheet and frame in one disposable unit. Some come with holes already punched and can have extra holes added. The sheet can usually be swung to one side to make room for a radiograph sensor. Preframed and pre-punched dams save time for single-tooth work, but they are single use, and like any dam they still need careful hole placement and a reliable way of holding them at the tooth: a clamp, or ligatures such as floss or elastic cord when the anchor tooth does not need a clamp.
Boyd's dental dam tray at a glance
Boyd's tray photograph lays the setup out in two columns: the sheet, floss, a plastic frame and crown-and-bridge scissors on one side, and on the other a beavertail burnisher, clamp forceps, a clamp with its floss ligature, and the punch. Any tray built from the same items works, as long as everything is in reach before the patient sits down.
Most failed dams come back to a short list of slips: a clamp with no floss on it, holes punched too close together, jaws resting on the gum, a frame pulled so tight that it lifts the clamp, or a torn scrap of dam left between the teeth.
- Before: check the history for latex allergy, look at the arch, then mark and punch the sheet.
- Placement: ligated clamp on the anchor tooth, dam over the clamp and through the contacts, frame on, edges inverted.
- Removal: cut the septa, take off the clamp, lift dam and frame away and hold the sheet up to check nothing is missing. Step-by-step placement and removal are on the rubber dam tray setup page.
Cleaning and sterilising dental dam instruments
Clamps and clamp forceps go into the mouth, while the punch and frame are handled during the procedure and sit close to the field; Boyd recommends heat sterilising all four between patients. Both the CDC's Guidelines for Infection Control in Dental Health-Care Settings (Kohn and colleagues, 2003) and HTM 01-05 for dental practices in England expect heat-tolerant reusable instruments to be cleaned and then heat sterilised (see the sterilisation and protective equipment guide). Follow the reprocessing instructions the manufacturer provides and your national regulations.
- Hinged instruments: clean and sterilise the punch and clamp forceps open and unlocked, so steam reaches the joint, the spring and the inside of the punch table.
- Clamps: clean off debris and sterilise in a pouch or wrapped cassette with an internal process indicator; check both the external and internal indicators before use.
- Inspect clamps after every cycle. Repeated heating and spreading fatigues the bow, so discard any clamp with a crack, a sprung bow or prongs that no longer meet evenly.
- Inspection and lubrication: HTM 01-05 recommends checking instruments under an illuminated magnifier after cleaning, and using a non-oil-based lubricant on hinged instruments that have gone stiff, so steam can still reach the metal.
- Punch care: keep the pin and table clean and dry; a pin that no longer cuts cleanly should be replaced from the maker's spare parts rather than forced.
- Plastic frames: autoclave only if the maker states they are heat tolerant; otherwise follow their disinfection instructions.
- Single use: dispose of dam sheets, preframed dams and floss ligatures after one patient according to your national healthcare waste regulations. Stamps and templates are disinfected as their manufacturer recommends.
Buying dental dam instruments: what to check
- Kit or loose: a complete kit (punch, forceps, frame and a clamp set) is the simplest start; replace clamps individually as they wear or as your case mix demands.
- Clamp range: at minimum an anterior, a premolar, and universal upper and lower molar clamps, in both winged and wingless forms if you use more than one placement technique.
- Punch: a table that turns firmly and clicks into each position, and a pin that lands dead centre in every hole.
- Forceps: beak tips that fit your clamps' holes closely, a spring with even tension and a reliable holding bar.
- Frames: a metal U-frame for general use, plus a radiolucent plastic frame if you take radiographs with the dam in place; all of Equate's frames are stainless steel.
- Material: passivated stainless steel that tolerates repeated steam sterilisation without pitting, staining or losing spring.
- Clamp numbers by tooth and Equate's kits: rubber dam instruments.
- See the restorative dental instruments guide for the instruments that usually work alongside the dam.
The Equate difference
Equate's catalogue lists 71 individual rubber dam clamps (9 anterior, 13 premolar, 12 universal and 37 upper or lower molar clamps), three 13-piece clamp sets, 11 clamp forceps, 4 dam punches and a punch spare-parts kit, 5 dam frames and 5 complete rubber dam kits. Equate does not supply dam sheets, stamps or templates.
Equate Dental Dam Instruments Explained, from Sheet to Frame options

Ainsworth Rubber Dam Punch 17cm
EI-0724
Ivory-Pattern Rubber Dam Punch 16cm
EI-0725
Rubber Dam Clamp Forceps 17cm
EI-0727
Rubber Dam Clamp Forceps, Stocks Pattern - 17 cm
EI-0728
Brewer Rubber Dam Clamp Forceps 17cm
EI-0729
Brewer Rubber Dam Forceps
EI-0730
Rubber Dam Clamp Forceps, Stocks Pattern - 17 cm
EI-0731
Rubber Dam Clamp Forceps - Straight Beaks
EI-1504
Rubber Dam Punch Plier, New Design, 17 cm
EI-2372
Rubber Dam Punch Plier, New Design, Spring-Loaded, 17 cm
EI-2373
Rubber Dam Clamp Forceps - Angled Beaks
EI-2374
Rubber Dam Clamp Forceps, Serrated, Color-Coded Handles
EI-2375Browse all prosthodontic & laboratory instruments Browse all oral surgery instruments
Buying in your market
Frequently asked questions
What instruments do you need to place a dental dam?
A dam sheet, a stamp or template to mark the holes, a dam punch, clamp forceps, a clamp chosen for the anchor tooth with floss tied to it, a frame, floss for the contacts, a burnisher or plastic instrument to tuck the dam edge, and scissors to cut it free at the end.
Which dental dam punch hole is used for which tooth?
On a five-hole punch, No. 5 (largest) is for the clamped anchor tooth, No. 4 for molars, No. 3 for premolars, No. 2 for upper incisors and both upper and lower canines, and No. 1 (smallest) for lower incisors. Adjust for unusually large or small teeth.
What thickness (gauge) of dental dam should I use?
Medium suits most restorative work. Thin dam slips through tight contacts and is popular for single-tooth endodontics, while heavy and extra-heavy dam grip the tooth neck harder and hold the gum back better for cervical work, at the cost of being harder to stretch. One maker's gauges run from 0.006 to 0.012 in.
Is purple dental dam always latex-free?
No. Colour is each maker's own convention: Boyd shows a purple latex-free sheet, but one maker sells latex dam in pink, blue and purple and its latex-free dam in purple and teal green. Check the packet label, not the colour, and record any latex allergy in the medical history.
Do patients mind having a dental dam?
Most do not. In a Czech survey of 150 patients, 86% said they would choose a rubber dam again and 77% found treatment more comfortable with it. The usual complaints were not being able to talk (33%) and difficulty swallowing or breathing (21%), and patients who felt its purpose had not been explained well enough were much less likely to want it again, so explain it first.
Can dental dam clamps be sterilised and reused?
Yes. Stainless steel clamps are cleaned and heat sterilised between patients. Inspect them after each cycle and discard any with a cracked or sprung bow. Dam sheets and preframed dams are single use.
References
- Boyd LB. Dental Instruments: A Pocket Guide, 7th edition. Saunders/Elsevier, 2020 (photographs used under licence)
- European Society of Endodontology. Quality guidelines for endodontic treatment: consensus report of the European Society of Endodontology. International Endodontic Journal 2006;39(12):921-930
- American Association of Endodontists. AAE Position Statement: Dental Dams (2024)
- Miao C, et al. Rubber dam isolation for restorative treatment in dental patients. Cochrane Database of Systematic Reviews 2021, CD009858
- Kohn WG, et al. Guidelines for Infection Control in Dental Health-Care Settings, 2003. MMWR 52(RR-17), Centers for Disease Control and Prevention
- Department of Health and Social Care. Health Technical Memorandum 01-05: Decontamination in primary care dental practices, 2013 edition
- Lin PY, Huang SH, Chang HJ, Chi LY. The effect of rubber dam usage on the survival rate of teeth receiving initial root canal treatment: a nationwide population-based study. Journal of Endodontics 2014;40(11):1733–1737
- Kapitan M, Hodacova L, Jagelska J, Kaplan J, Ivancakova R, Sustova Z. The attitude of Czech dental patients to the use of rubber dam. Health Expectations 2015;18(5):1282–1290
- Coltene/Hygenic. Dental Dam Procedures: Basic Techniques (technique booklet 40002739H)
I am a…
Related
- Rubber Dam Clamps, Forceps, Punches and Frames: Which to Choose
- Rubber Dam (Dental Dam) Tray Setup and Placement
- Basic Dental Instruments: Mirror, Explorer, Cotton Forceps and Handles
- Amalgam Restorative Instruments: What Each One Does
- Restorative Dental Hand Instruments
- Dental Burnishers: Ball, Football, Acorn, T-Ball and Beavertail
- Dental Surgical Scissors
- Dental Evacuation Devices, the Air/Water Syringe and the Dental Unit
- Dental Handpieces: Types, Attachments and Reprocessing
- Composite Restorative Instruments, from Matrix Band to Finishing Strip
- Endodontic Instruments for Root Canal Treatment
- Endodontic Tray Setup: Opening and Sealing a Tooth
- Dental Sterilisation and Protective Equipment