Dental Hygiene Instruments: Curettes, Sickle Scalers, Ultrasonic Inserts and Sharpening
Written by the Equate Instruments Technical Team · Reviewed by the Medical & Dental Board, Equate Instruments · Updated ·
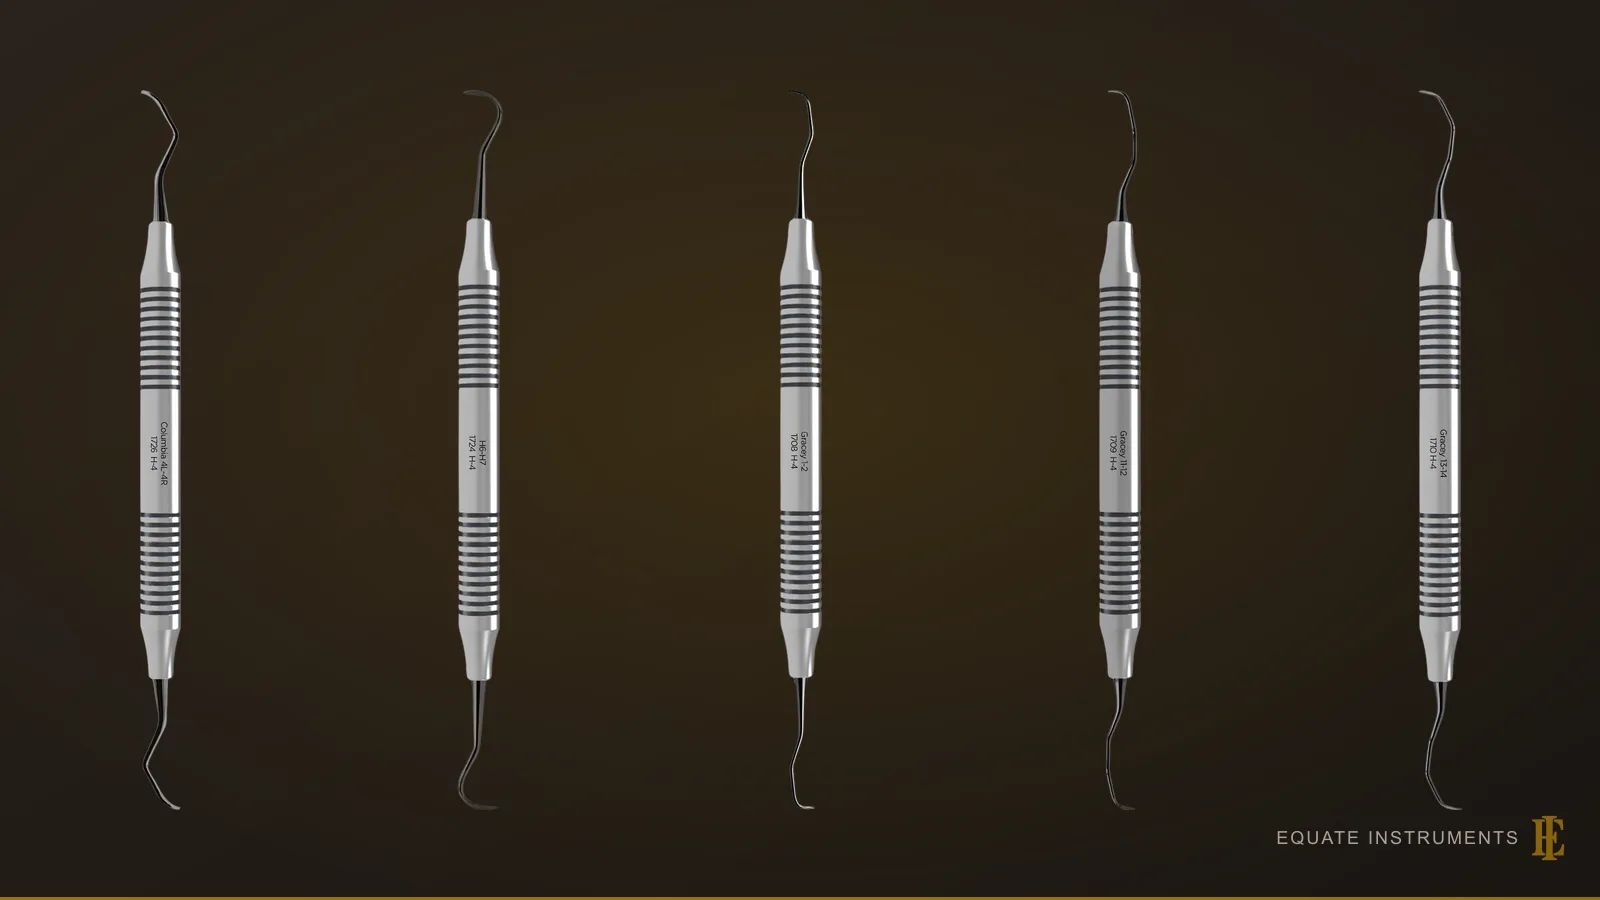
Dental hygiene instruments are the hand and powered tools used to remove calculus, biofilm and stain from teeth and root surfaces. The core set is sickle scalers for deposits above the gumline, universal and area-specific (Gracey) curettes for work below it, ultrasonic scaler inserts, non-metal scalers for implants, and the sharpening stones that keep every blade working.
Key points
- Sickle scalers have a pointed tip and belong above the gumline; curettes have a rounded toe and back, so they can work safely inside a periodontal pocket.
- A universal curette uses both cutting edges anywhere in the mouth, while a Gracey curette has an offset blade with one working edge designed for a particular group of teeth and surfaces.
- Reusable scalers, curettes and ultrasonic inserts are cleaned, pouched with a process indicator and heat sterilised (usually by steam) after each patient; single-use tips are discarded, and hand instruments need regular sharpening.
What are dental hygiene instruments?
Hygiene instruments do one job in many shapes: they lift hard and soft deposits off enamel and root surfaces without damaging the tooth or the gum around it. Linda Bartolomucci Boyd's Dental Instruments: A Pocket Guide (Elsevier) groups them into curettes, sickle scalers, implant scalers, powered ultrasonic scalers with their inserts, and the stones and devices used to sharpen them.
A hygiene appointment starts with the basic setup of mirror, explorer and cotton forceps, and a periodontal probe to chart pocket depths. The scaling instruments are then chosen by where the deposit sits: above the gingival margin, below it, on a root in a deep pocket, in a furcation or on an implant. Hoes and periodontal files are covered in the periodontal instruments guide.
| Instrument | Where it works | Blade or tip | Typical use |
|---|---|---|---|
| Sickle scaler | Supragingival | Two edges meeting in a sharp point; triangular cross-section | Heavy calculus on crowns, contact areas of anterior teeth |
| Universal curette | Supra- and subgingival, any tooth | Two working edges, rounded toe and back; face at 90° to the lower shank | Light to moderate calculus, general scaling |
| Area-specific (Gracey) curette | Subgingival, one area of the mouth | Offset blade at 70°; only the lower edge works | Root debridement and root planing |
| Extended-shank or mini-bladed curette | Deep or narrow pockets, furcations | Longer terminal shank, or a blade about half the usual length | Pockets of 5 mm or more, narrow roots |
| Implant scaler | Around implant crowns and abutments | Resin, plastic or titanium-compatible tip | Implant maintenance without scratching |
| Ultrasonic insert | Supra- and subgingival | Water-cooled tip vibrating at ultrasonic frequency | Calculus, biofilm and stain removal |
Universal curettes: one blade for every tooth
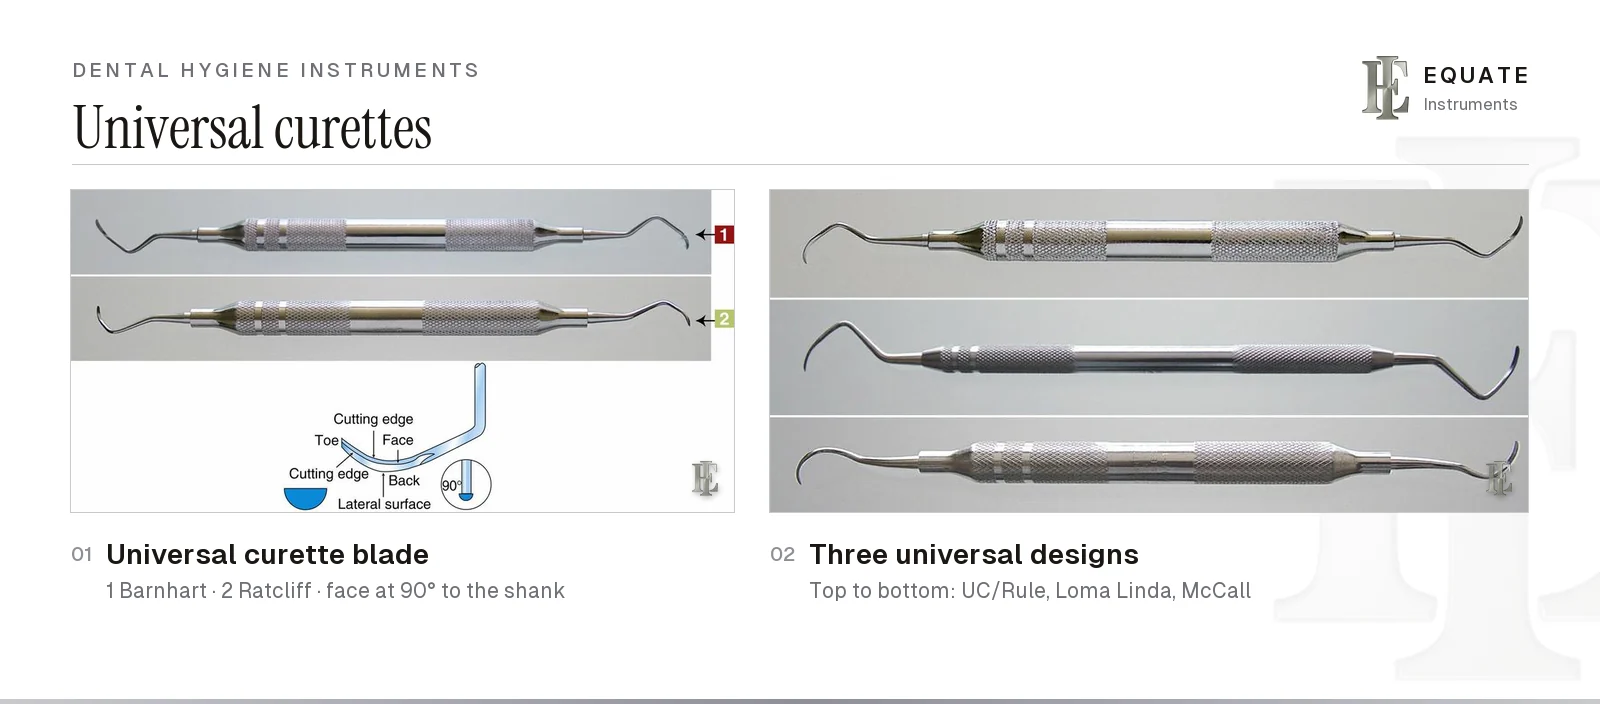
A universal curette has a spoon-shaped blade with a rounded toe and a rounded back, and both edges of the blade are sharpened. Its face sits at a right angle to the lower (terminal) shank, so the clinician tilts the instrument a little to bring either edge against the tooth. Because the same working end adapts to mesial and distal surfaces of anterior and posterior teeth, a single double-ended universal can carry out most of a routine scale.
Designs differ mainly in shank length, shank rigidity and blade size. Columbia, McCall, Barnhart, Ratcliff, UC/Rule and Loma Linda patterns are all universal curettes; Columbia 4L-4R and McCall 13S-14S are common posterior choices, while the Barnhart 1-2 is a frequent anterior one. The Langer curette is a hybrid: a universal 90° blade on a Gracey-style shank with extra bends, which helps it reach posterior teeth. Compare blade and shank designs in the dental curettes guide.
Universal curettes are used on hygiene, periodontal and some restorative trays, for light calculus removal both above and just below the gumline. For heavy deposits or deep, tight pockets, sickle scalers and area-specific curettes do the job better.
Area-specific (Gracey) curettes
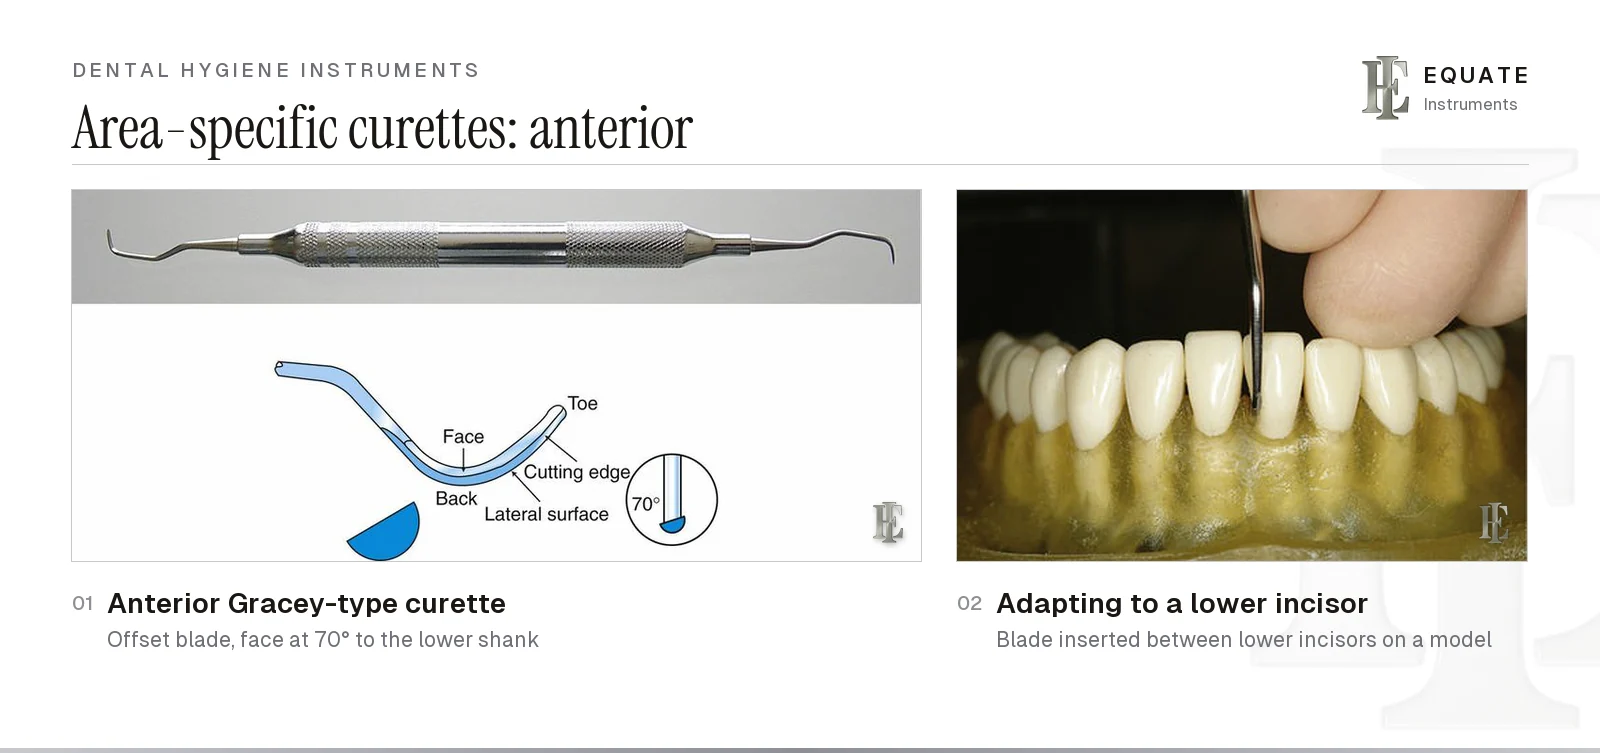
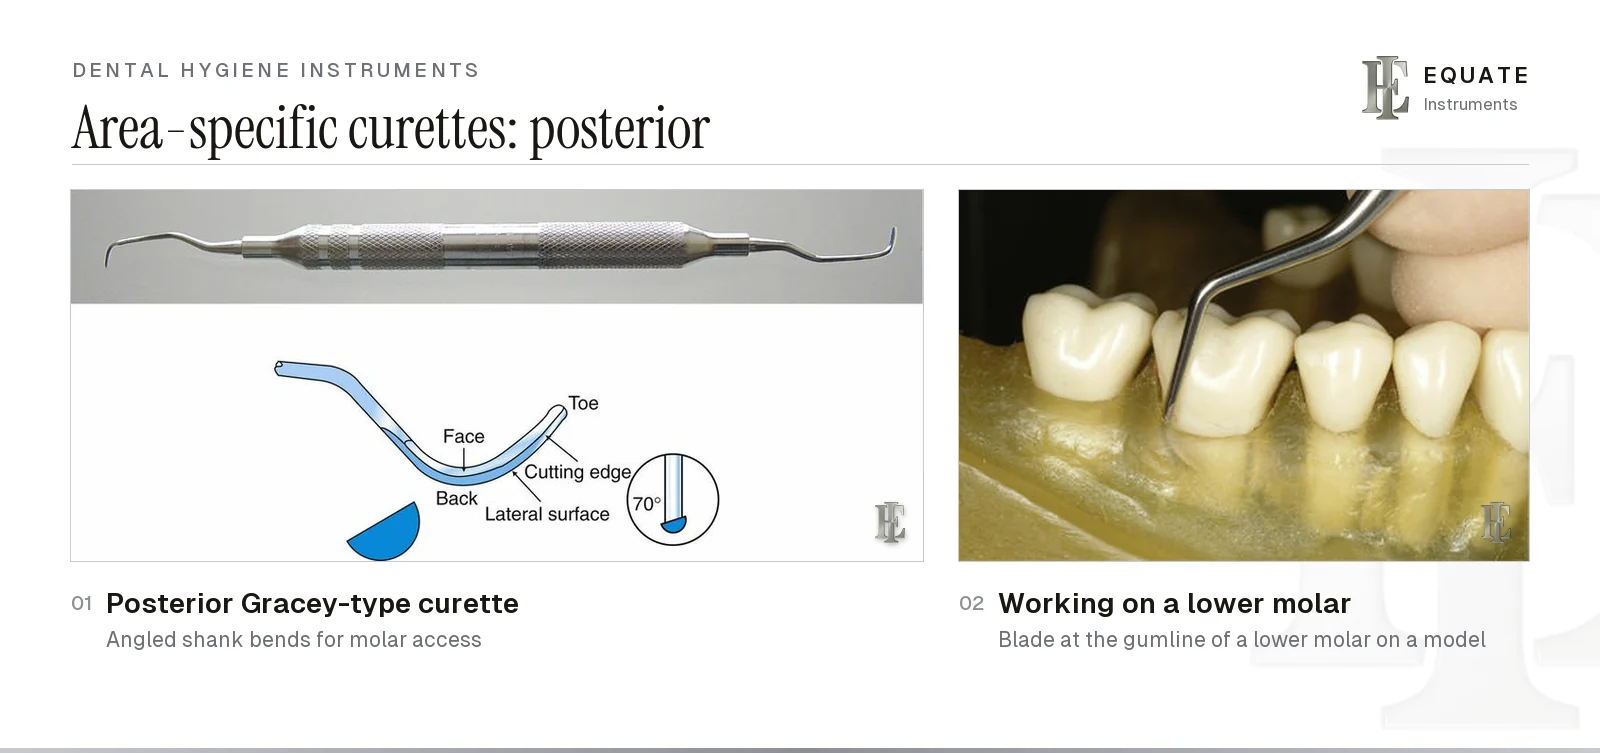
Area-specific curettes take their common name from Dr Clayton Gracey of the University of Michigan, who designed the original series in the early 1940s. Each blade is offset: the face is tilted at about 70° to the lower shank, so when the lower shank is held parallel to the tooth surface, the lower cutting edge meets the root at the correct working angle. Only that lower edge is used, and each instrument is curved to fit one group of teeth and surfaces.
Gracey curettes are numbered in pairs, and the numbers tell you where they work; the table follows the standard sequence set out in Gehrig's periodontal instrumentation textbook. Low numbers have short, simple shanks for anterior teeth; higher numbers have longer, more angled shanks for premolars and molars. Kramer-Nevins and Turgeon patterns follow the same area-specific idea. Rigid versions have a stiffer shank for tenacious calculus; standard versions flex more and give better tactile feedback.
| Gracey pair | Teeth | Surfaces |
|---|---|---|
| 1-2, 3-4 | Anterior teeth | All surfaces |
| 5-6 | Anterior teeth and premolars | All surfaces |
| 7-8, 9-10 | Premolars and molars | Facial and lingual |
| 11-12, 15-16 | Premolars and molars | Mesial |
| 13-14, 17-18 | Premolars and molars | Distal |
Extended-shank and mini-bladed curettes
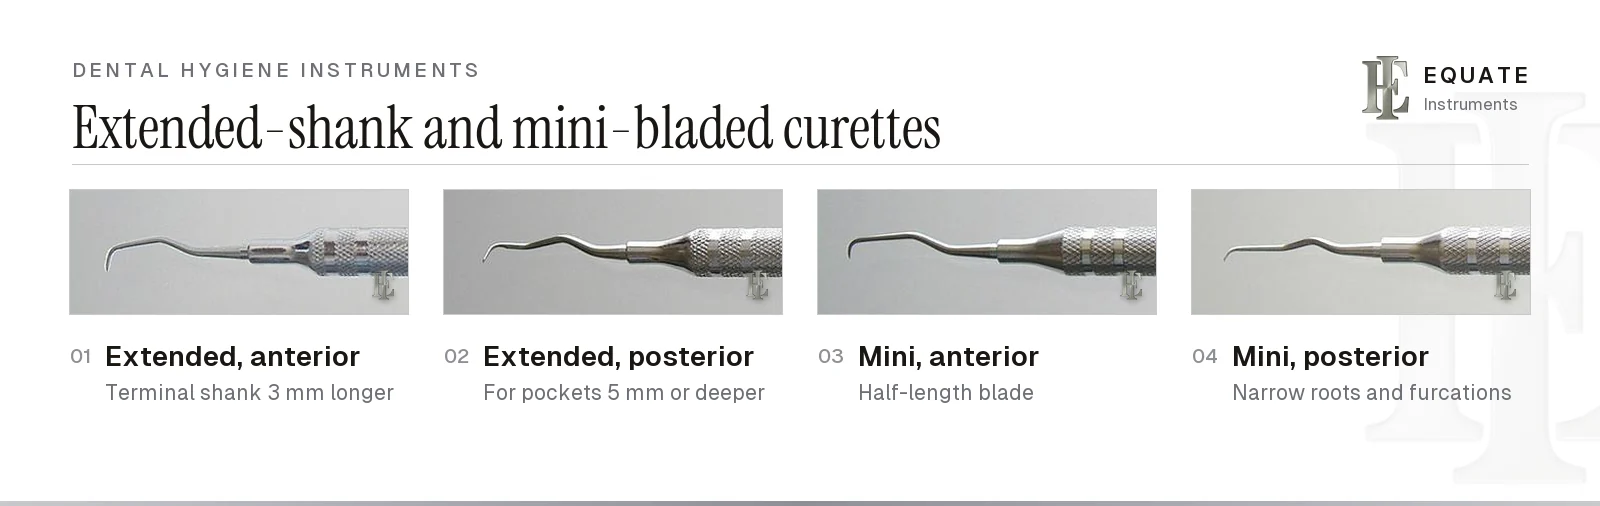
Standard Gracey blades often can't reach the base of a deep pocket without stretching the tissue. Extended-shank versions solve this with a longer terminal shank while keeping the familiar blade and numbering, so a clinician who knows the standard sequence needs no new technique. The usual rule of thumb is to switch to them once probing depths pass about 5 mm. They're usually bought as double-ended sets, with the low-numbered pairs for anterior teeth and 11-12 and 13-14 for posterior teeth.
Mini-bladed versions go one step further: the blade is about half the length of a standard or extended Gracey on the same long shank. The shorter, thinner blade fits narrow roots, line angles, tight pockets and furcation entrances, where a full-length blade would catch the tissue or bridge across the concavity. Micro-mini versions keep a short blade but have a slightly stiffer shank. The dental curettes guide compares the full range.
Sickle scalers: heavy deposits above the gumline
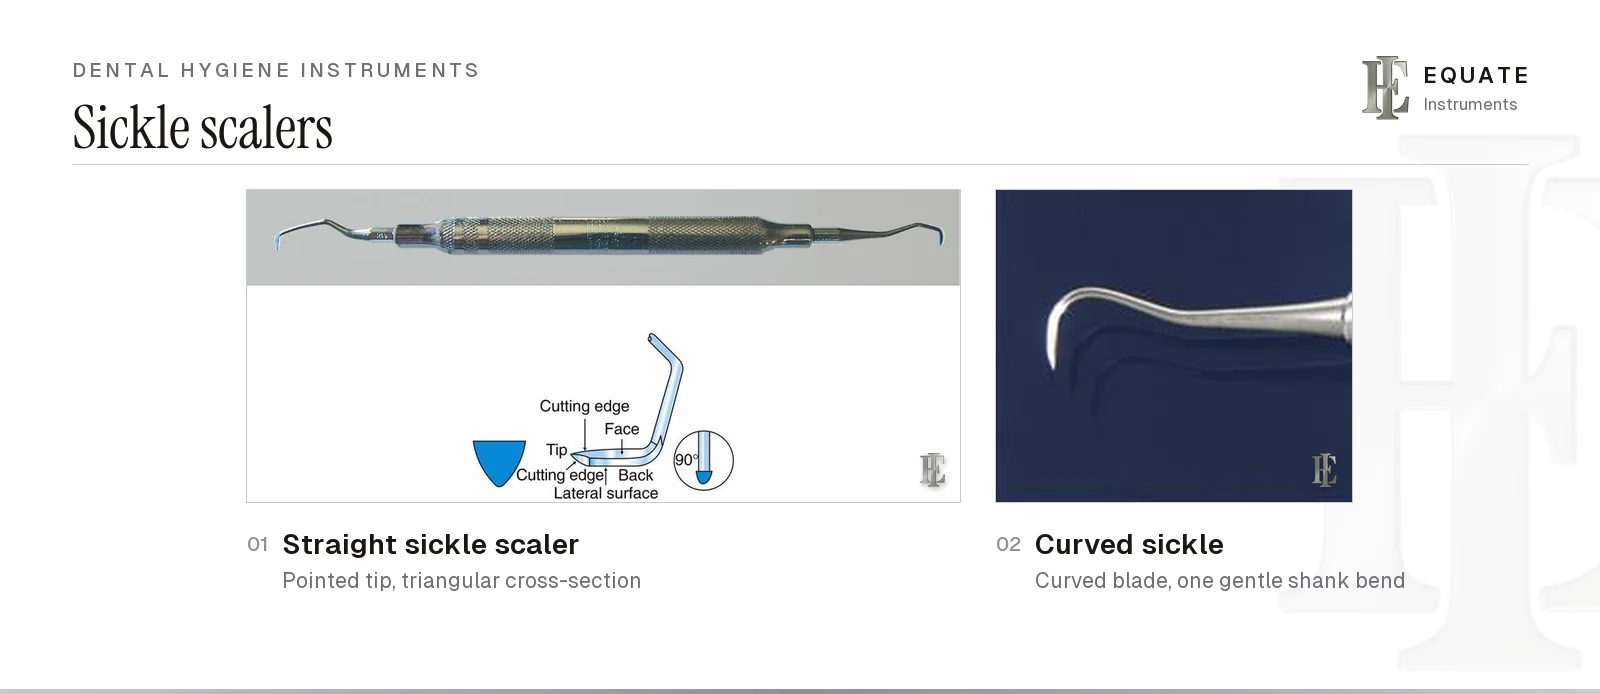
A sickle scaler has two cutting edges that converge in a sharp point, giving a blade that's triangular in cross-section. That point is ideal for getting into contact areas and lifting heavy calculus off enamel, but it's also why sickles are kept above the gingival margin: the sharp point and pointed back can tear the soft-tissue lining of the pocket.
Straight sickles have a straight blade and a shank with two bends, which suits anterior teeth. Curved sickles have a curved blade, usually on a long shank with one gentle bend, and adapt more easily to the convex crowns of premolars and molars. Many are double-ended, sometimes with two different blade shapes. Jacquette scalers are a close relative with a straight blade at the end of an angled shank. See the dental scalers guide for named patterns such as the H6-H7, Nebraska 128 and 204S.
Implant maintenance instruments
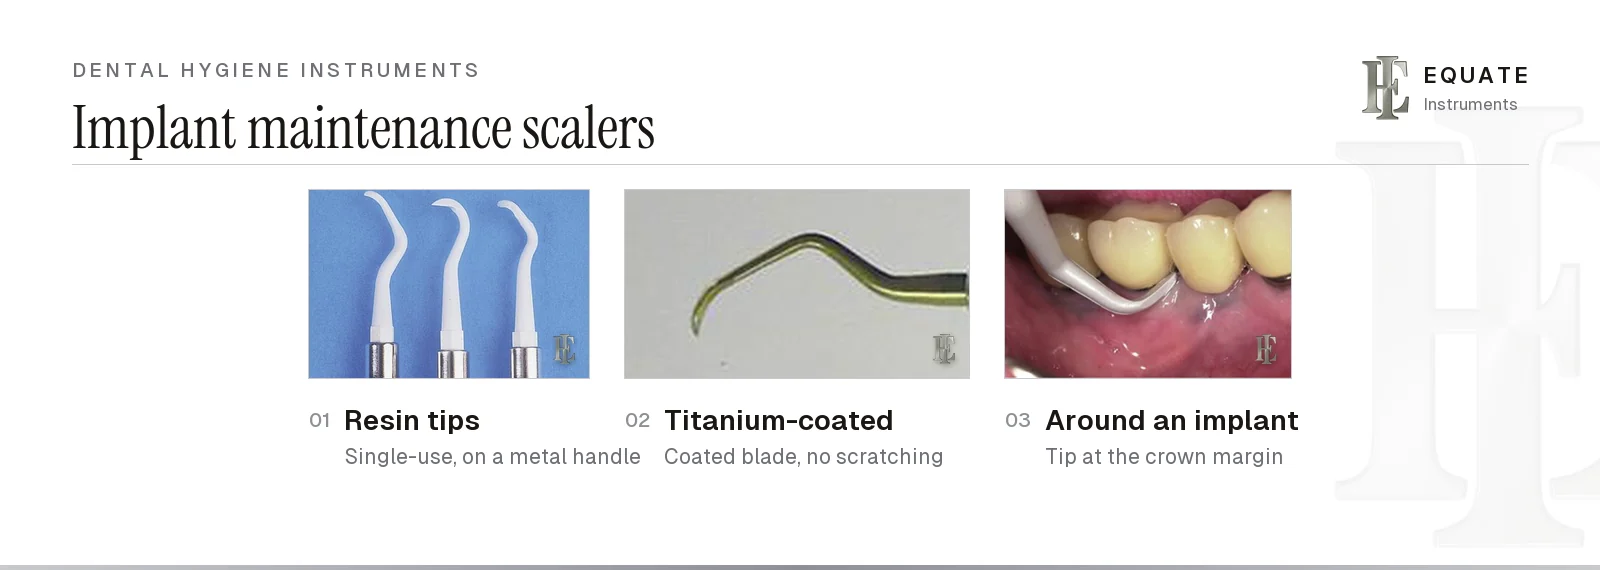
Implant crowns, abutments and exposed titanium surfaces need instruments that won't scratch them, because scratches hold biofilm. That's why implant scalers swap plain stainless steel for softer resin or plastic tips, or for a metal blade with a titanium-compatible coating. Where the tips are single-use, they arrive sterile or are sterilised before use, then go into a sharps container after the appointment while the handle is reprocessed. Coated metal implant curettes go through the same cycle as any other curette.
Implant scalers appear on hygiene and periodontal trays for patients with implants. Match the tip design to the surface: a resin tip for the crown margin and abutment, and a manufacturer-approved instrument for any exposed implant thread. Ultrasonic units also offer non-metal or coated inserts for implant work; SDCEP's instrument guidance shows ultrasonic tips fitted with a suitable plastic covering for use around implants. The same guidance reports that air polishing around implant-supported restorations has been shown to be safe in healthy patients, but asks for care where the tissues are inflamed.
Ultrasonic scalers and inserts
A powered scaler converts electrical energy into very fast vibrations at the tip, which shatter calculus and disrupt biofilm, while a water spray cools the tip and flushes debris. Ultrasonic scalers vibrate at roughly 18-50 kHz, and the two main types move their tips differently. Magnetostrictive units, the type Boyd describes, use a metal stack inside the insert, usually supplied as 25 kHz or 30 kHz inserts matched to the unit, while piezoelectric units use screw-on tips. Yousefimanesh and colleagues (2012) note that magnetostrictive units run at 18-45 kHz with an elliptical tip path, and piezoelectric units at 25-50 kHz with a mainly linear one. Some units add their own water reservoir or an air-polishing system for stain.
Insert tips come in several shapes, and the choice is mostly about bulk versus reach. Broad supragingival tips tolerate higher power and clear heavy calculus, stain and leftover cement quickly. Slim subgingival tips trade that power for access, so they run at lower settings. Ball-ended furcation tips fit root concavities, and universal tips handle general debridement. Water can be delivered through an internal channel or an external tube along the tip.
The European Federation of Periodontology's S3 guideline (Sanz and colleagues, 2020) treats hand and powered subgingival instrumentation as alternatives that can be used alone or together. SDCEP's guidance on putting the UK version into practice adds that, when either is used effectively, the quality of subgingival debridement is the same, that powered instrumentation can take about 37% less time, and that air polishers don't remove calculus, so a hand or powered scaler is still needed. Ultrasonic scaling produces aerosol, so CDC guidance supports high-volume evacuation and barrier protection; see the evacuation and delivery systems guide. The unit itself is covered with barriers and disinfected as its manufacturer directs, while the inserts are sterilised between patients.
Sharpening, cleaning and sterilising hygiene instruments
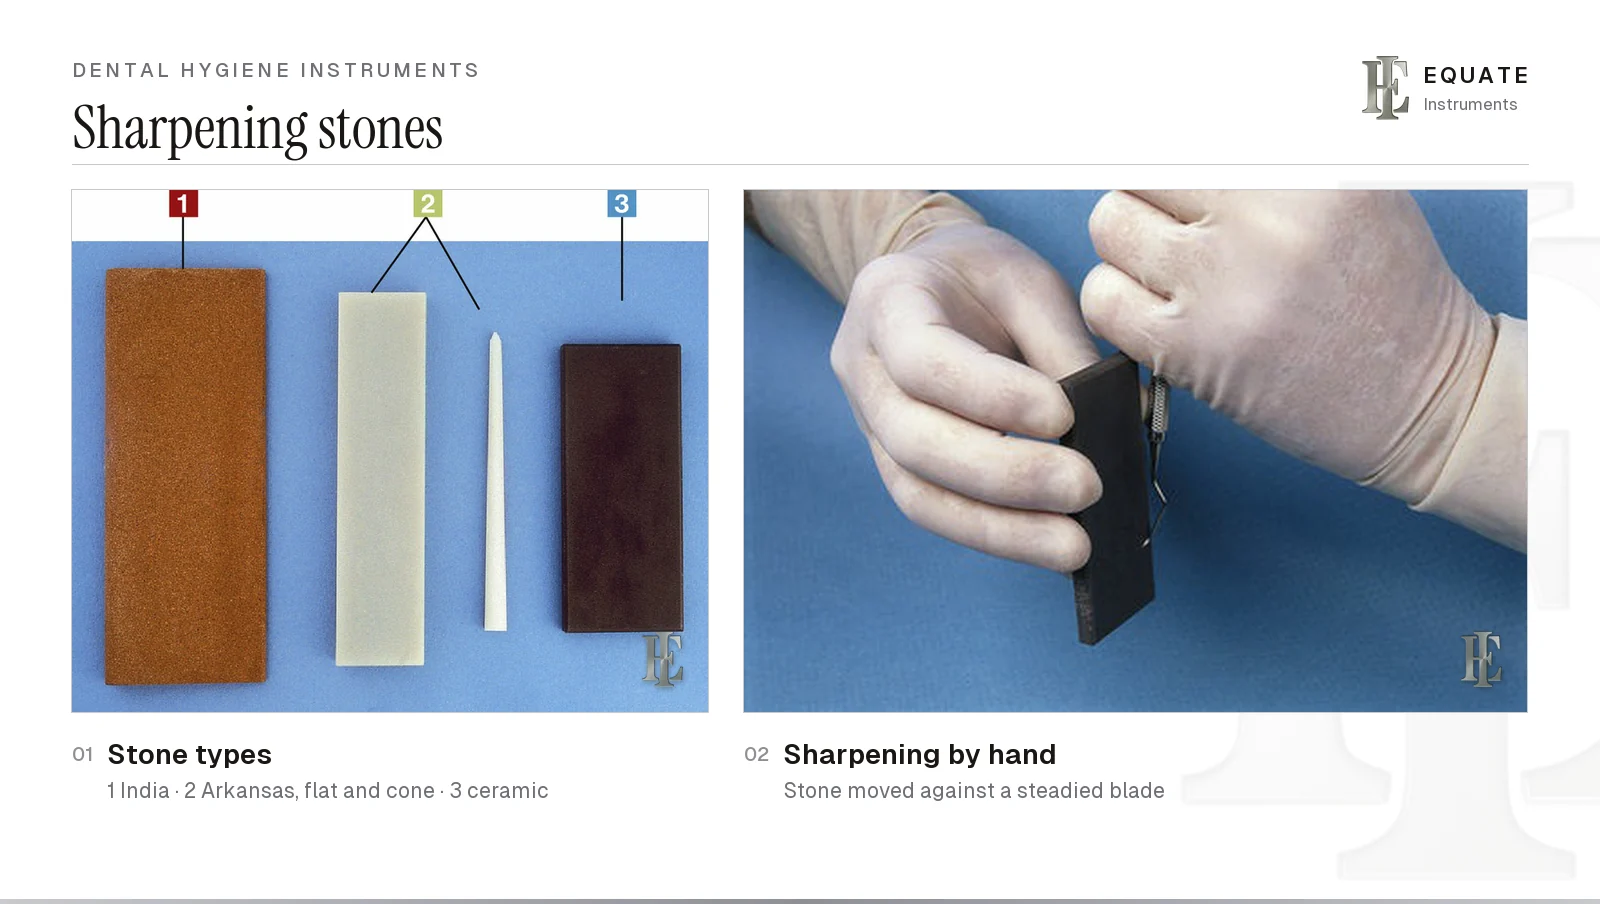
A dull blade burnishes calculus instead of removing it, needs more lateral pressure and tires the hand. Coarse stones, such as India stones, reshape a badly worn edge fast but leave a rough burr, so a finer Arkansas or ceramic stone always finishes the job. Lubricate a stone only as its maker directs; Mary Kaye Scaramucci's 'Sharpening 101' in Dimensions of Dental Hygiene warns against stones that need oil, because oil can't be effectively sterilised. Boyd notes that ceramic stones need no lubricant. Start with the stone square to the blade face, then open it to roughly 100-110° for the working strokes, which preserves the original edge angle, and stop on a down stroke so no wire edge is left. Powered sharpeners with a guide plate take the guesswork out of that angle. Sharpen only clean, sterile instruments, put them back through sterilisation afterwards, and check the result on a plastic (acrylic) test stick.
Every sharpening removes metal, so blades have a working life. Laboratory figures on how often worn Gracey curettes break, and guidance on when to retire a curette, are on the tray setup page.
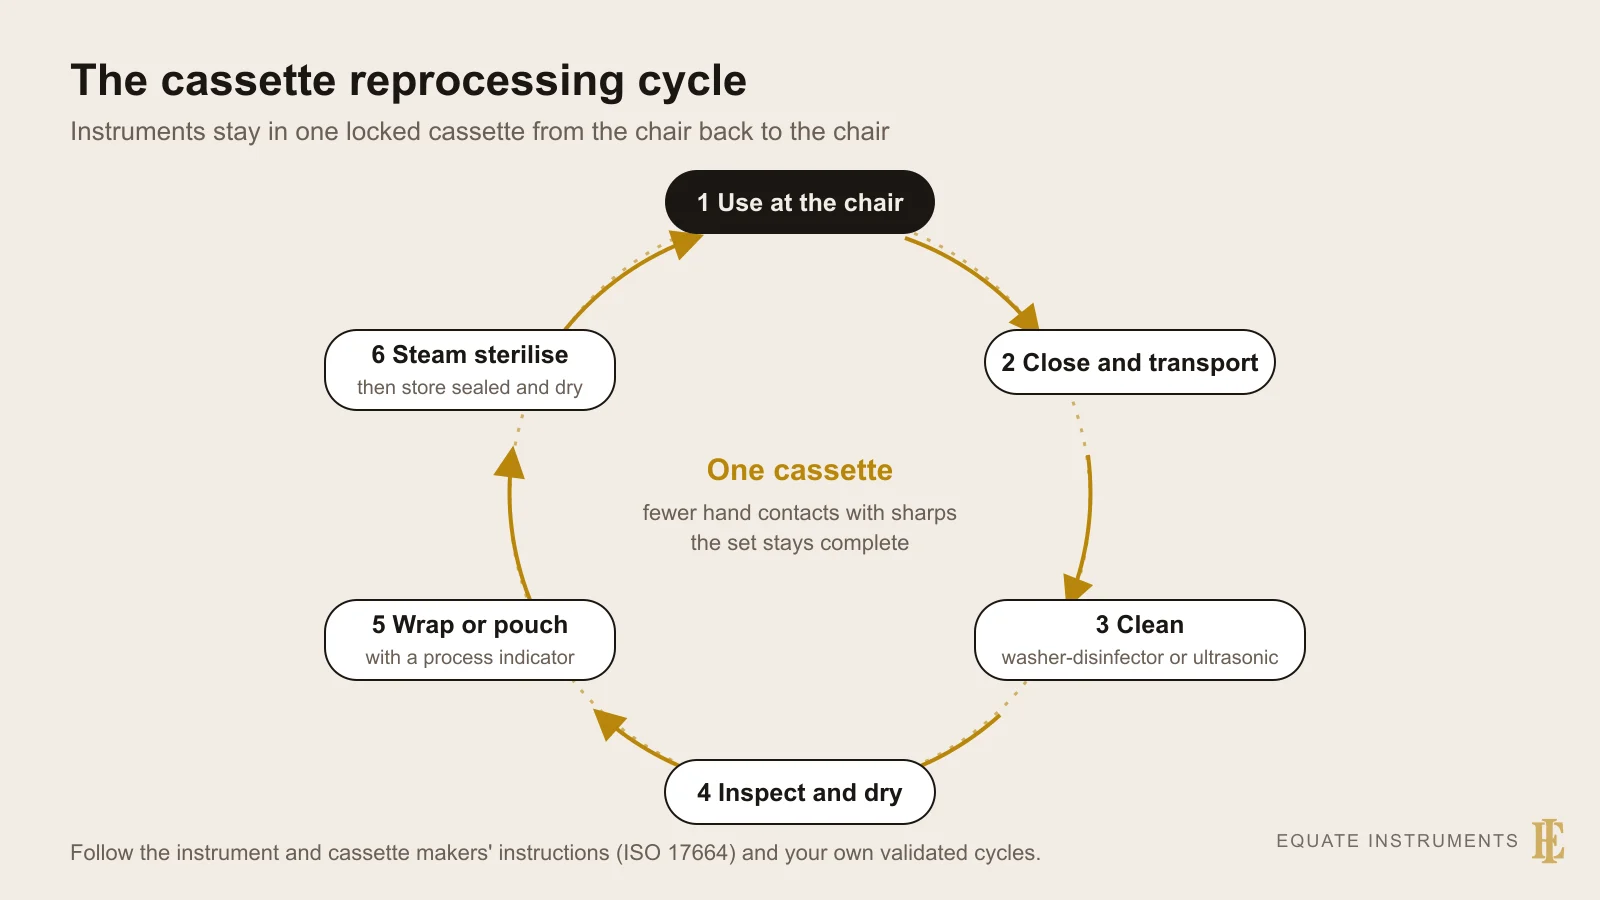
CDC guidance (Kohn and colleagues, 2003, and the CDC's current sterilisation and disinfection summary) classes periodontal scalers as critical items, to be cleaned, preferably in an ultrasonic cleaner or washer-disinfector, and heat sterilised after each patient. The Department of Health's HTM 01-05 in England likewise requires reusable dental instruments to be decontaminated and sterilised after every use; steriliser types, pouches and indicators are covered in the sterilisation equipment guide. Follow each manufacturer's reprocessing instructions and your national regulations.
- Keep instruments moist after use so debris doesn't dry on the blades, and transport them in a closed cassette to limit sharps handling.
- Clean in an ultrasonic bath or washer-disinfector; sterilisation can't make up for a dirty instrument.
- Pouch each instrument with an internal process indicator, or wrap the cassette with an internal indicator and seal it with indicator tape.
- Steam sterilise in a cycle validated for wrapped loads, check the external indicator as the load comes out and the internal indicator when the pack is opened.
- Sharpening stones are cleaned and sterilised along with the instruments they are used on.
- Inspect every instrument after cleaning, ideally under an illuminated magnifier as HTM 01-05 recommends, and discard any that are blunt, bent or corroded. Retire a blade that has become thin or noticeably shorter after repeated sharpening; it can fracture in a pocket.
The hygiene and root planing tray setups
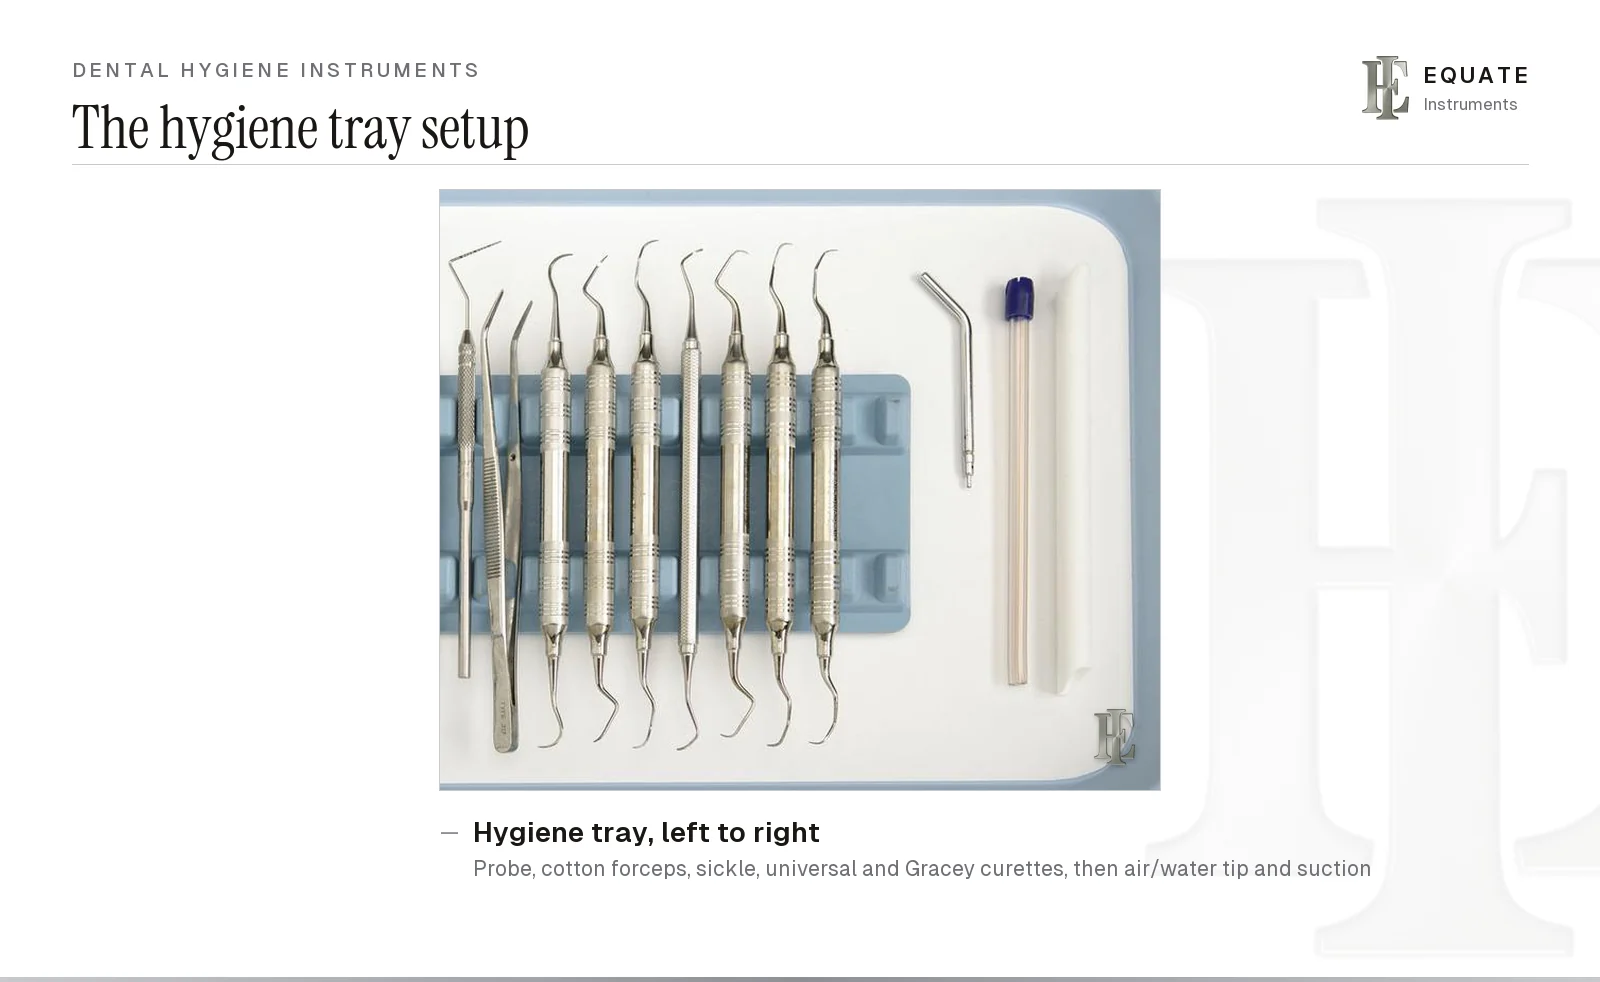
Boyd lays out two hygiene trays from left to right in order of use. The basic instruments and the probe come first, then the scalers and curettes from supragingival to subgingival, and finally the air/water syringe tip and the suction tips.
A third setup, the polishing tray, holds the prophylaxis items. The step-by-step hygiene tray setup covers order of use, the clinical steps and the polishing tray. The root planing tray keeps Boyd's name here, although the British Society of Periodontology's UK guideline now calls this work subgingival professional mechanical plaque removal (PMPR).
- Hygiene tray: the basic instruments and probe, then a sickle, a universal curette and a few Graceys, with the rinsing and suction tips at the end.
- Root planing tray: the same basics, with Graceys in number order in place of the sickle and universal; the instrument-by-instrument order for both trays is on the tray setup page linked above.
- Colour-coding rings or coloured handles, one colour per setup, make it quick to check a cassette is complete after reprocessing.
- Prophylaxis angles, polishing paste and fluoride trays are covered in the preventive and sealant instruments guide, and the prophy angle itself in the handpieces guide.
Buying hygiene instruments: what to check
- Blade geometry: the face angle (90° for universals, about 70° for Graceys) and a blade that's evenly curved with no flat spots.
- Shank: standard shanks for tactile feedback, rigid shanks for heavy calculus, extended shanks for pockets of 5 mm or deeper.
- Steel and edge: hardened stainless steel that holds an edge and takes resharpening, or a coated sharpen-free tip if you'd rather not sharpen.
- Handle: a wide, light, textured handle reduces pinch force and fatigue over a full day of scaling.
- Sets: buy Graceys as a matched sequence for the tray rather than one at a time, so every area of the mouth is covered.
- Reprocessing: instruments that tolerate repeated steam sterilisation and cassettes sized for the full hygiene setup.
The Equate difference
Equate's catalogue lists 101 standard Gracey curettes, 38 mini Gracey curettes, 7 extended-shank Gracey curettes from 1-2 to 13-14, 7 duplex Gracey curettes and 2 rigid Graceys; among universal curettes, 17 Columbia-pattern, 15 McCall, 8 Langer and 6 Barnhart instruments; 25 posterior, 14 anterior, 10 mini and 6 micro sickle scalers plus 11 Jacquette scalers; and 8 ready-made scaler and curette kits. Two sharpen-free coated-tip options are listed, a Gracey 17-18 and an M23 sickle. Equate does not list ultrasonic inserts or sharpening stones.
Equate Dental Hygiene Instruments: Curettes, Sickle Scalers, Ultrasonic Inserts and Sharpening options

Sickle Scaler 204S
EI-0009
Gracey Curette 11-14 - Hollow Handle
EI-0010
Gracey Curette 12-13 - Hollow Handle
EI-0012
Crane-Kaplan Sickle Scaler - Hollow Handle
EI-0054
Sickle Scaler Fig. 204SD - Solid Knurled Handle
EI-0073
Universal Implant-Maintenance Curette M23 - Titanium-Coated
EI-0074
M23 Sickle Scaler
EI-0075
Universal Curette Fig. 413/414 - Solid Knurled Handle
EI-0092
McCall Fig. 13S-14S Curette - Hollow Handle 10mm
EI-0106
Williams Periodontal Probe - Hollow Handle 10mm
EI-0112
Williams Periodontal Probe - Knurled Solid Handle
EI-0113
Kaplan 9-10 Sickle Scaler - Hollow Handle
EI-0122Browse all periodontal & hygiene instruments
Buying in your market
Frequently asked questions
What instruments does a dental hygienist use?
A mirror, explorer, cotton forceps and periodontal probe to assess the mouth, then sickle scalers above the gumline, universal and Gracey curettes below it, ultrasonic scaler inserts, non-metal scalers around implants and sharpening stones to keep the hand instruments working. An air/water syringe tip and suction tips complete the tray.
What is the difference between a Gracey curette and a universal curette?
A universal curette has its face at 90° to the lower shank and uses both cutting edges on any tooth. A Gracey has an offset blade at about 70°, uses only the lower edge and is shaped for one area of the mouth. The dental curettes guide compares them in detail.
What does PMPR mean, and is it the same as root planing?
PMPR stands for professional mechanical plaque removal. The British Society of Periodontology's UK guideline uses subgingival PMPR as an umbrella term that replaces root surface debridement or root planing, and retires 'scale and polish' as misleading for people with periodontitis. Hand instruments, powered scalers or a combination are all acceptable.
Are ultrasonic scalers better than hand instruments?
Neither is better in every case. The EFP's S3 guideline accepts hand or powered subgingival instrumentation, alone or combined, and SDCEP notes that both reach the same quality of debridement when used well, with powered instruments taking about 37% less time. Ultrasonics flush with water; hand instruments give more tactile feedback and generate much less aerosol.
Can steel scalers be used on dental implants?
Plain stainless steel scalers are generally avoided on implant surfaces because they can scratch titanium and restorative materials. Implant scalers with resin, plastic or titanium-compatible tips, or inserts the implant or unit manufacturer approves, are used instead.
How often should scalers and curettes be sharpened?
Whenever the edge stops feeling crisp, which with regular use is often. Frequent light sharpening that keeps the original angles removes less metal than occasional heavy sharpening. A sharp edge catches on a plastic (acrylic) test stick rather than sliding over it. Sharpen clean, sterile instruments, resterilise them afterwards, and retire blades that have worn thin.
References
- Boyd LB. Dental Instruments: A Pocket Guide, 7th edition. Saunders/Elsevier, 2020 (photographs used under licence)
- Sanz M, Herrera D, Kebschull M, et al. Treatment of stage I–III periodontitis: the EFP S3 level clinical practice guideline. J Clin Periodontol 2020;47(Suppl 22):4–60
- Kohn WG, et al. Guidelines for Infection Control in Dental Health-Care Settings, 2003. MMWR 52(RR-17), Centers for Disease Control and Prevention
- Department of Health. Health Technical Memorandum 01-05: Decontamination in primary care dental practices, 2013 edition (NHS England)
- Gehrig JS, Sroda R, Saccuzzo D. Fundamentals of Periodontal Instrumentation and Advanced Root Instrumentation, 8th edition. Wolters Kluwer, 2017 (ISBN 978-1-4963-2020-9)
- Centers for Disease Control and Prevention. Sterilization and Disinfection: Dental Infection Prevention and Control summary
- Scottish Dental Clinical Effectiveness Programme (SDCEP). Prevention and Treatment of Periodontal Diseases in Primary Care: instrument choice for PMPR
- British Society of Periodontology. BSP UK Clinical Practice Guidelines for the Treatment of Periodontitis (UK version of the EFP S3 guideline)
- Yousefimanesh H, Robati M, Kadkhodazadeh M, Molla R. A comparison of magnetostrictive and piezoelectric ultrasonic scaling devices: an in vitro study. J Periodontal Implant Sci 2012;42(6):243-247
- Scaramucci MK. Sharpening 101. Dimensions of Dental Hygiene, May 2007
I am a…
Related
- Dental Curettes
- Dental Scalers (Hand Scalers)
- Periodontal Probes
- Basic Dental Instruments: Mirror, Explorer, Cotton Forceps and Handles
- Dental Evacuation Devices, the Air/Water Syringe and the Dental Unit
- Preventive, Sealant and Whitening Tray Instruments
- Periodontal Instruments Explained: Probes, Hoes, Knives and Files
- Dental Hygiene Tray Setup: Scaling, Root Planing and Polishing
- Dental Explorers
- Dental Instrument Cassettes, Trays and Boxes
- Dental Sterilisation and Protective Equipment