Dental Materials Equipment: From Impression to Finished Model
Written by the Equate Instruments Technical Team · Reviewed by the Medical & Dental Board, Equate Instruments · Updated ·
Dental materials equipment is the kit used to mix, carry and shape dental materials: flexible bowls and spatulas for alginate and gypsum, stock and disposable impression trays, cartridge guns and automixers for elastomeric impressions, agar conditioning units, and laboratory items such as the vibrator, vacuum mixer, model trimmer and laboratory knife, plus mixing spatulas, glass slabs and paper pads for cements.
Key points
- Most of the work is two steps: taking an accurate impression in a well-fitting tray, then turning it into a bubble-free stone model.
- Metal impression trays and chairside mixing spatulas are cleaned and heat sterilised after each patient; bowls, alginate and laboratory spatulas, mixing guns and bench machines are cleaned and disinfected; disposable trays and mixing tips are used once.
- Every impression or bite record is rinsed and disinfected with a product that suits the material before it is poured or sent to a laboratory.
What dental materials equipment covers
Linda Bartolomucci Boyd's Dental Instruments: A Pocket Guide (Elsevier) groups this equipment in its own chapter because it sits between the chair and the laboratory bench. Some of it goes into the mouth, such as impression trays and bite registration frames. The rest stays on the bench and handles the material before or after it has been in the mouth: bowls, spatulas, mixers, vibrators and trimmers.
The equipment follows the material. Alginate needs a flexible bowl and a wide spatula; elastomeric impression materials come in cartridges that need a gun or an automixer; agar needs a heated conditioning unit and water-cooled trays; and plaster, stone and die stone need a spatula, a vibrator or vacuum mixer and a trimmer. Cements and liners are mixed on a glass slab or a paper pad with a small flexible spatula. The fixed prosthodontic instruments guide covers the crown and bridge tray these items usually support.
| Equipment | Used for | Reuse and care |
|---|---|---|
| Flexible rubber bowl and alginate spatula | Hand-mixing alginate, plaster and stone | Cleaned and disinfected between uses |
| Mechanical alginate mixer | Spinning the bowl for a smooth, consistent alginate mix | Surface disinfection; bowl cleaned after each mix |
| Stock impression trays (perforated or solid) | Carrying impression material for a full arch, a quadrant or the anterior teeth | Metal: cleaned and steam sterilised. Disposable plastic: single use |
| Dual-arch and bite registration trays | Recording both arches, or the bite, in one closure | Single use |
| Cartridge gun and automixer | Dispensing and mixing base and catalyst of elastomeric materials | Barrier or overgloves, then disinfection; mixing tips single use |
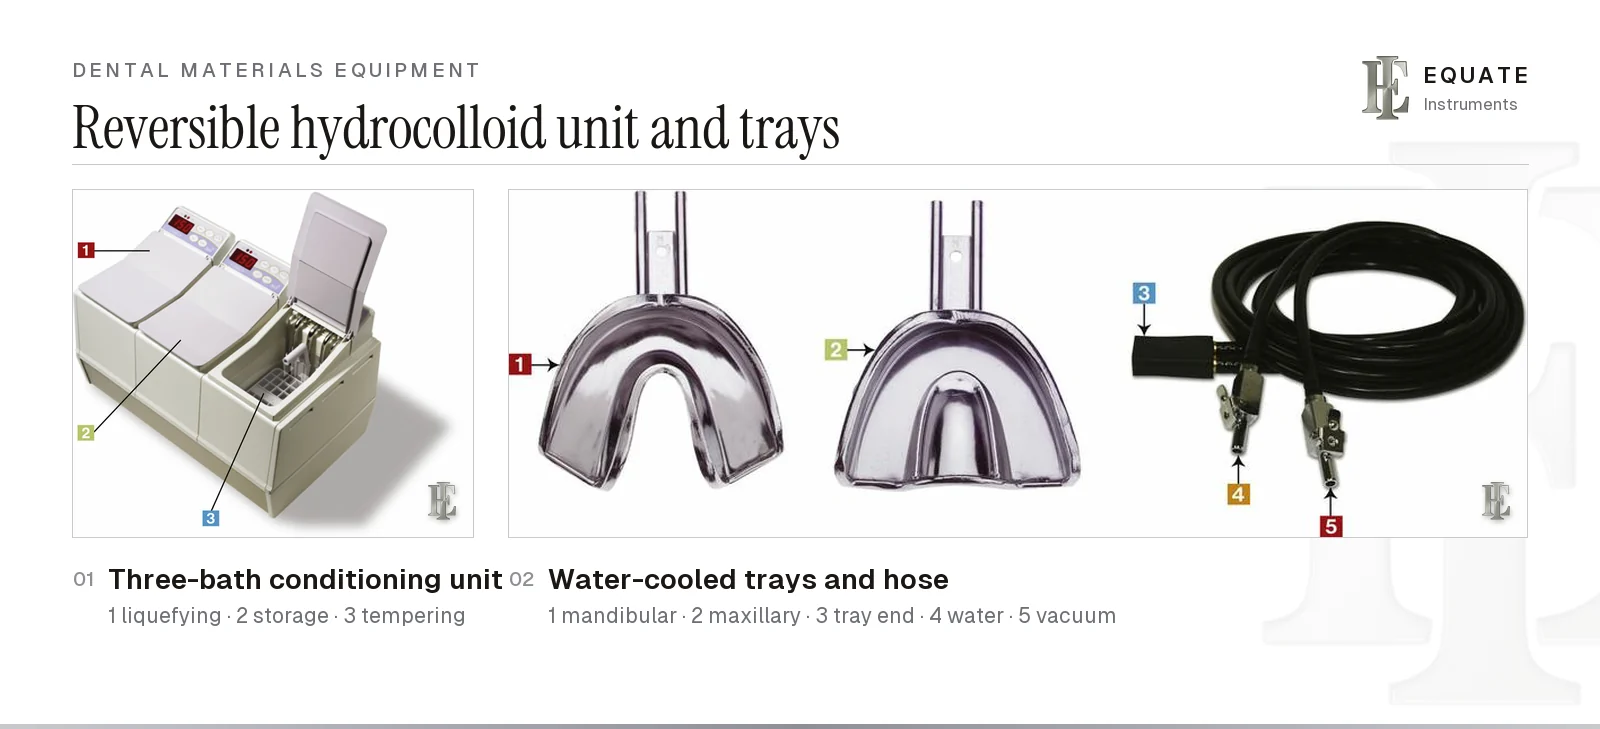
| Reversible hydrocolloid unit and water-cooled trays | Liquefying, storing and tempering agar; chilling it in the mouth | Unit disinfected; metal trays sterilised; hoses disinfected |
| Laboratory spatula, vibrator, vacuum mixer | Mixing gypsum and pouring models without bubbles | Cleaned; disinfected if contaminated |
| Model trimmer and laboratory knife | Separating, shaping and finishing models | Cleaned; disinfected if contaminated |
| Flexible mixing spatula, glass slab, paper pad | Mixing cements, liners and other small-volume materials | Spatula cleaned and steam sterilised; glass slab cleaned and disinfected or sterilised; pad sheets discarded |
Alginate: flexible bowls, spatulas and mechanical mixers
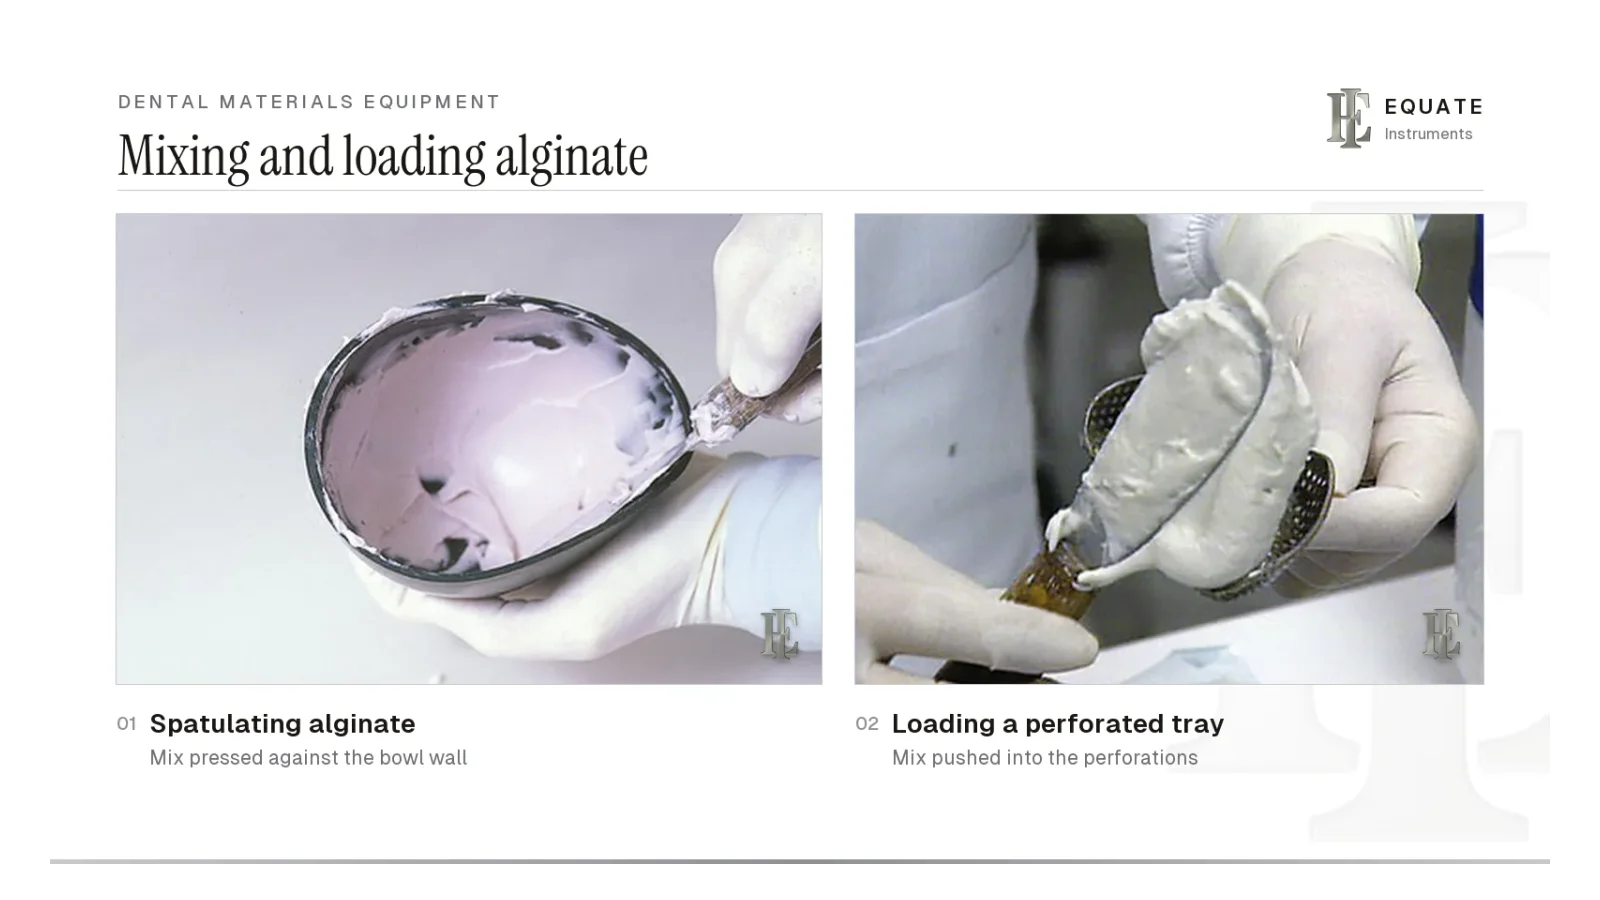
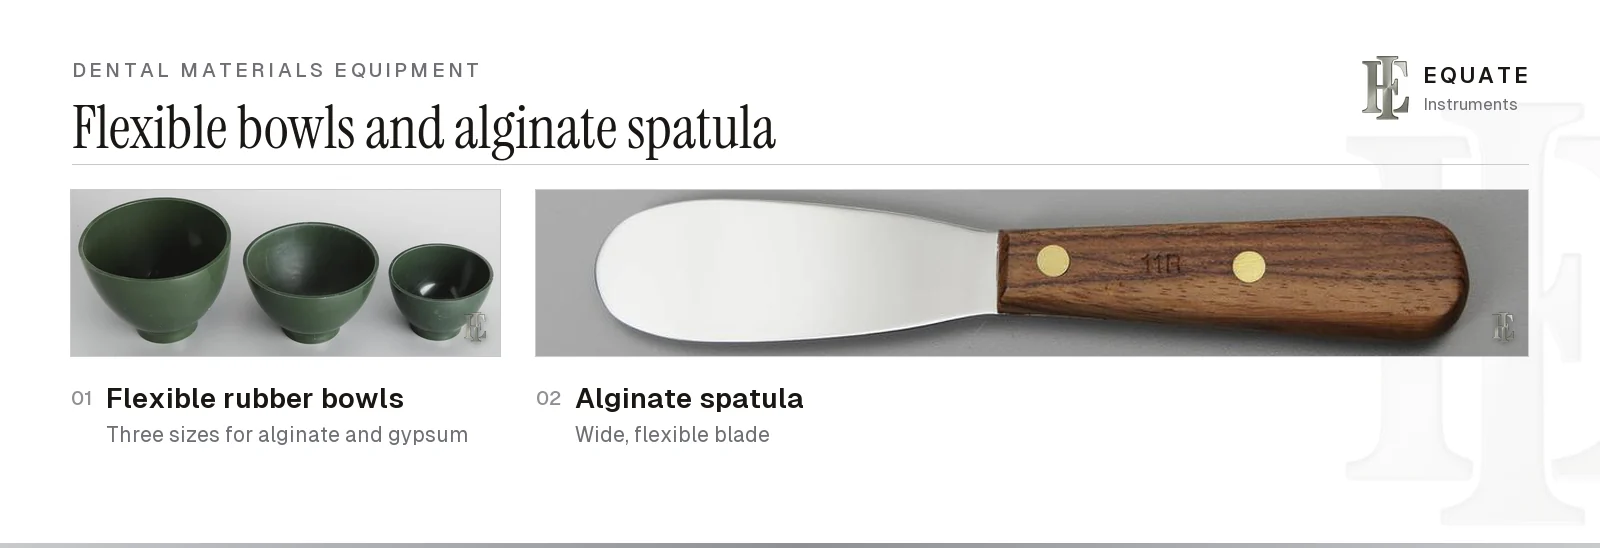
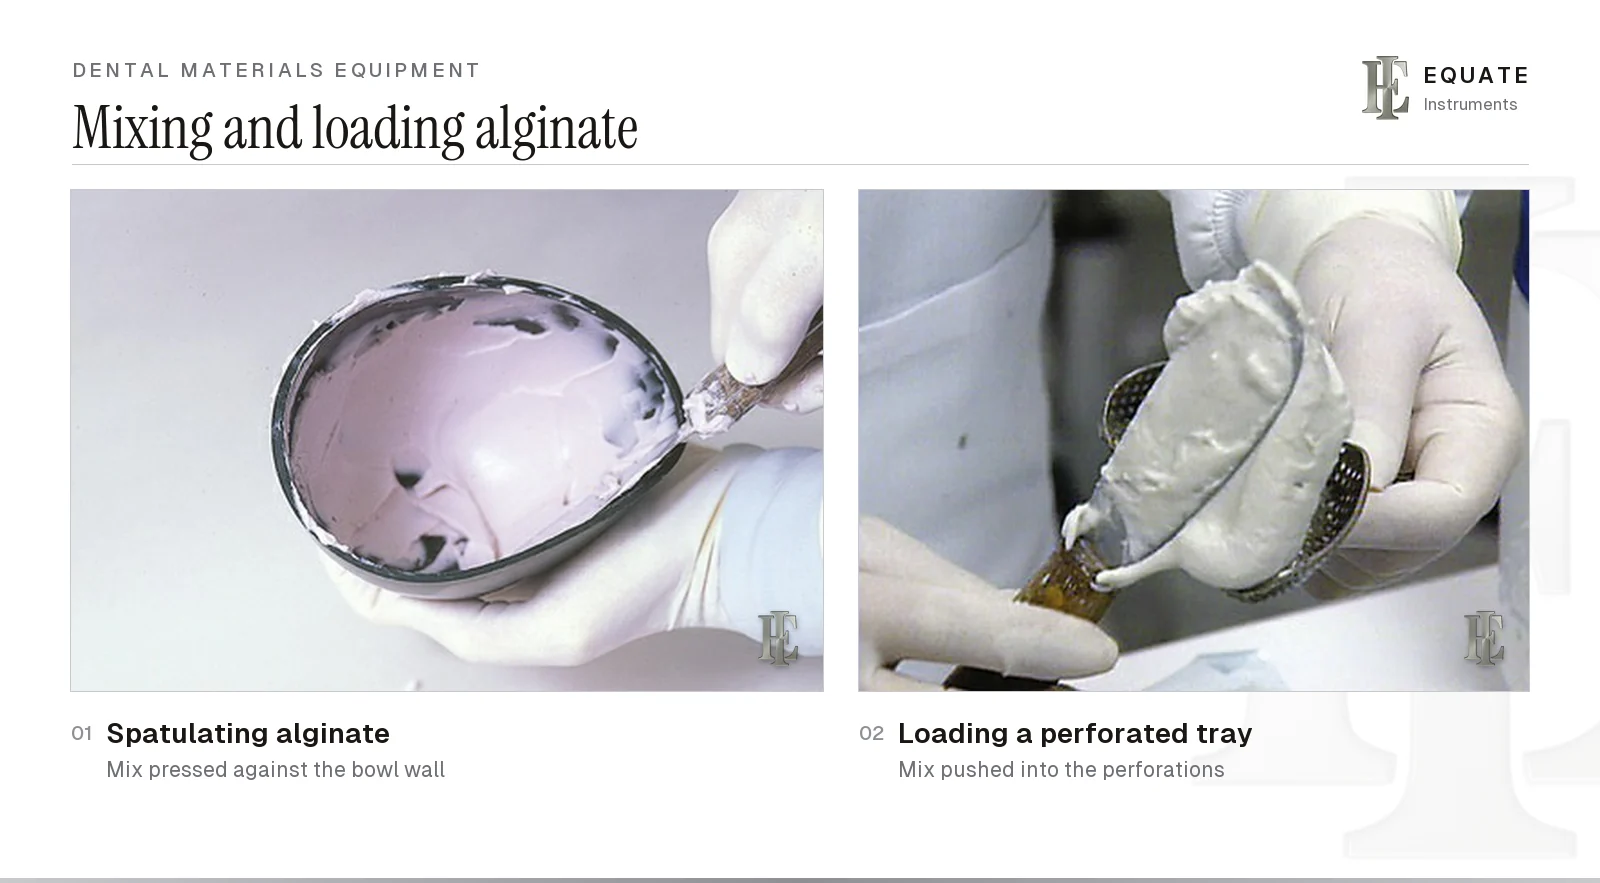
Alginate (irreversible hydrocolloid) is the everyday material for study models, opposing models and models for whitening trays, mouthguards, night guards and orthodontic appliances. It is mixed by hand in a flexible rubber bowl with a broad, flexible alginate spatula. The flexibility is the point: the bowl can be squeezed and the blade can bend, so the mix is pressed and smeared against the bowl wall rather than stirred. That spatulation breaks up lumps and pushes out trapped air, giving a creamy mix that records fine detail.
Bowls come in several sizes. A small one suits a quadrant or a single cast; a large one is easier for a full-arch impression or a model pour. The same bowl and spatula are often used for plaster and stone, but many clinics keep separate sets, because leftover set gypsum speeds the setting of the next mix and loose fragments can end up in an impression.
Measure powder and water with the scoops and cylinders supplied with the material, and follow the maker's mixing time. Water temperature changes the working time: warmer water makes alginate set faster, cooler water gives more time. A mechanical alginate mixer spins the bowl while the operator holds the spatula against the wall, which gives a smooth, consistent mix with less effort and is popular where many impressions are taken. It is not automatically bubble-free: in a 2013 bench study in General Dentistry, McDaniel and colleagues found fewer surface bubbles with centrifugal and vacuum mixers than with hand mixing, but did not report the same gain for a spinning bowl, and hand mixes were less porous when the powder went into the bowl before the water. The mix is then loaded into the tray from one end, pressing it into the perforations so it locks in place. Alginate models are also where custom trays begin: the laboratory or the clinic builds a close-fitting tray for a denture or other removable appliance on a model poured from an alginate impression.
Stock impression trays: perforated, solid, full-arch and sectional
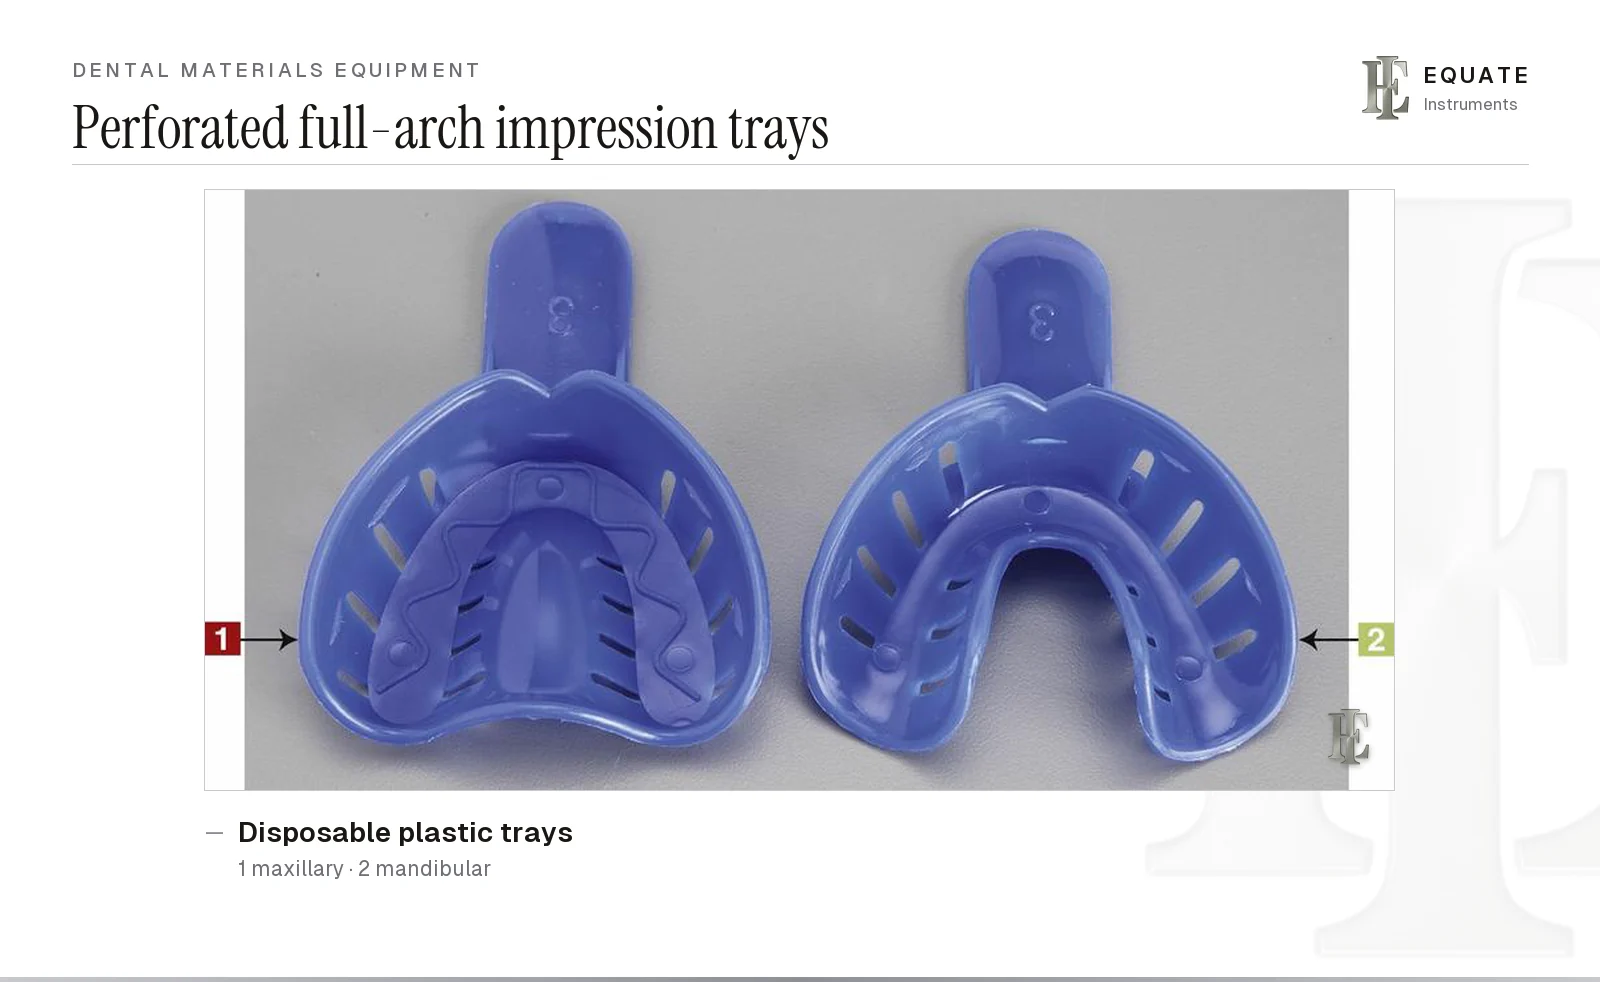
A stock tray carries the impression material to the mouth and supports it while it sets and while it is withdrawn. Full-arch trays come in upper and lower shapes and a range of sizes, and sectional trays cover just the anterior teeth or one quadrant; the impression trays page covers tray shapes, sizes and materials in detail.
The tray has to hold the material, or the impression can pull away and distort as it comes out. Perforations, a rim-lock bead around the border and tray adhesive are the three ways of doing that, used alone or together. Rigidity matters as much, because a tray that flexes under a heavy material distorts the impression; the trays page sets out the evidence on metal against plastic trays and on retention methods.
For complete dentures the sequence is a stock edentulous tray first, then a custom tray built on the model it produces. Sizes, rim-lock designs, tray adhesive and metal versus disposable trays are compared on the dental impression trays page. Whatever the tray, the impression is rinsed under running water and disinfected before it is poured. Gypsum models poured from these impressions are also the starting point for whitening trays, covered in the preventive, sealant and whitening instruments guide.
Dual-arch trays, bite registration trays and cartridge guns
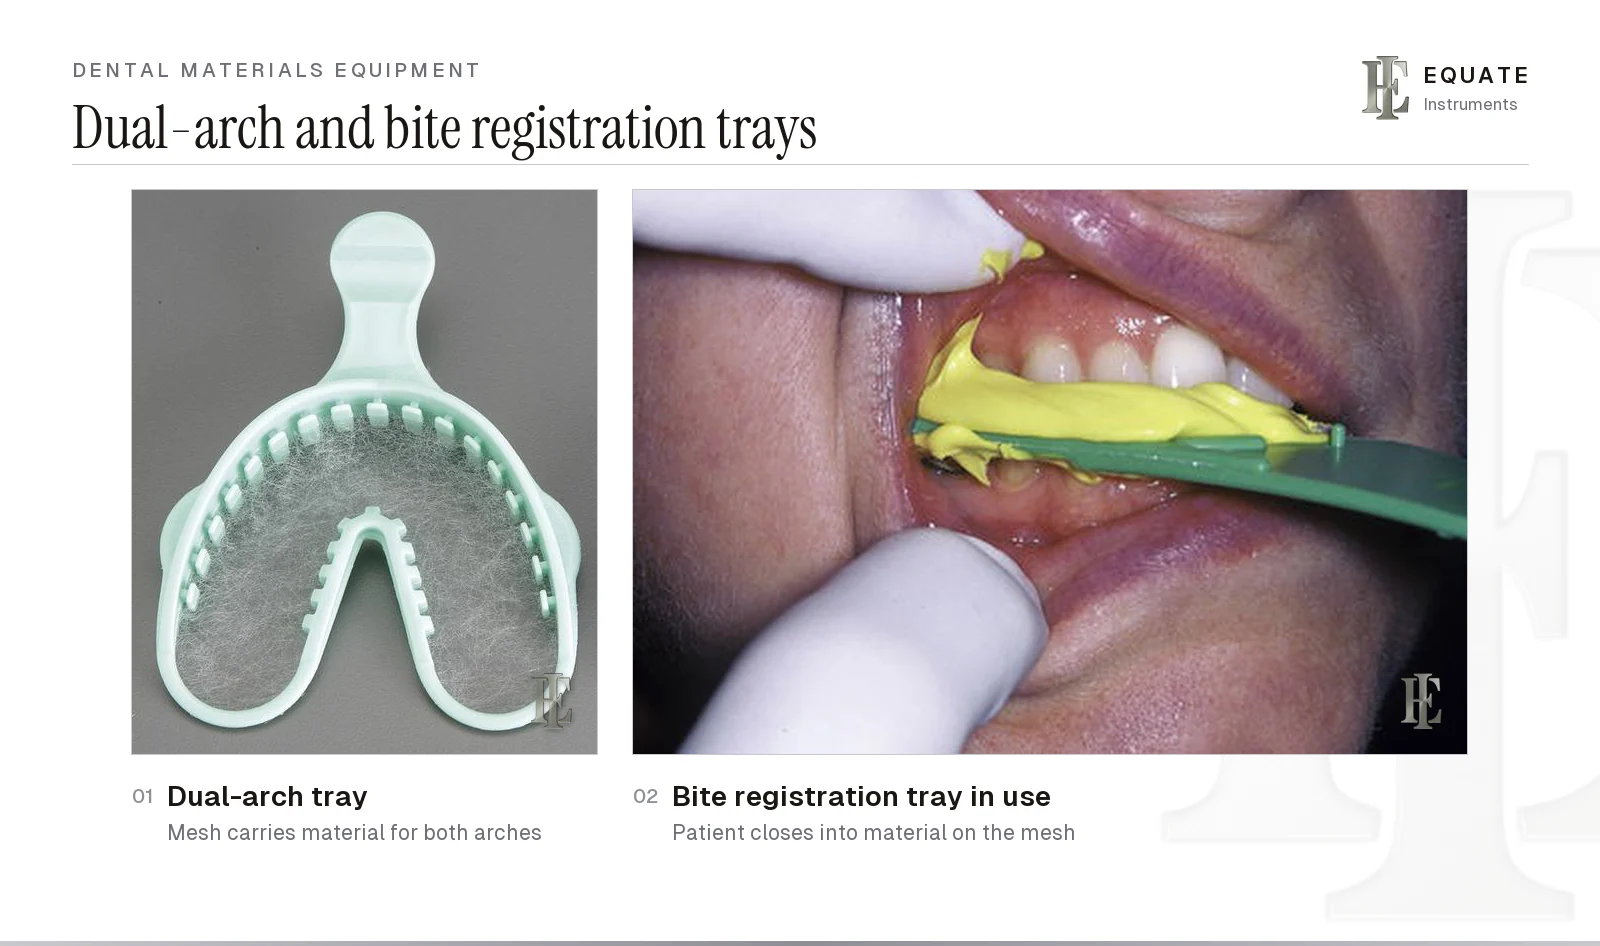
A dual-arch tray, often called a triple tray, records the prepared tooth, the opposing teeth and the way they meet in one impression. It has a frame with a fine mesh across the middle; material is loaded on both sides of the mesh, the patient closes into it, and the mesh separates the upper and lower records. Full-arch, quadrant and anterior versions exist. Dual-arch impressions are popular for single crowns where the occlusion is stable; longer bridges and cases with missing posterior teeth usually need full-arch impressions and a separate bite record.
A bite registration tray is a lighter mesh frame for recording the occlusion only, and it is usually laid out with the crown and bridge tray setup. A fast-setting registration material is placed on the mesh, the patient closes in their normal bite, and the set record lets the laboratory mount the models in the right relationship on an articulator. Bite frames are single use, and the record is rinsed and disinfected before it is sent to the laboratory with the impressions.
Elastomeric materials such as polyvinyl siloxane, polyether and, less often today, polysulfide come as base and catalyst in a double-barrelled cartridge. A hand-held cartridge gun pushes both pastes through a disposable static mixing tip, so they arrive mixed at the tray, on a bite frame or in an intraoral syringe tip; the same gun also dispenses many provisional crown materials. A bench-top automixer does the same job with a motor and larger cartridges, and is mainly used for filling full-arch trays. In a two-viscosity technique a light-bodied wash goes around the preparation, once the margin has been exposed by packing retraction cord with a gingival cord packer, while a heavier tray material is loaded and seated over it. Mixing tips are discarded after each use, and the gun is handled with overgloves or behind a barrier and disinfected afterwards. Guns are not the only route: putty versions of polyvinyl siloxane are kneaded by hand from equal scoops of base and catalyst and used as the tray material under a syringed wash (the putty-wash technique). Latex can stop polyvinyl siloxane from setting, even at second hand: Kimoto and colleagues (Journal of Prosthetic Dentistry, 2005) traced the problem to sulfur residues carried from latex onto vinyl gloves and retraction cord, which washing did not remove. Handle putty in gloves that have not touched latex, and check the maker's glove advice.
Reversible hydrocolloid: conditioning unit and water-cooled trays
Reversible hydrocolloid (agar) is less common than it was, but some clinics still use it for crown and bridge impressions because it records fine detail on a moist surface. It turns to a liquid when heated and back to a gel when cooled, so it needs dedicated equipment. A conditioning unit has three water baths: one boils the tubes to liquefy the material at about 100 °C, a storage bath holds it ready at roughly 63–66 °C, and a tempering bath brings the loaded tray down to about 44 °C for around five minutes so it is comfortable in the mouth. Smaller syringe cartridges carry the wash material that is placed around the preparation first.
Agar sets only when it is chilled, so it is used in special metal trays with water channels in their walls. A hose connects the tray to the dental unit's water supply and to a drain or the suction line; cool water flows through the tray once it is seated, gelling the material. If the hose is not fully coupled at every joint before the water is opened, it leaks at the chair, so check the connections first. The metal trays are cleaned and steam sterilised, the hose is cleaned and disinfected, and the unit itself is disinfected if it has been touched during treatment. Agar impressions lose or take up water quickly, so they are disinfected and poured promptly.
Pouring models: laboratory spatula, vibrator and vacuum mixer
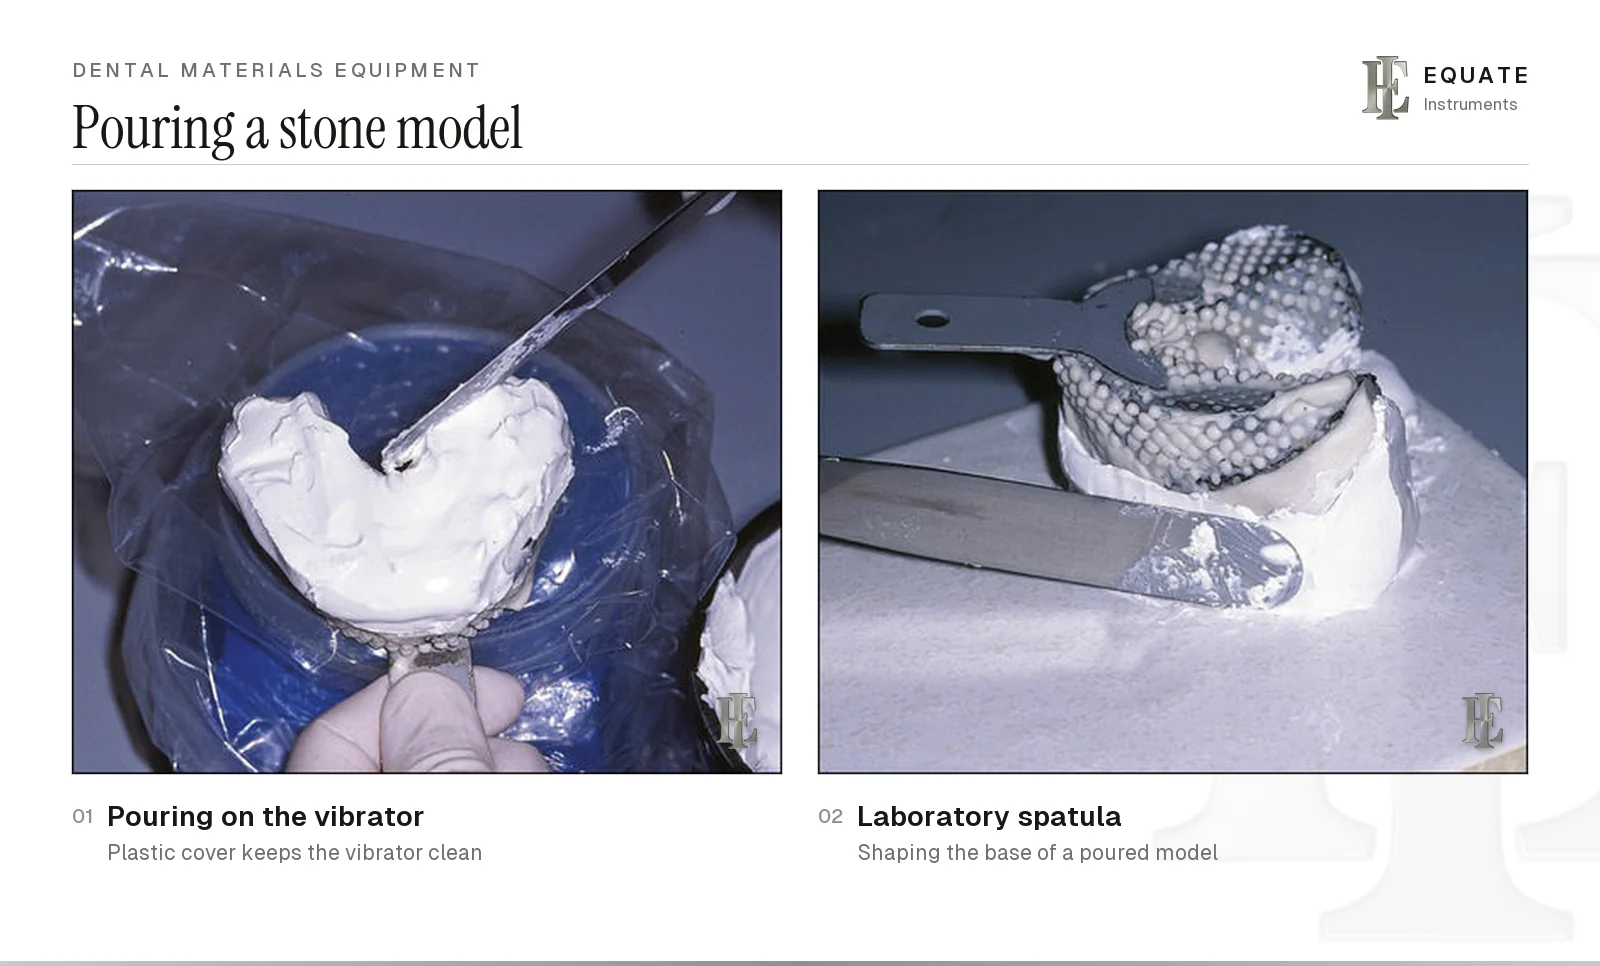
Models are poured in gypsum: model plaster for study models, dental stone for working models and high-strength die stone for crown and bridge dies (see the crown and bridge instruments). ISO 6873 groups dental gypsum products into types by use and sets requirements for properties such as setting time and setting expansion. Measure powder and water to the maker's ratio; extra water weakens the model.
A laboratory spatula has a straight blade for mixing gypsum in a bowl, carrying it to the impression and shaping the base. The laboratory vibrator is a small motorised platform that shakes the bowl or the impression. Vibrating the bowl after mixing brings air bubbles to the surface, and holding the impression on the vibrator while stone is added from one end lets the mix flow along the teeth and push air ahead of it, rather than trapping bubbles in the cusps. A plastic cover over the platform keeps it clean and easy to disinfect.
A vacuum mixer mixes gypsum or investment with paddles inside a sealed bowl while drawing air out, which gives a denser, smoother mix with fewer voids. It is standard in dental laboratories and in clinics that make their own working models or cast restorations, and many can be programmed for different materials and mixing times.
Trimming models: model trimmer and laboratory knife
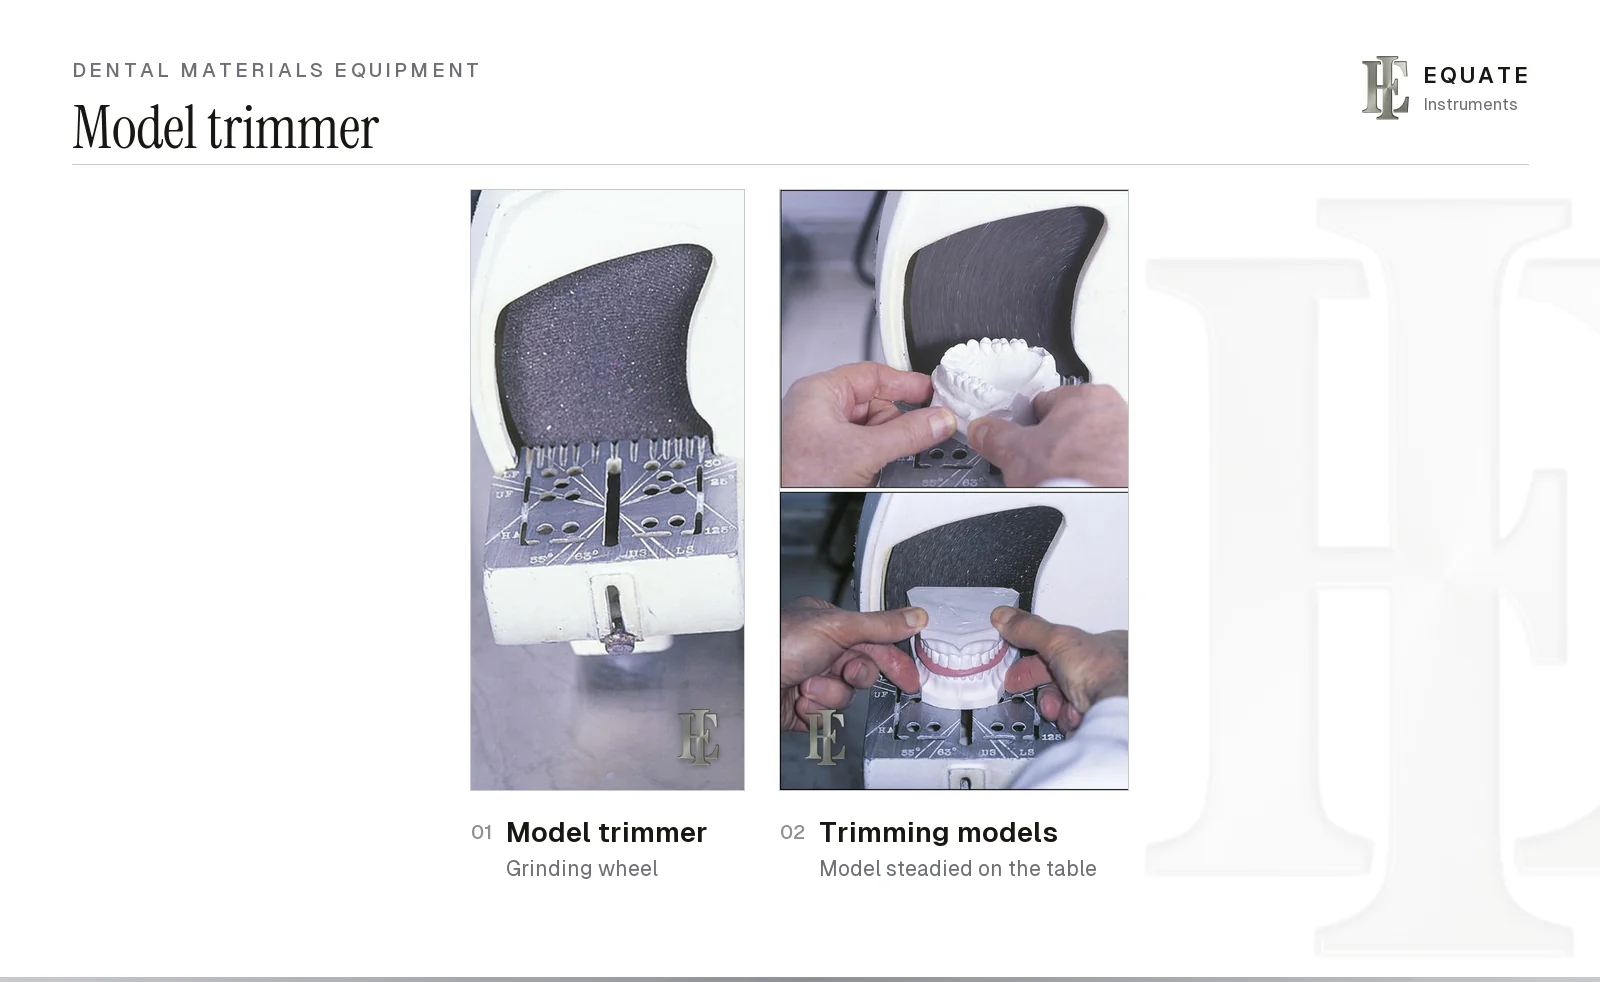
Once the stone has set, a laboratory knife is used to ease the model out of the impression and to pare away thin edges, bubbles and flash by hand. The typical laboratory knife has a short, stiff blade and a wooden handle, often green, and it can also trim appliances and wax; Equate's plaster knives of this kind are listed with the dental spatulas. It is a sharp instrument, so it should be handled and cleaned with the same care as any other blade. Two other hand instruments sit alongside it on the bench: plaster cutting shears for snipping set plaster or stone and trimming excess impression material, and wax knives and carvers for bite rims, wax-ups and adjusting wax patterns.
A model trimmer grinds the base and sides of the model on an abrasive wheel. Running water cools the wheel and turns gypsum dust into slurry that drains away, so check the water feed and the drain before switching on. The guide table is marked with angles so models can be trimmed to a standard shape; the right shape depends on the model's job. Orthodontic study models are trimmed to symmetrical, angled bases so they can be analysed, measured with a Boley gauge and compared, diagnostic models only need a neat, stable base, and crown and bridge working models are kept compact so the dies can be sectioned and handled. Wear eye protection and a mask, keep the splash guard in place, and keep fingers clear of the wheel. Orthodontic model work links to the orthodontic instruments guide.
Mixing spatulas, glass slabs and paper pads
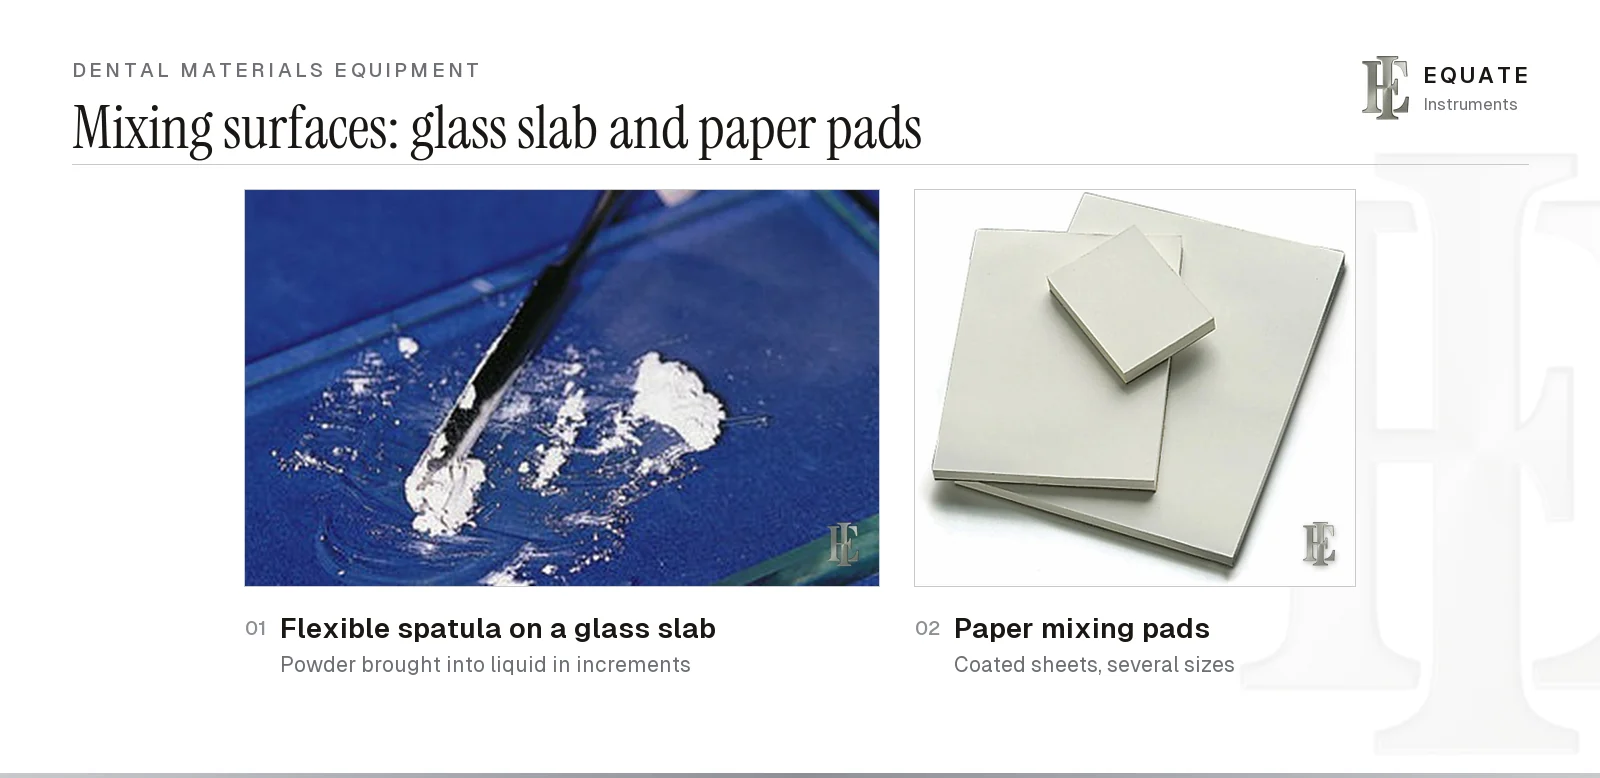
Small-volume materials such as cements, liners, bases and endodontic sealers are mixed with a flexible stainless steel mixing spatula. This spatula appears on restorative, endodontic, orthodontic and periodontal setups. A thin, springy blade lets the operator spread the material in a thin layer and gather it back, which is how most powder–liquid and paste–paste materials reach a uniform consistency. Which blade and surface suit zinc phosphate, glass-ionomer, polycarboxylate, zinc oxide-eugenol, alginate, gypsum and wax is set out on the cement and laboratory spatulas page.
The mixing surface depends on the material. A thick glass slab can be cooled so it absorbs heat from materials that set faster when warm, which extends working time; cool it, but normally not below the dew point, or condensation forms on the glass and can spoil water-sensitive cements. Zinc phosphate is the deliberate exception: Kendzior and colleagues (Angle Orthodontist, 1976) mixed it on slabs at 6 °C and −10 °C and found strength and solubility unchanged once extra powder brought it to the usual consistency, and working time on the slab grew longer. The slab is cleaned and either disinfected or sterilised after use. Paper mixing pads have coated sheets that stop the material soaking through. Peel off the used sheet straight away; touching the pad with contaminated gloves contaminates every sheet underneath, so separate a sheet before the procedure or use overgloves. Some materials come with their own pad, and the maker's instructions say which surface to use. For composite and cement instruments see the composite restorative instruments guide.
Infection control: impressions and materials equipment
Impressions and bite records leave the mouth coated with saliva and sometimes blood, and they go on to be handled by people who were not at the chair. US Centers for Disease Control and Prevention guidance (Kohn and colleagues, 2003) asks for impressions, bite registrations and prostheses to be cleaned, disinfected with an intermediate-level (tuberculocidal) hospital disinfectant and rinsed before they are handled in the laboratory, and for cases sent out to be labelled with the disinfection used. In England, the Department of Health's HTM 01-05 likewise expects impressions to be decontaminated before they leave the practice. Ask the material's maker which disinfectant and contact time it tolerates, since some impression materials swell or distort.
Reusable items that enter the mouth, such as metal impression trays and water-cooled trays, are semi-critical and are cleaned, packed with an internal process indicator and steam sterilised. The dental sterilisation and protective equipment guide explains the cycle. Follow the reprocessing instructions in each item's manufacturer information and your national regulations, such as HTM 01-05 in England or the equivalent national guidance elsewhere in Europe.
| Item | After use |
|---|---|
| Impressions and bite records | Rinse, disinfect with a compatible product, rinse again, label for the laboratory |
| Stainless steel impression trays, water-cooled trays | Remove material, clean, pouch or wrap with an indicator, steam sterilise |
| Flexible mixing spatulas, metal lab spatulas | Clean and steam sterilise if used at the chair; clean and disinfect if bench-only and contaminated |
| Rubber bowls, alginate spatulas, glass slabs | Clean off set material, then disinfect (or sterilise where the maker allows) |
| Cartridge guns, automixers, alginate mixers, agar units | Barrier or overgloves in use, then clean and wipe-disinfect |
| Vibrators, vacuum mixers, model trimmers | Clean after each session; disinfect if contaminated |
| Disposable trays, bite frames, mixing tips, pad sheets | Discard after one use |
Buying dental materials equipment: what to check
- Trays: a full size range in rigid stainless steel, with perforated or rim-lock trays for alginate and solid trays for adhesive techniques; sizes and handles are compared on the dental impression trays page.
- Spatulas: a wide, flexible blade for alginate and gypsum and a short, narrow, flexible blade for cements; blade widths and handles are compared on the dental spatulas page.
- Bowls: at least two sizes, kept separate for alginate and for gypsum.
- Bench equipment: water supply, drainage and splash guards for a model trimmer, and a vibrator with adjustable intensity and a cover.
- Reprocessing: written cleaning and sterilisation instructions for every reusable item, so it fits your decontamination routine.
The Equate difference
Equate's catalogue lists 116 stainless steel stock impression trays: 70 perforated trays (14 of them partial, quadrant or anterior designs), 33 solid trays and 13 tray sets. For mixing and model work it has 17 plaster spatulas and knives, 6 laboratory spatulas, 19 cement spatulas, 9 wax knives and carvers, plaster cutting shears, a 16-piece dental laboratory instrument set and a stainless steel dappen dish. Equate does not supply rubber bowls, disposable trays, cartridge guns or powered bench equipment.
Equate Dental Materials Equipment: From Impression to Finished Model options

Cement Spatula 6 mm
EI-0078
Cement Spatula 6mm - Double-Ended Knurled Handle
EI-0079
Cement Spatula - Double-Ended Titanium-Coated Blades
EI-0080
Cement Spatula 5.0mm Hollow Handle 10mm
EI-0126
Cement Spatula 6.0mm - Double-Ended
EI-0127
Cement Spatula 7mm - Solid Handle 6mm
EI-0128
Cement Spatula 5 mm - 6 mm Solid Handle
EI-0194
Cement Spatula
EI-0930
Cement Spatula 6mm Light Blue Silicone Handle
EI-1328
Cement Spatula 5.0mm - Light Blue Silicone Handle
EI-1329
Cement Spatula 7mm Light Blue Silicone Handle
EI-1330
Cement Spatula 4/2.2mm Light Blue Silicone Handle
EI-1331Browse all prosthodontic & laboratory instruments Browse all restorative & operative instruments
Buying in your market
Frequently asked questions
What is a dual-arch or triple tray used for?
It records the prepared tooth, the opposing teeth and the bite in a single closure. A mesh across the frame separates the upper and lower records. It suits single crowns with a stable bite; larger cases usually need full-arch impressions and a separate bite record.
Why do you vibrate plaster or stone when pouring a model?
Vibration brings trapped air to the surface of the mix and helps the stone flow into every part of the impression. Pouring from one end on a vibrator pushes air ahead of the stone, so the model has fewer bubbles on the teeth.
Do impressions need to be disinfected before they go to the laboratory?
Yes. CDC guidance and HTM 01-05 both expect impressions and bite records to be rinsed and disinfected before they are handled in the laboratory, using a disinfectant the impression material tolerates, and the case should be labelled with the method used.
How soon should an alginate impression be poured?
As soon as you can, and within about 30 minutes for a conventional alginate. Walker and colleagues (Angle Orthodontist, 2010) found a conventional alginate most accurate when poured at 30 minutes, the earliest time tested, and that it kept shrinking with longer storage. Extended-storage alginates tolerate longer delays, but only for the time their maker states, and immediate pouring was still the most accurate in a 2014 comparison by Rohanian and colleagues.
Is a mechanical alginate mixer better than mixing by hand?
It depends on the mixer. In McDaniel and colleagues' 2013 bench study, centrifugal and vacuum mixers left fewer surface bubbles than hand mixing and needed the least mixing time; a spinning-bowl mixer was not reported to beat the hand. Hand mixing works well when the powder goes into the bowl before the water and the mix is pressed firmly against the bowl wall.
What equipment do you need to pour and trim a study model?
A flexible bowl and a laboratory or plaster spatula, gypsum and water measured to the maker's ratio, a vibrator to run the stone into the impression without bubbles, a laboratory knife to separate and pare the model, and a wet model trimmer used with eye protection and a mask. A vacuum mixer is optional and gives a denser mix.
References
- Boyd LB. Dental Instruments: A Pocket Guide, 7th edition. Saunders/Elsevier, 2020 (photographs used under licence)
- Kohn WG, et al. Guidelines for Infection Control in Dental Health-Care Settings, 2003. MMWR 52(RR-17), Centers for Disease Control and Prevention (Dental laboratory section)
- Department of Health (England). Health Technical Memorandum 01-05: Decontamination in primary care dental practices, 2013 edition
- ISO 21563:2021 Dentistry: Hydrocolloid impression materials
- ISO 6873:2013 Dentistry: Gypsum products
- Powers JM, Wataha JC. Dental Materials: Foundations and Applications, 11th edition. Elsevier, 2017
- McDaniel TF, Kramer RT, Im F, Snow D. Effects of mixing technique on bubble formation in alginate impression material. General Dentistry 2013;61(6):35–39
- Walker MP, Burckhard J, Mitts DA, Williams KB. Dimensional change over time of extended-storage alginate impression materials. Angle Orthodontist 2010;80(6):1110–1115
- Rohanian A, Ommati Shabestari G, Zeighami S, Samadi MJ, Shamshiri AR. Effect of storage time of extended-pour and conventional alginate impressions on dimensional accuracy of casts. Journal of Dentistry (Tehran) 2014;11(6):655–664
- Kimoto K, Tanaka K, Toyoda M, Ochiai KT. Indirect latex glove contamination and its inhibitory effect on vinyl polysiloxane polymerization. Journal of Prosthetic Dentistry 2005;93(5):433–438
- Kendzior GM, Leinfelder KF, Hershey HG. The effect of cold temperature mixing on the properties of zinc phosphate cement. Angle Orthodontist 1976;46(4):345–350
I am a…
Related
- Fixed Prosthodontic Instruments for Crown and Bridge Work
- Dental Sterilisation and Protective Equipment
- Composite Restorative Instruments, from Matrix Band to Finishing Strip
- Orthodontic Instruments: What Each One Does, Stage by Stage
- Dental Articulator
- Restorative Dental Hand Instruments
- Dental Impression Trays
- Dental Spatulas (Cement, Plaster, Wax and Laboratory)
- Crown and Bridge Tray Setup: Preparation and Cementation