Composite Restorative Instruments, from Matrix Band to Finishing Strip
Written by the Equate Instruments Technical Team · Reviewed by the Medical & Dental Board, Equate Instruments · Updated ·
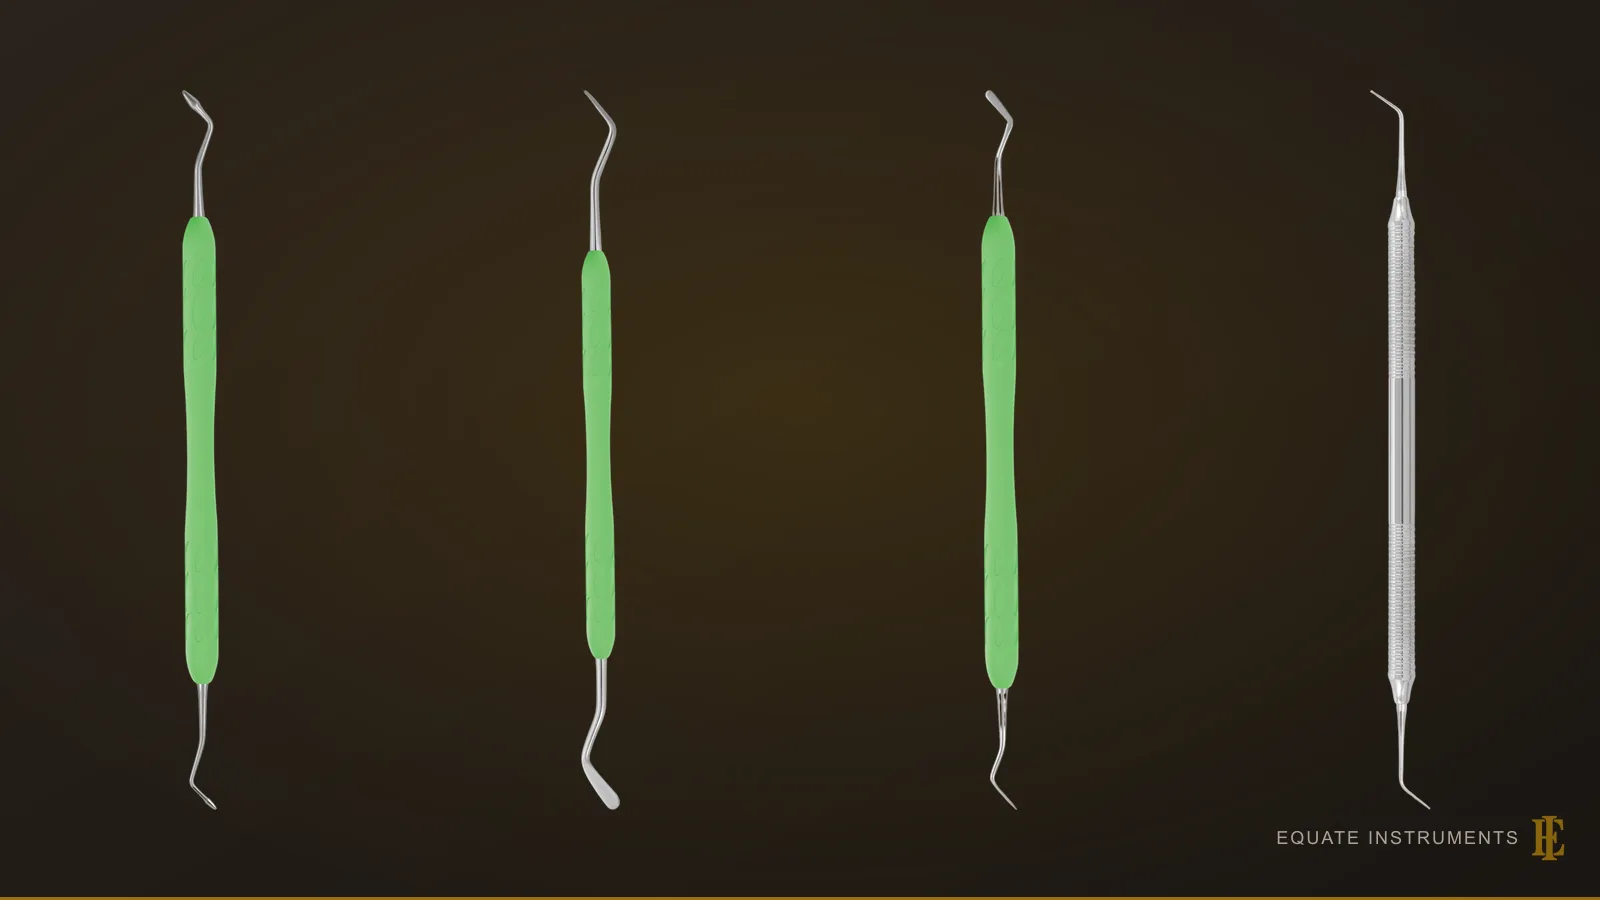
Composite restorative instruments are the hand instruments, matrices and small devices used to place a tooth-coloured resin filling. They include matrix bands or clear strips to rebuild missing walls, applicators and wells for etchant and adhesive, coated or resin placement instruments and burnishers to pack and shape the resin, a curing light to set it, and finishing strips to smooth the contacts.
Key points
- Composite is sticky, light-sensitive and shaped before it sets, so its instruments are titanium nitride-coated metal or resin that resists scratching and stays smooth, its materials are kept covered from light, and every layer is cured as it goes.
- A curing light only works as well as its output, its distance from the resin and the time it is held there: check it with a radiometer and protect every pair of eyes in the room from its blue light.
- Most of the kit is either single use (bands, applicators, strips, disposable wells) or heat sterilised after every patient (placement instruments, burnishers, tension rings); the curing light is barrier-protected and disinfected.
What are composite restorative instruments?
A composite restoration is built rather than packed. The tooth is etched and bonded, resin is added in thin layers, each layer is set with blue light, and the surface is then shaped and polished. Linda Bartolomucci Boyd's Dental Instruments: A Pocket Guide (Elsevier) groups the instruments for this work into one chapter, and they sit on top of the basic setup of mirror, explorer and cotton forceps.
Two properties of resin composite drive almost every design choice. It sticks to bare steel and pulls away from the cavity wall when the instrument is lifted, so working ends are coated or made of resin. And it starts to set under any strong light, including the operating lamp, so materials are dispensed into covered wells and only exposed when they are needed. The cavity itself is prepared with rotary instruments and the hand instruments in the enamel cutting guide; this page covers what happens after the preparation is finished.
| Instrument | Job in a composite restoration | Reuse |
|---|---|---|
| Sectional matrix band and tension ring | Rebuilds the missing side wall in a Class II cavity and gives a tight, curved contact | Band single use; ring heat sterilised |
| Clear matrix strip | Shapes the proximal surface of front teeth (Class III and IV) and lets curing light through | Single use |
| Applicator brush | Carries etchant, primer and adhesive onto the cavity walls | Single use |
| Well with light cover | Holds adhesive and composite on the tray, protected from light | Disposable or heat sterilised |
| Composite placement instrument | Carries resin to the cavity, then packs and contours it | Heat sterilised |
| Composite burnisher | Forms cusps, pits and fissures before the resin is cured | Heat sterilised |
| Curing light, shield and radiometer | Sets light-cured materials, protects eyes and checks light output | Barrier and disinfect; detachable guides heat sterilised if permitted |
| Finishing strip | Smooths and finishes the proximal surface after curing | Single use |
Sectional matrix systems and clear strips
When a cavity includes a proximal surface, the lost wall has to be replaced before resin can be placed against it. On back teeth this is usually done with a sectional matrix: a short, thin, pre-curved metal band that covers only the one proximal surface, held by a wedge at the gingival margin and a spring-tension ring (stainless steel or nickel-titanium) that sits between the teeth. The ring grips the band against the tooth and pushes the teeth very slightly apart, so that once the band is removed the restoration meets its neighbour in a tight contact.
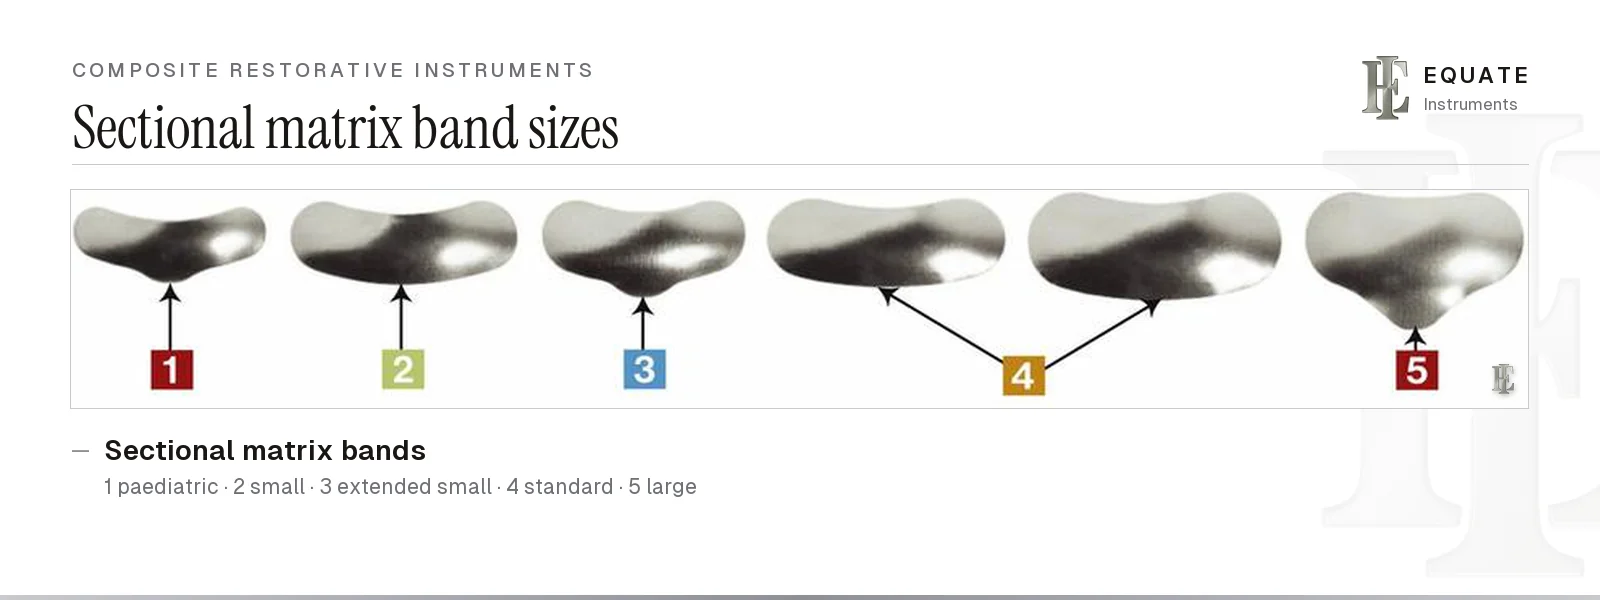
Bands come in a range of heights and curvatures. Boyd shows a paediatric band for primary molars, small bands for premolars and small molars, an extended small band for cavities that reach well below the contact, a standard band for molars and a large band for deep cervical boxes. Choosing the right one is a matter of matching band height to the depth of the box: too short and resin escapes past the gingival margin, too tall and the band is hard to seat under the ring. Rings come in sizes too, and are opened and placed with rubber dam clamp forceps or a dedicated ring forceps (see the dental dam guide).
Front teeth are handled differently. Class III and IV composites are shaped against a clear polyester strip, which is thin enough to pass through the contact and transparent so the curing light can reach the resin through it. Circumferential matrices held in a Tofflemire-style retainer, as described in the amalgam restorative instruments guide, can also be used for composite, but they give a flatter contact than a sectional system. For Class II composites the evidence favours the sectional route: a 2025 systematic review in Cureus by Kamble and colleagues pooled six randomised trials and found tighter proximal contacts with sectional bands and rings, with operators equally satisfied with both systems.
Applicators and wells for bonding materials
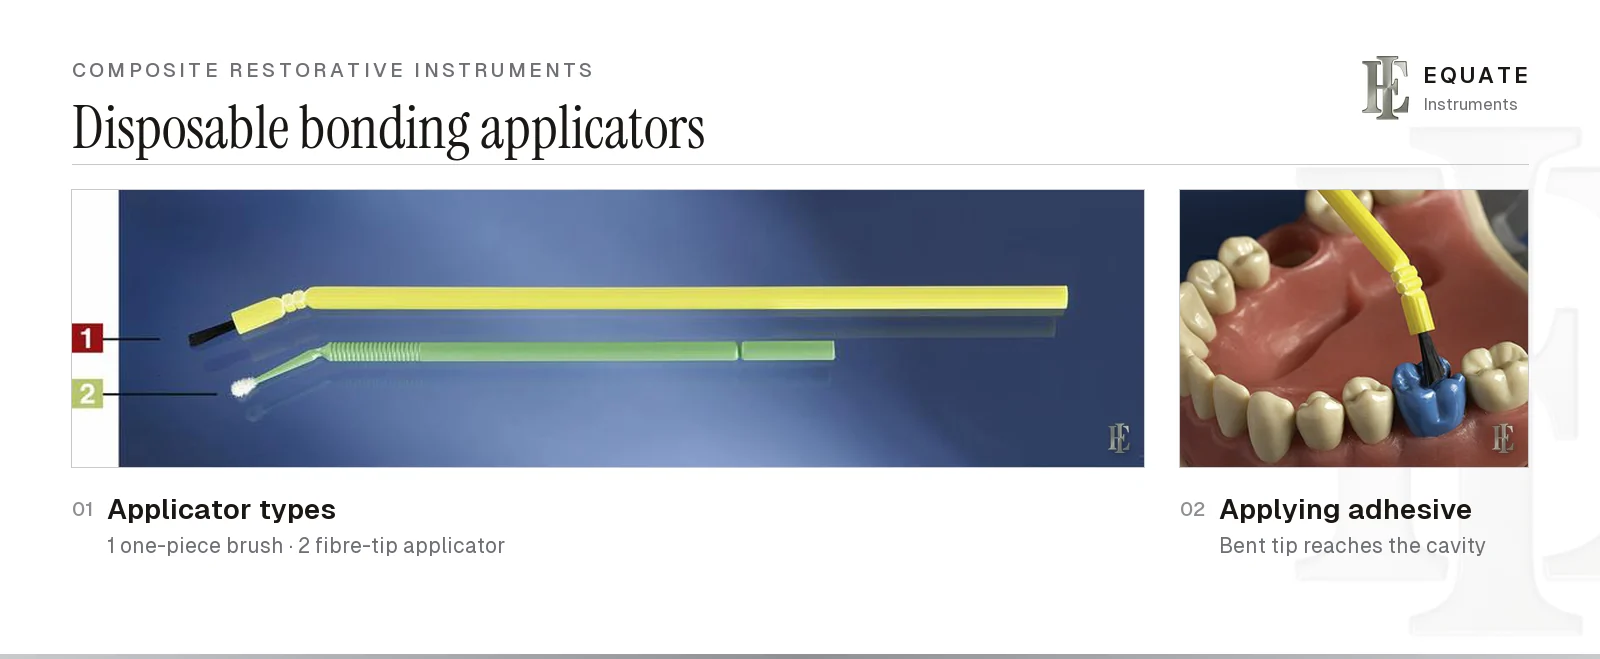
Bonding is the step that holds a composite in place, and it relies on putting a thin, even layer of each liquid exactly where it is needed. Disposable applicators do this. The one-piece brush type has short bristles on a flexible neck that can be bent to reach a distal box or a lingual surface; the fibre-tip type has a tiny lint-free bud that soaks up a measured drop and scrubs it into the dentine. Both come in several tip sizes, from fine tips for narrow boxes to larger tips for veneers and sealants.
Clinics often use a different colour of applicator for each liquid on the tray, so the etchant brush is never dipped into the adhesive. Applicators are single use; dispose of them after the procedure according to your national healthcare waste rules. The same applicators appear on sealant trays and in orthodontic bonding (see the orthodontic instruments guide).
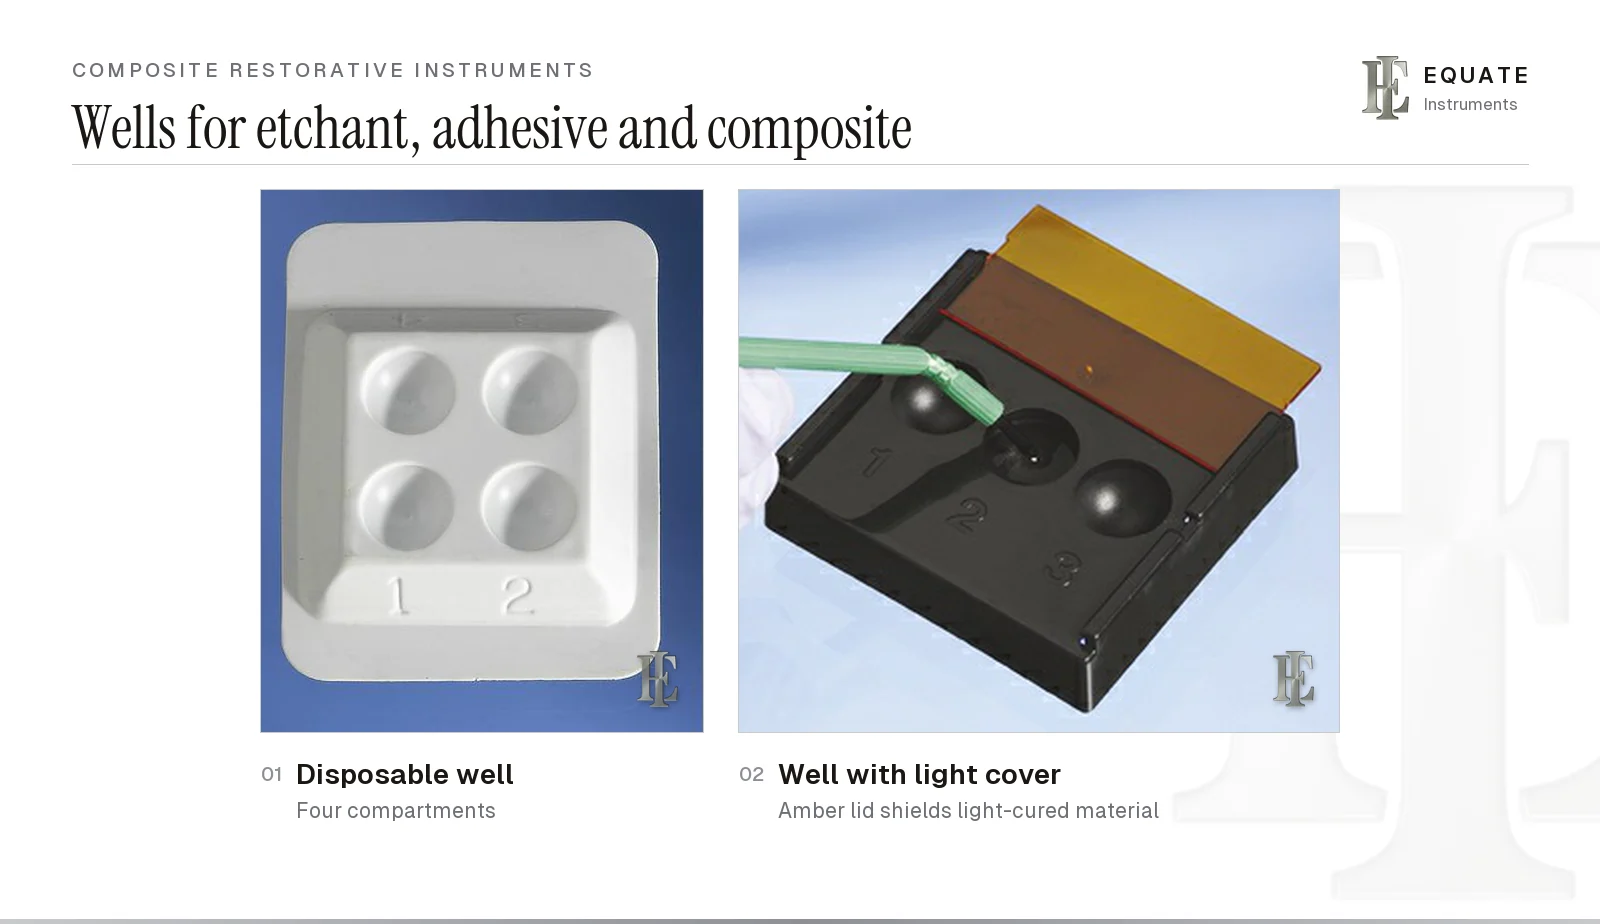
A well is a small palette with numbered hollows that keeps each material separate on the tray: etchant, primer, adhesive and a little composite for each shade. Disposable plastic wells are used once and discarded. Reusable wells can be cleaned and steam sterilised if the maker's instructions allow it.
The feature that matters most is a light cover. An amber or orange lid filters out the blue wavelengths that start the setting reaction, so adhesive and composite stay workable for the length of the procedure even under a bright operating light. A stainless steel dappen dish does the same job for liquids that are not light sensitive, but it gives no protection from light.
Composite placement instruments
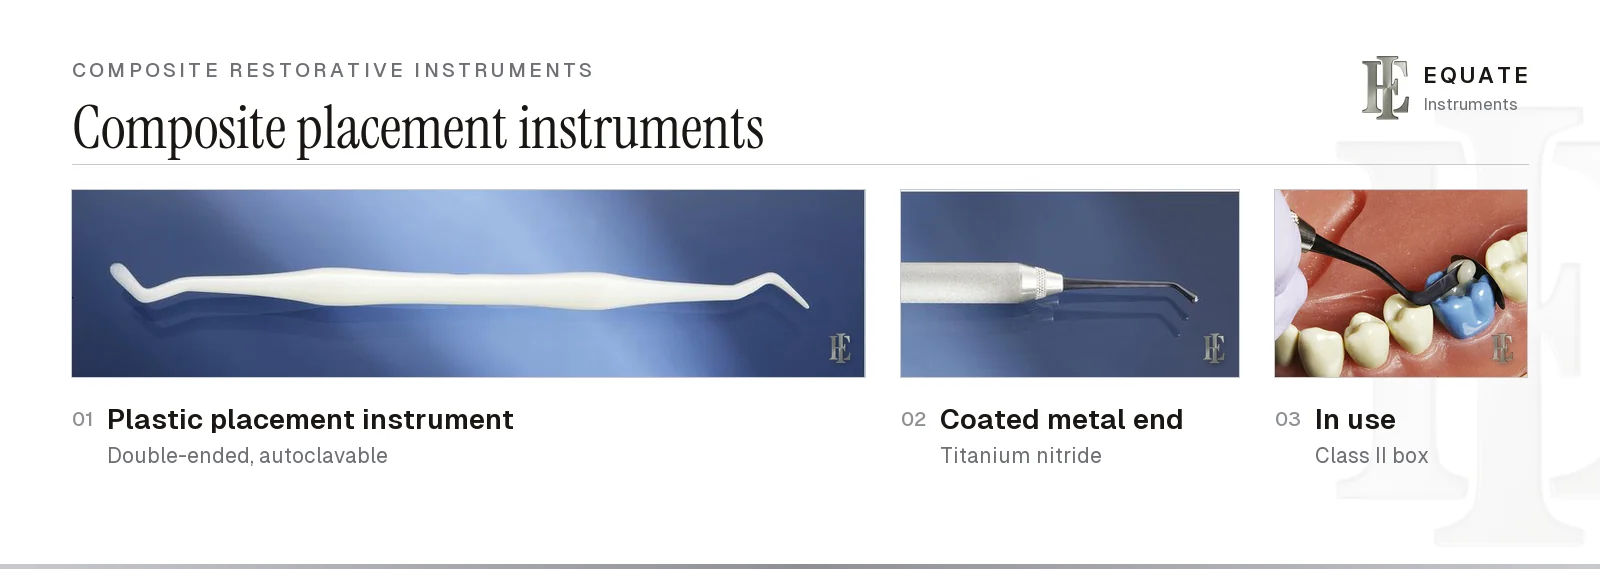
A composite placement instrument (often called a plastic filling instrument) carries resin into the cavity and then condenses, spreads and shapes it. Most are double-ended. One end is a thin, flat paddle for picking up a small increment and laying it against a wall; the other is a smaller blade or a round packer for pressing the resin into line angles and contouring the surface. Ends are set at different angles so that one instrument can reach both mesial and distal walls.
There are two main constructions. Resin (plastic) instruments cannot grey light shades of composite; they are steam sterilisable but wear and bend over time. Metal instruments are usually coated, typically with titanium nitride, which gives a hard, smooth, gold or dark surface that resists scratching and does not discolour the resin. The coating is not a release agent: in a 1991 laboratory study by Steele, McCabe and Barnes it was slightly stickier than clean, polished steel. Its value is durability, because scratched bare steel is what drags composite, and a coated instrument keeps a crisp, smooth edge for longer and is easier to control in thin layers.
Related shapes include flow composite spatulas, with very fine tips for spreading flowable resin; Heidemann spatulas, thin flat blades for spreading and adapting each layer; and packer-modellers, which pair a condensing end with a modelling end. A composite gun pushes resin out of a single-use capsule (compule) straight into the cavity. The composite instruments page compares these shapes, the coating research and how small, oblique increments keep shrinkage stress low.
Composite burnishers and shaping anatomy
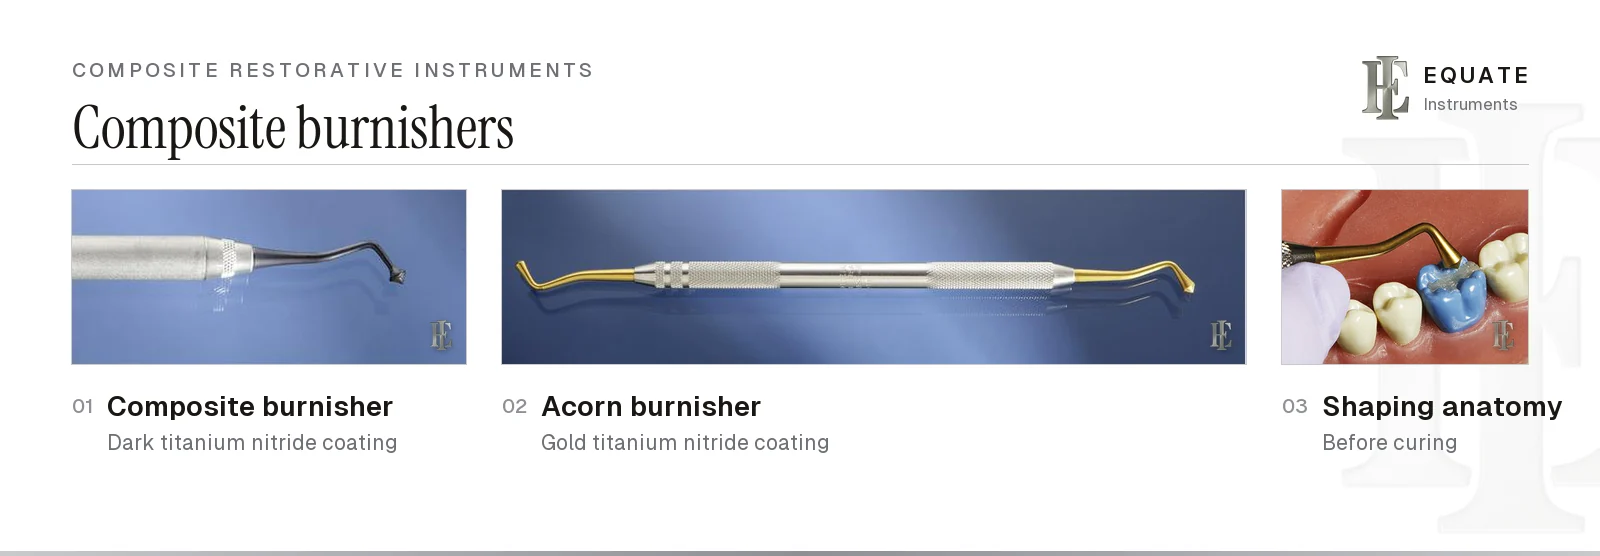
Once the last increment is in, the occlusal surface is shaped before it is cured. A composite burnisher is used to press in the central fissure, define the cusp slopes and smooth the margins, so that very little needs to be removed with a bur afterwards. Boyd shows a double-ended composite burnisher with a dark titanium nitride coating and an acorn burnisher with a gold-coloured titanium nitride coating; the acorn shape fits naturally into the fossae and grooves of a molar.
The coating is the point. A bare steel burnisher drags the soft resin and can leave grey streaks on light shades, while a coated tip slides over the surface. Work with a light touch and a slightly wiping motion: heavy pressure on uncured composite pulls it away from the cavity margin. Ball and football burnishers from the amalgam tray are sometimes used for composite as well, but only coated versions should be.
Curing lights, eye protection and radiometers
A curing light emits blue light that starts the setting reaction in adhesives, composites, light-cured liners and sealants. Modern units are LED lights, usually cordless with a rechargeable battery and a charging base; older units used a halogen bulb. ISO 10650 (current edition 2026, adopted in Europe as EN ISO 10650) sets the requirements for these devices: chairside quartz-tungsten-halogen and LED activators working between 380 and 515 nm, whether battery, mains or dental-unit powered. Lasers, plasma arc units and laboratory curing units fall outside it, and ISO 4049 covers the polymer-based restorative materials they cure.
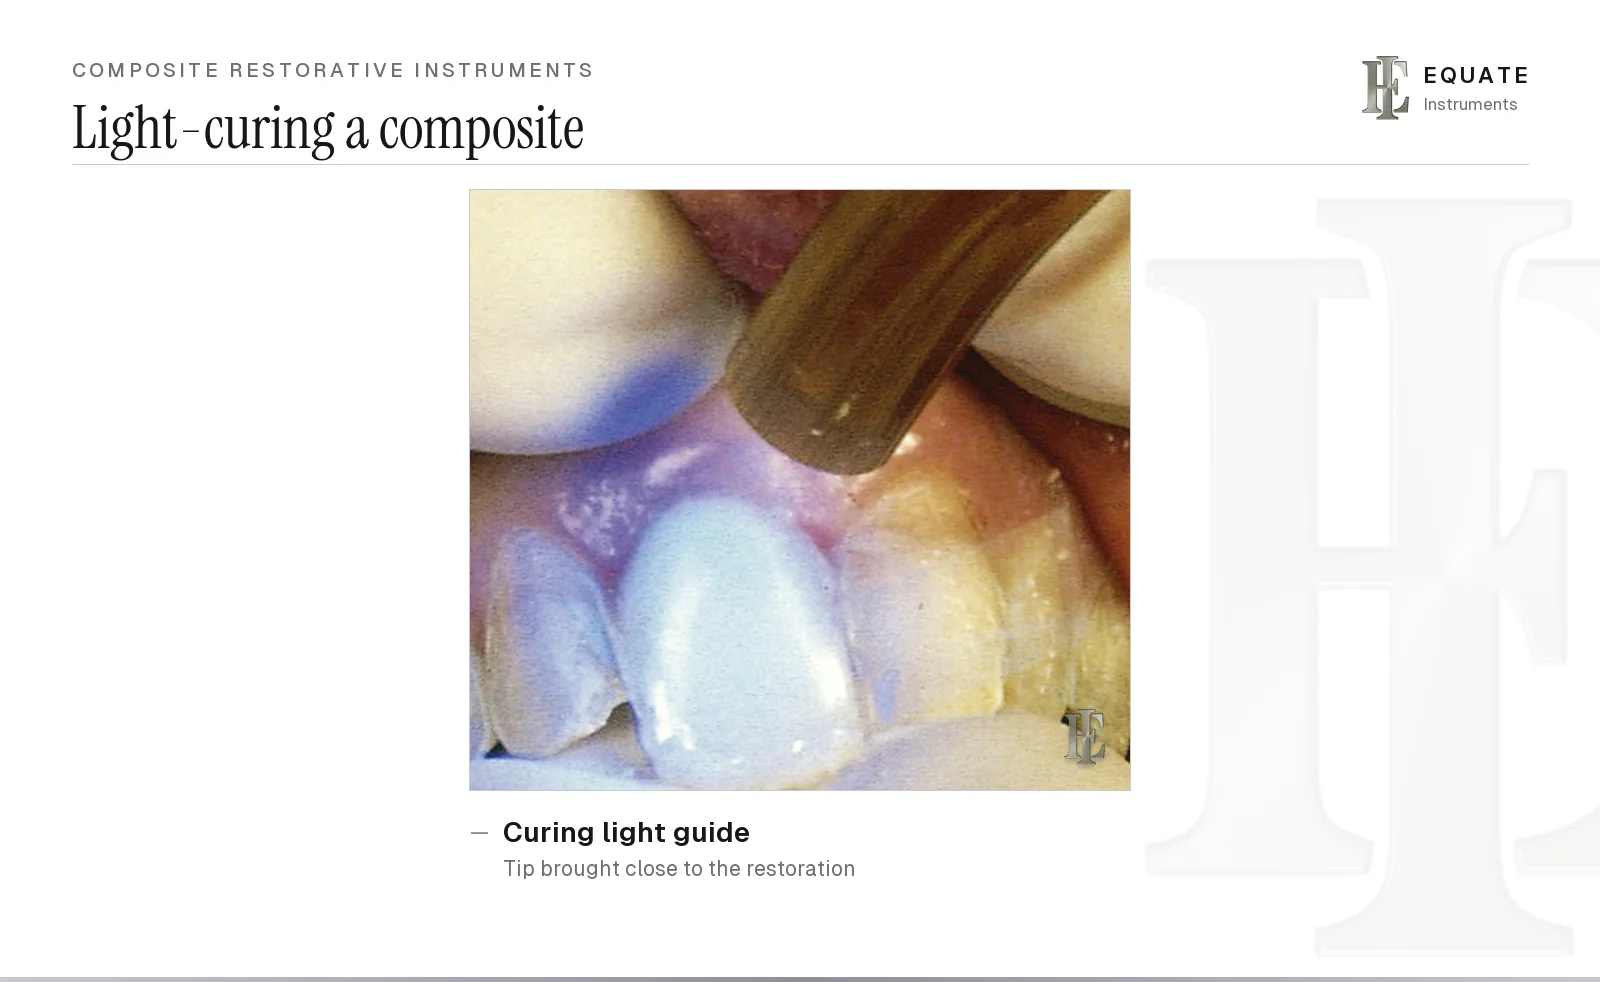
How well a composite sets depends on the light reaching it, not just on the seconds on the timer. Richard Price's review of light curing (Dental Clinics of North America, 2017) and the American Dental Association's guidance on curing lights both stress the same points: hold the tip as close to the resin as possible and perpendicular to the surface, keep it steady, and follow the curing time the material maker gives for that shade and depth. Conventional composites are placed and cured in layers no more than about 2 mm thick (2 mm or less); bulk-fill materials are designed for deeper layers but only to the depth their maker states. The ADA expresses the dose as output multiplied by time: 1,000 mW/cm² held for 20 seconds delivers 20 J/cm². If a radiometer shows that output has fallen, lengthen the exposure by the same percentage. To limit heating of the pulp, blow a stream of air over the tooth while curing or wait a few seconds between cycles.
Blue light can damage the retina, so the clinician, assistant and patient all need protection while the light is on. Orange filtering paddles, shields that clip onto the light guide and orange-tinted glasses are the usual options; the ADA advises a filter matched to the wavelengths of the light in use, and in its own laboratory test 9 of 22 filtering devices let through from more than 4% to more than 15% of the blue light.
Output also falls over time as batteries age, light guides get chipped or coated with cured resin, and barrier sleeves are added. A radiometer is a small meter that reads the light's output when the tip is held over its sensor. Checking each light regularly, and with its barrier sleeve in place, shows when a unit needs cleaning, a new battery or replacement. Use a radiometer made for the light type, LED or halogen, and treat its reading as a comparison with the same light's baseline when new rather than an absolute value; the ADA notes handheld meters may not match the maker's stated output but are consistent enough for comparison. A barrier sleeve can cut output by as much as 40%, according to the ADA, so measure with the sleeve on and lengthen the curing time if output has dropped.
Finishing strips and finishing the restoration
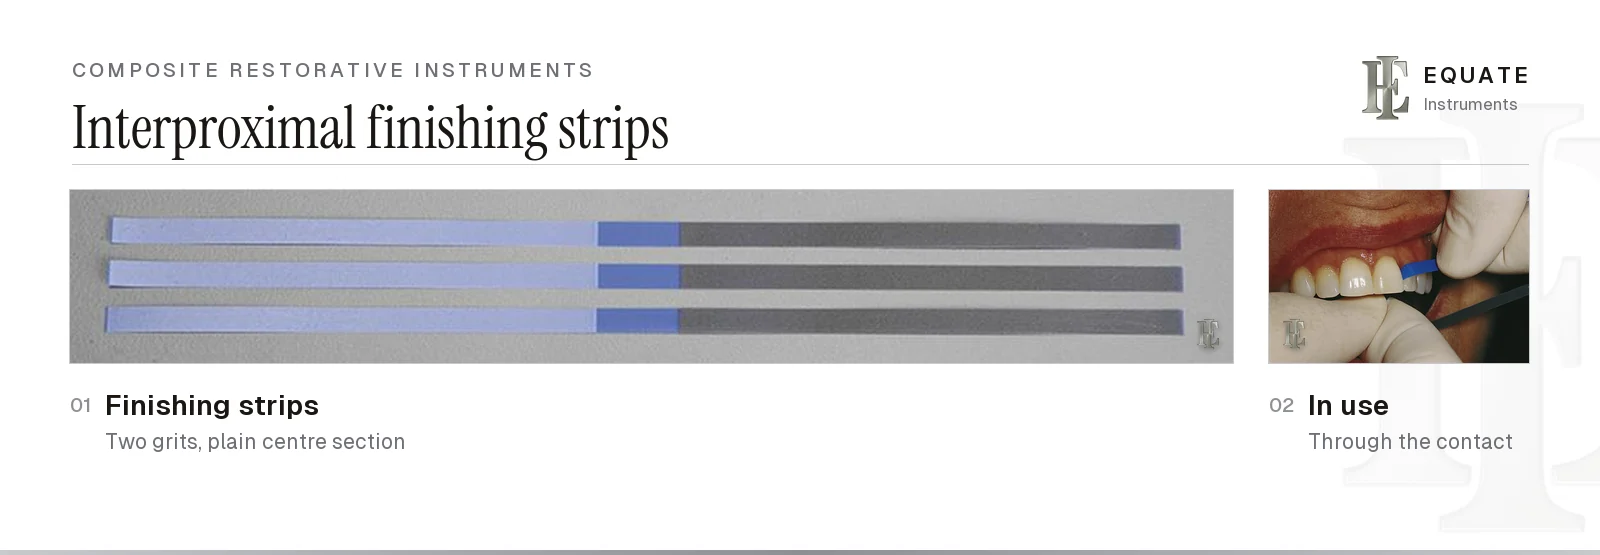
After curing, the proximal surface often carries a thin overhang or rough flash where the matrix did not seal perfectly. A finishing strip is a narrow plastic or metal strip coated with abrasive, passed through the contact and drawn back and forth in a gentle S-shape to smooth the proximal surface gingival to the contact, and occlusal to it where there is flash. Most strips have a coarser grit at one end and a finer one at the other, so the same strip can shape and then smooth.
Many strips have a short section with no abrasive in the middle. This plain section is what slides through the contact, so the strip can be positioned without scraping enamel on the way in. Pass only the plain centre through the contact itself and work the abrasive part on the surface either side; drawing grit through the contact area opens it. Use the finest grit that does the job. Strips are single use. Occlusal finishing is done with finishing burs and polishing discs on a mandrel, covered in the burs and rotary instruments guide.
The two composite trays at a glance
This is a summary; the step-by-step composite tray setup covers the order of work. Boyd lays out two composite trays: one for front teeth (Class III and IV) and one for Class I, II and V restorations. Both start with the basic setup of mouth mirror, explorer and cotton forceps, plus a spoon excavator, and add the bonding and placement instruments in the order they are used. The main difference is the matrix: a clear strip and a holding clamp for anterior teeth, against a sectional band, wedges, tension rings and ring-placement forceps for posterior teeth. Both trays also carry a local anaesthetic syringe (see the local anaesthetic equipment guide) and a high-volume evacuator tip and air/water syringe tip (see the evacuation and delivery systems guide).
The procedure page sets out the sequence: match the shade before the teeth are isolated, build the missing proximal wall first so a Class II becomes a simpler Class I, cure every increment and sculpt the anatomy before the final cure. It also lists the usual faults, such as choosing the shade on dried teeth, leaving a sectional band unwedged so it creates an overhang, and leaving adhesive or composite open under the operating light. Isolation has its own rubber dam tray: a 2021 Cochrane review by Miao and colleagues found that a dam may improve six-month survival of cervical composites compared with cotton rolls, but the evidence was of low certainty and no clear difference was shown at later checks.
| Item | Class III and IV (anterior) | Class I, II and V (posterior and cervical) |
|---|---|---|
| Basic setup | Mouth mirror, explorer, cotton forceps | Mouth mirror, explorer, cotton forceps |
| Caries removal | Spoon excavator | Spoon excavator |
| Matrix | Clear polyester strip with holding clamp, wooden wedges | Sectional band, wooden wedges, tension rings, ring forceps |
| Bonding | Liner applicator, applicator brushes in three colours, covered well | Liner applicator, applicator brushes in three colours, covered well |
| Placement and shaping | Coated metal and resin placement instruments, gold carving knife | Coated metal and resin placement instruments, coated composite burnisher, gold carving knife |
| Shade and occlusion | Shade guide, articulating paper and holder | Shade guide, articulating paper and holder |
| Finishing | Burs, mandrel and finishing discs, crown and bridge scissors, dental floss | Burs, mandrel and discs, finishing strip, dental floss |
Cleaning, sterilising and single-use items
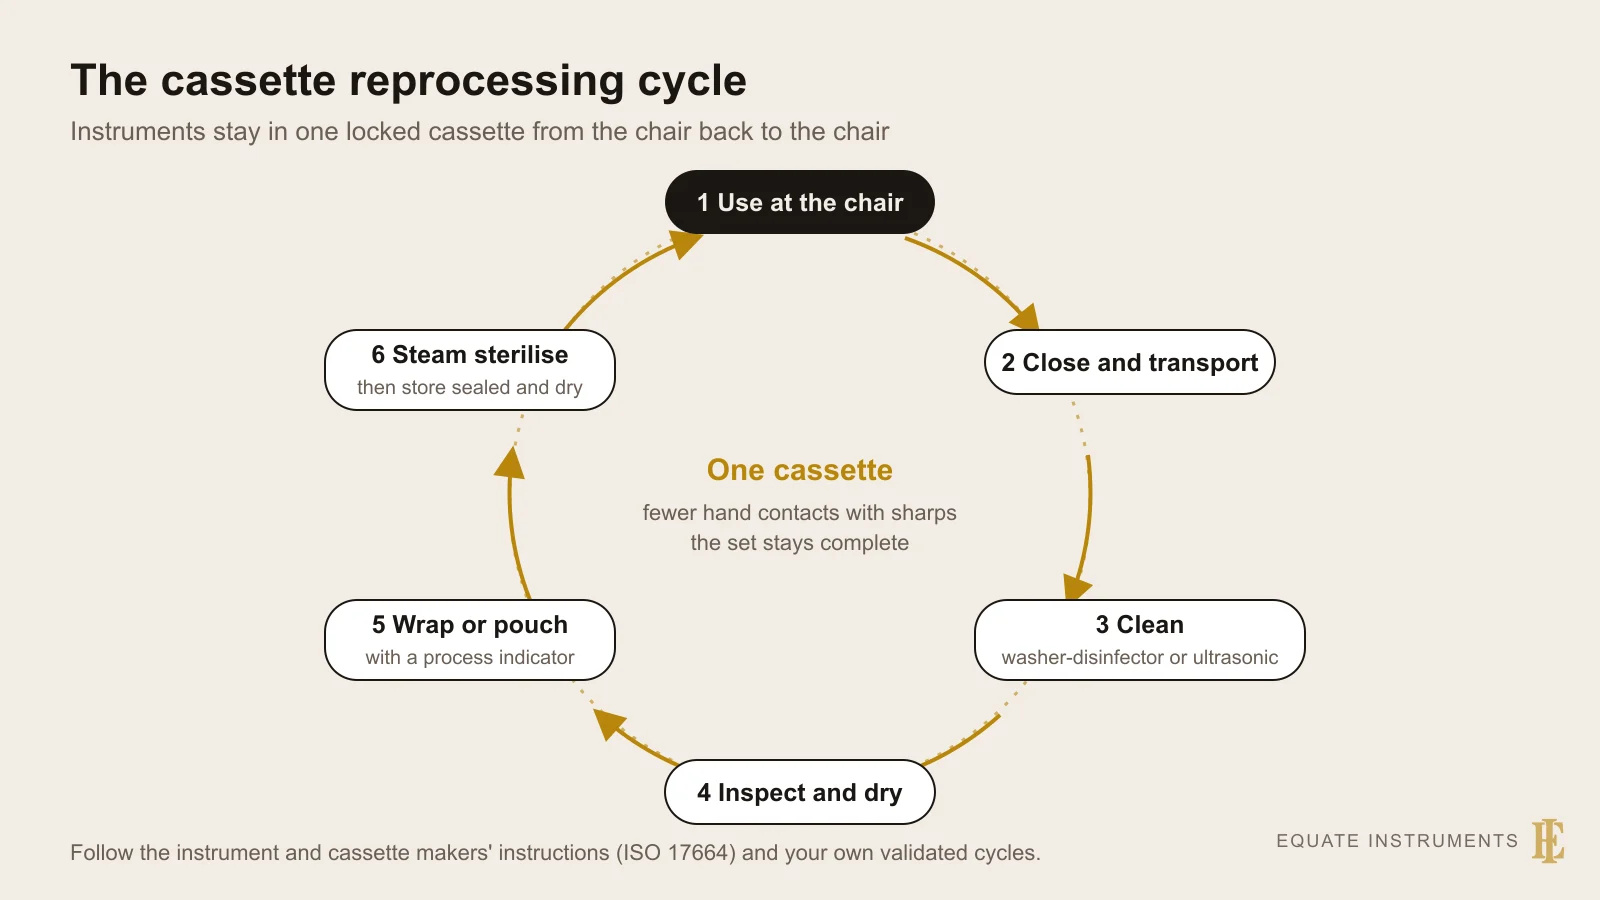
Composite instruments contact mucous membrane, so reusable ones are semi-critical items. The US Centers for Disease Control and Prevention (CDC) guidelines for dental settings and the Department of Health's HTM 01-05 for dental practices in England both expect heat-tolerant semi-critical instruments to be cleaned and then heat sterilised between patients. Follow the manufacturer's reprocessing instructions and your national regulations; the sterilisation and protective equipment guide covers the decontamination room itself. HTM 01-05 (paragraph 2.17) also asks practices to switch hard-to-clean items to single-use versions where possible, and names matrix bands among them.
- Single use and discard: sectional and circumferential matrix bands (into a sharps container, as they have thin metal edges), clear strips, applicator brushes, disposable wells and finishing strips.
- Heat sterilise after every patient: placement instruments, burnishers, carving knives, tension rings, ring forceps and reusable wells. Clean off cured resin first; sterilisation does not remove it.
- Pack with an internal process indicator in a sealed pouch, or wrap the cassette with an indicator inside and indicator tape outside, then check both indicators before use.
- Look after coatings: use neutral-pH detergents, avoid scraping resin off with a steel instrument, and retire coated tips once the coating is worn through to bare steel.
- The curing light body, and LED units with the chip in the tip, cannot be autoclaved: cover them with a barrier sleeve and clean and disinfect them between patients with a product the maker approves. A detachable light guide, and some shields, can be heat sterilised if the maker's instructions allow it; the ADA describes autoclavable light guides as the best option for infection control. Radiometers are only wiped and disinfected. Remove cured resin from the light guide tip, since it blocks output.
Buying composite instruments: what to check
- Coating: titanium nitride or a similar hard coating that is smooth along the whole working end, with no bare spots at the edges. Expect it to resist scratching and discolouring, not to make the tip less sticky than polished steel.
- Working ends: a thin, flexible paddle for placement and a firm, well-defined packer or blade for contouring; mini and flow ends for small and anterior cavities.
- Angles: double-ended instruments with offset ends that reach mesial and distal walls without twisting the wrist.
- Resin instruments: autoclavable grade, and enough spares to replace them as tips wear or bend.
- Burnishers: acorn and ball shapes in sizes that match the fissure pattern of premolars and molars.
- Handles: a wide, lightweight handle reduces pinch force over a long restorative session; colour-coded handles make it easy to keep composite instruments in their own cassette.
- Kits: a composite restoration kit kept in a cassette stays complete through reprocessing and cuts sorting time.
The Equate difference
Equate's catalogue lists 70 products for composite work across 12 subcategories: 61 hand instruments (17 composite spatulas and plastic filling instruments, 9 flow composite spatulas, 12 Heidemann spatulas, 7 composite pluggers and packer-modellers, 8 non-stick coated spatulas, 2 non-stick burnishers, a non-stick plugger, a non-stick carver and 4 placement instruments for small-volume restorative materials), 2 application guns for flowable composite and 7 instrument kits. Equate does not list curing lights, radiometers, sectional matrix systems or disposable applicators and strips.
Equate Composite Restorative Instruments, from Matrix Band to Finishing Strip options

Composite Knife / Carver - Non-Stick Double-Ended
EI-0022
Heidemann Flex Composite Spatula 2.0 mm - Solid Handle
EI-0048
Heidemann Composite Spatula 2.5 mm - Solid Handle
EI-0049
Heidemann Flex Composite Spatula 3.0 mm - Solid Handle
EI-0050
Composite Instrument Anterior - Double-Ended Hollow Handle
EI-0097
Composite Spatula 2.5mm - Knurled Hollow Handle
EI-0098
Composite Plugger 1.6mm/1.3mm - Knurled Handle
EI-0101
Composite Plugger No. 2 Flat - Double-Ended Knurled Handle
EI-0102
Composite Trimmer - Hollow Handle
EI-0103
Anterior Composite Placement Instrument 1.7/1.2 mm, Solid Handle 6 mm
EI-0166
Heidemann Flexible Spatula 2.5 mm - 6 mm Solid Handle
EI-0167
Composite Instrument UP1 - Double-Ended Solid Handle
EI-0193Browse all restorative & operative instruments
Buying in your market
Frequently asked questions
What instruments are used for a composite filling?
After the basic mirror, explorer and cotton forceps, a composite tray adds a matrix (a sectional band with wedges and a tension ring, or a clear strip for front teeth), applicator brushes and a covered well for the bonding liquids, placement instruments and a burnisher to pack and shape the resin, a curing light with eye protection, and finishing strips, discs and burs. The composite tray setup puts them in order of use.
What is a plastic filling instrument?
It is the traditional name for a composite placement instrument: a double-ended hand instrument with a flat paddle and a smaller blade or packer for carrying, packing and contouring tooth-coloured filling material. Despite the name, many are metal with a hard, scratch-resistant coating such as titanium nitride; others are made of autoclavable resin.
Why are composite instruments coated or made of plastic?
Resin instruments cannot grey light shades, and a titanium nitride coating keeps a metal tip hard and smooth for many cycles; scratched bare steel is what drags composite. The coating is not less sticky than clean, polished steel; the research is summarised on the composite instruments page.
Can I use amalgam instruments for composite?
Some shapes overlap, but uncoated amalgam condensers, carvers and burnishers are a poor choice because composite sticks to them. Keep a separate set of coated or resin instruments for composite, and never use an instrument that has amalgam residue on it.
How thick should each layer of composite be?
Conventional composites are usually placed and cured in layers no more than about 2 mm thick (2 mm or less) so the light can set the full depth. Bulk-fill composites are designed for thicker layers, but only up to the depth their manufacturer states. Always follow the curing time in the material's instructions.
How often should a curing light be checked?
Check it with a radiometer on a regular schedule set by the practice (many check weekly) and whenever results seem inconsistent. Test it with the barrier sleeve in place, compare the reading with the light's own baseline, keep the tip free of cured resin and replace the battery or the light guide when output falls.
How long should composite be light-cured?
As long as it takes to deliver the dose the material maker specifies, not a fixed number of seconds. The dose is output multiplied by time, so a light giving 1,000 mW/cm² for 20 seconds delivers 20 J/cm². If the barrier sleeve or an ageing light lowers the radiometer reading, lengthen the time by the same proportion.
References
- Boyd LB. Dental Instruments: A Pocket Guide, 7th edition. Saunders/Elsevier, 2020 (photographs used under licence)
- Price RBT. Light Curing in Dentistry. Dental Clinics of North America 2017;61(4):751–778
- American Dental Association. Dental Curing Lights (Oral Health Topics)
- Kohn WG, et al. Guidelines for Infection Control in Dental Health-Care Settings, 2003. MMWR 52(RR-17), Centers for Disease Control and Prevention
- Department of Health (England). Health Technical Memorandum 01-05: Decontamination in primary care dental practices, 2013 edition (NHS England)
- ISO 10650:2026 Dentistry: powered polymerization activators (third edition; adopted as EN ISO 10650:2026)
- ISO 4049 Dentistry: polymer-based restorative materials
- Steele JG, McCabe JF, Barnes IE. Properties of a titanium nitride coating for dental instruments. Journal of Dentistry 1991;19(4):226–229
- Kamble S, Ramugade M, Sayed A, Sapkale K, Gulhane A, Magar A. The effectiveness of circumferential and sectional matrix systems in obtaining optimum proximal contact in Class II composite restorations: a systematic review. Cureus 2025;17(5):e84967
- Miao C, Yang X, Wong MC, et al. Rubber dam isolation for restorative treatment in dental patients. Cochrane Database of Systematic Reviews 2021;5:CD009858
I am a…
Related
- Restorative Dental Hand Instruments
- Amalgam Restorative Instruments: What Each One Does
- Dental Dam Instruments Explained, from Sheet to Frame
- Dental Burs and Rotary Instruments: Types, Shanks and Uses
- Enamel-Cutting Instruments and G.V. Black's Instrument Formula
- Spoon Excavators (Dental Excavators)
- Fixed Prosthodontic Instruments for Crown and Bridge Work
- Preventive, Sealant and Whitening Tray Instruments
- Dental Composite Instruments: Placement, Sculpting and the Composite Gun
- Composite Restoration Tray Setup (Class I to V)
- Dental Burnishers: Ball, Football, Acorn, T-Ball and Beavertail
- Tofflemire and Other Matrix Band Retainers
- Dental Sterilisation and Protective Equipment
- Rubber Dam (Dental Dam) Tray Setup and Placement
- Dental Materials Equipment: From Impression to Finished Model