Enamel-Cutting Instruments and G.V. Black's Instrument Formula
Written by the Equate Instruments Technical Team · Reviewed by the Medical & Dental Board, Equate Instruments · Updated ·
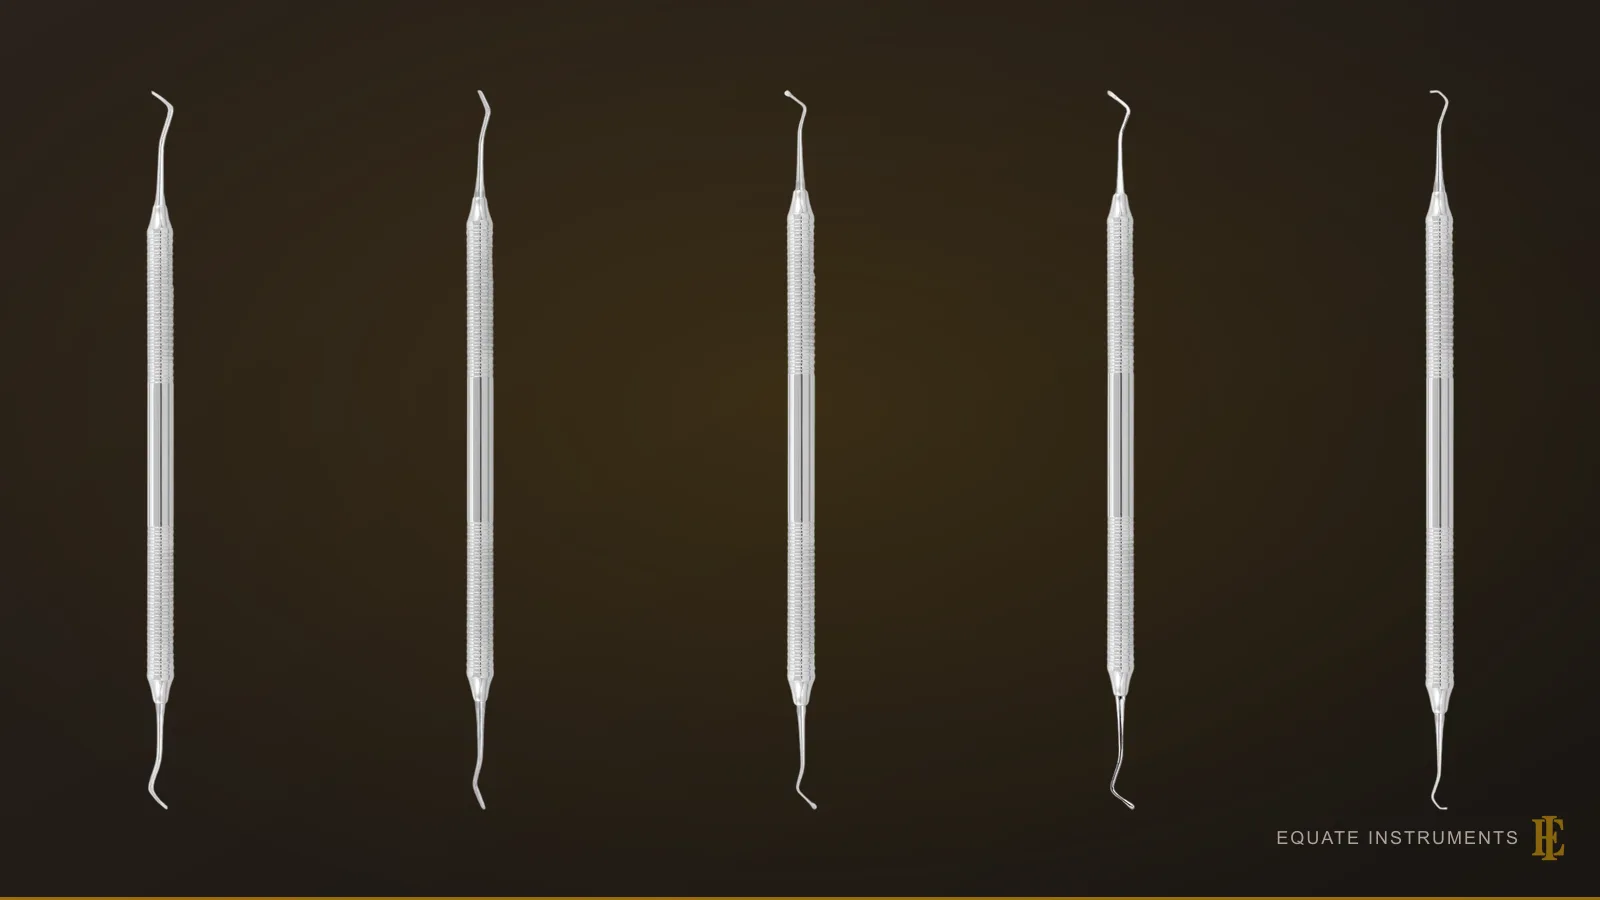
Enamel-cutting instruments are sharp hand instruments used during cavity preparation to cleave, plane and shape enamel and dentine after most of the tooth structure has been removed with a bur. The family includes the enamel hatchet, enamel hoe, straight, Wedelstaedt and binangle chisels, the angle former and gingival margin trimmers, with spoon excavators used alongside them to lift out soft carious dentine.
Key points
- Each instrument has a single, very sharp edge designed for one stroke: hatchets and chisels are pushed, hoes are pulled, and margin trimmers are worked along the gingival floor.
- The numbers on the handle follow G.V. Black's formula: blade width in tenths of a millimetre, blade length in millimetres and blade angle, with a fourth number for instruments whose edge is angled.
- They only work when sharp, so they need regular sharpening as well as cleaning and steam sterilisation after every patient.
What are enamel-cutting instruments?
Enamel is the hardest tissue in the body, and once a bur has opened a cavity it leaves walls and margins that are rarely perfect. Enamel-cutting hand instruments finish that work: they split away thin enamel that has lost its dentine support, smooth walls, sharpen internal angles and bevel margins, so that a restoration sits against sound, well-shaped tooth structure. Linda R. Bartolomucci Boyd's Dental Instruments: A Pocket Guide (Elsevier) treats them as one family: each has a sharp blade on a shank angled to reach a particular wall of a preparation. Why they are self-limiting near the pulp and gingiva is explained on the hand cutting instruments page.
In everyday practice most tooth reduction is done with rotary instruments in a handpiece, and many clinicians now use only a few hand cutting instruments. They remain useful where control matters more than speed: planing the enamel walls of a Class II box, removing a fragile enamel lip next to the adjacent tooth, and bevelling a gingival margin. They're laid out on the restorative tray with the basic instruments and the amalgam restorative instruments. The Equate range, the right and left bevel test and grip technique are on the hand cutting instruments page. Surgical bone chisels, struck with a mallet, are a heavier design made for bone, not enamel.
| Instrument | Blade and stroke | Typical use | Number type | Example formula |
|---|---|---|---|---|
| Enamel hatchet | Edge parallel to the handle's axis; push or sideways stroke | Cleaving unsupported enamel and smoothing proximal walls | Three numbers | 15-8-12 |
| Enamel hoe | Blade bent sharply, edge almost at right angles to the handle; pull stroke | Planing the floor and walls of a preparation | Three numbers | 10-4-8 or 10-4-14 |
| Straight chisel | Straight shank, single bevel; push stroke | Splitting and planing enamel on accessible walls | One or three numbers | 15 or 20 |
| Wedelstaedt chisel | Gently curved shank, single bevel; push stroke | Planing enamel walls, especially on anterior teeth | Three numbers | 15-15-3 |
| Binangle chisel | Two bends in the shank, single bevel; push stroke | Planing enamel walls further back in the mouth | Three numbers | 15-8-8 |
| Angle former | Edge ground at an angle across the blade | Sharpening line and point angles, creating retention | Four numbers | 12-80-5-8 |
| Gingival margin trimmer | Curved blade with an angled edge; mesial and distal pair | Bevelling the gingival margin of a Class II preparation | Four numbers | 13-80-8-14 (mesial), 13-95-8-14 (distal) |
| Spoon excavator | Rounded, concave spoon with a sharp rim; scooping stroke | Removing soft carious dentine and temporary materials | Usually sized by blade diameter | None; sold by spoon size and shape |
Parts of a hand instrument and Black's instrument formula
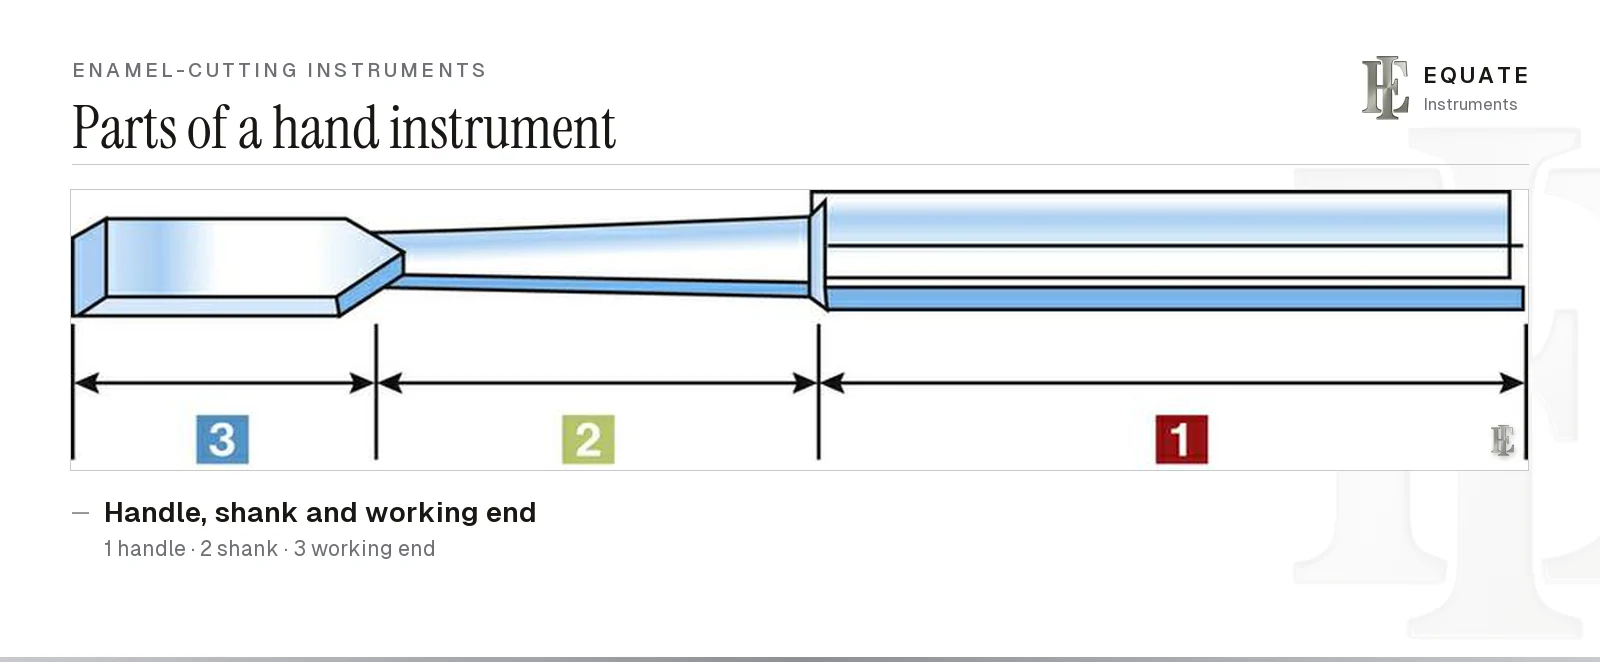
Every hand cutting instrument has three parts. The handle is where it's held; it comes in different diameters, weights and textures, as described in the guide to basic dental instruments. The shank joins the handle to the working end and may be straight or bent once, twice or three times to bring the blade into position while keeping the cutting edge close to the long axis of the handle, which keeps the instrument balanced. Sturdevant's textbook puts a figure on this: so that the instrument doesn't rotate in the grasp under force, the cutting edge should sit no more than 1 to 2 mm off the handle's axis. The working end carries the blade and its cutting edge.
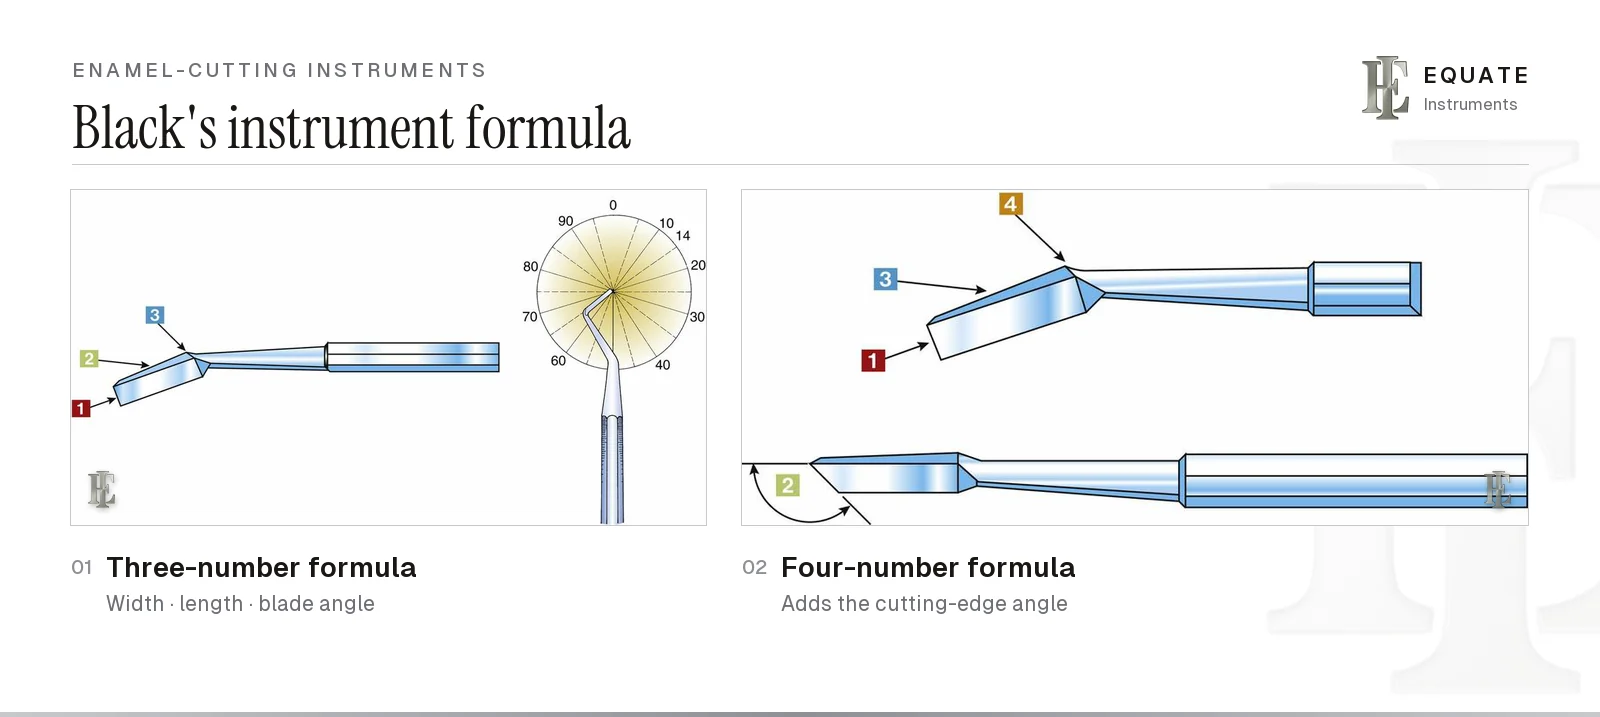
The numbers etched on the handle describe the blade. The system was devised by G.V. Black at Northwestern University, as Boyd notes, and it's still used across operative dentistry. In a three-number instrument such as 10-4-8, the first number is the blade width in tenths of a millimetre (10 = 1.0 mm), the second is the blade length in millimetres (4 mm), and the third is the angle the blade makes with the long axis of the handle. When the cutting edge isn't at right angles to the blade, a fourth number is added in second place for the angle of the edge, so an instrument reads width, edge angle, length, blade angle: 15-95-8-12, for example.
One detail trips people up. Black expressed angles in centigrades, a unit of one hundredth of a full circle (3.6°), and Sturdevant's Art and Science of Operative Dentistry still describes the formula this way; some quick-reference guides simplify the unit to degrees. Either way, the numbers let you compare instruments and order replacements precisely, even from a different maker.
Black also gave every hand instrument a name built from up to four parts, read from the general to the specific: the order says what it does (excavator, scaler), the suborder where or how it is used, the class what the working end looks like (hatchet, hoe, chisel, spoon) and the subclass how the shank is bent (binangle, contra-angle). A binangle chisel is therefore named for its blade and its shank.
Black's cutting instruments also fall into two families according to the direction of the edge, as Columbia University's operative dentistry notes set out. In the chisel family (chisel, hoe, angle former and the cleoid-discoid) the edge runs across the plane of the instrument, so the blade is pushed or pulled. In the hatchet family (hatchet, gingival margin trimmer and spoon excavator) the edge lies along that plane; the trimmer and the spoon excavator add a curved blade, which suits a sideways, scraping stroke.
- Width: tenths of a millimetre (15 = 1.5 mm, 20 = 2.0 mm).
- Cutting-edge angle (four-number instruments only): the angle of the edge to the handle's axis. On gingival margin trimmers a value of 90–100 marks the distal instrument and 75–85 the mesial one.
- Length: millimetres from the cutting edge to the first bend.
- Blade angle: how far the blade is turned from the handle's axis; small values give a nearly straight instrument, larger ones a hoe-like shape.
Enamel hatchet
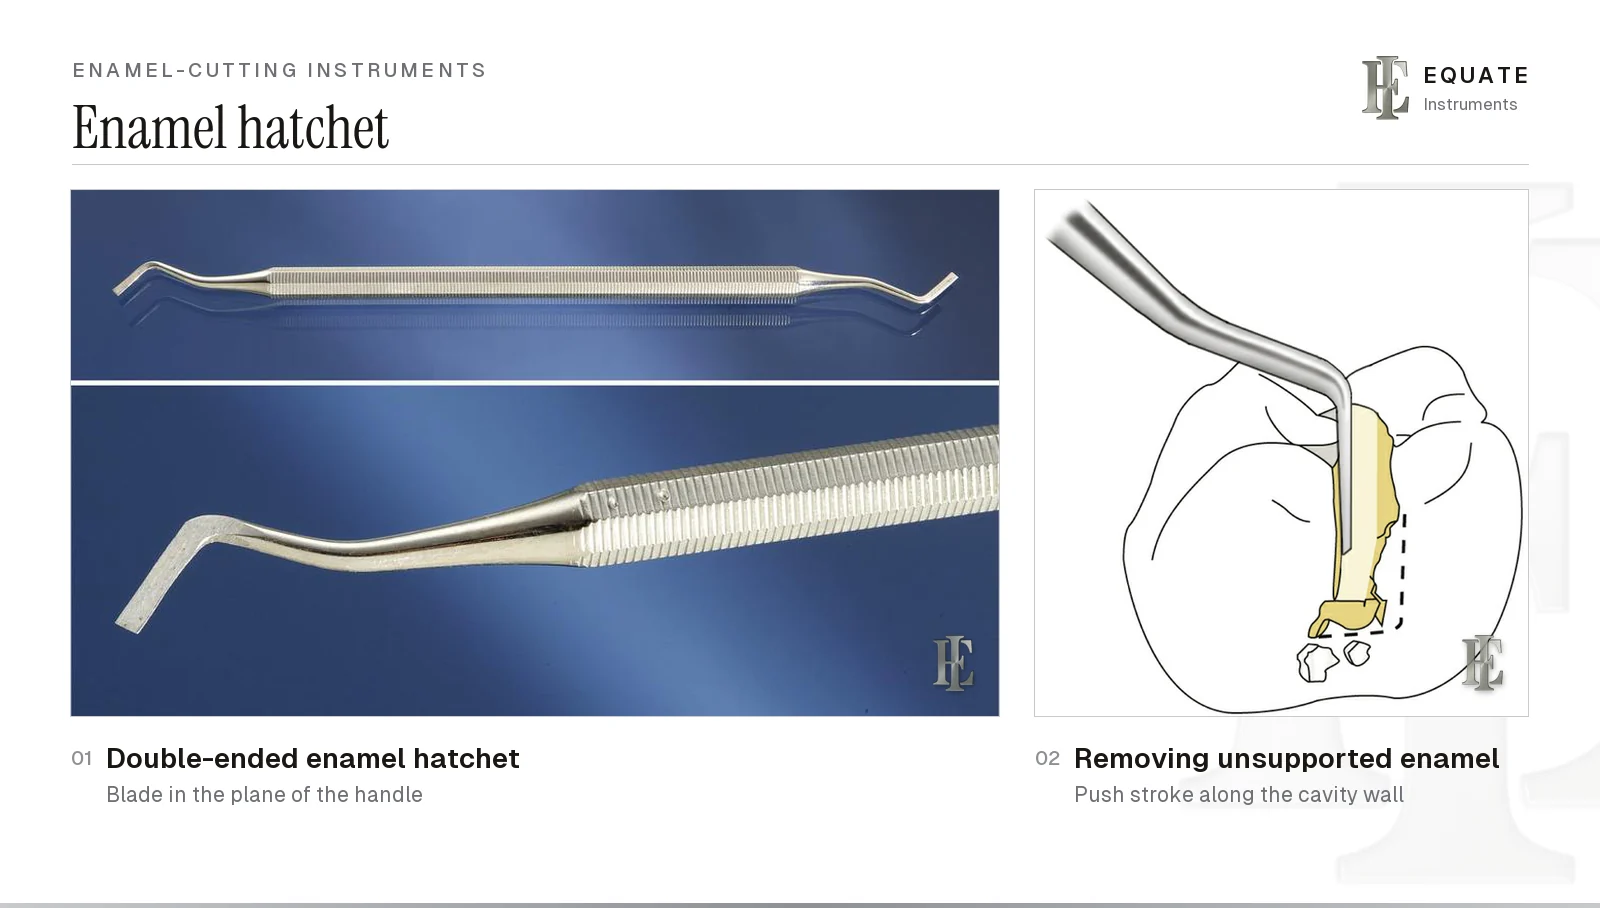
An enamel hatchet looks like a small axe. Its cutting edge runs in the same plane as the handle, so the blade can be laid flat against a proximal wall and pushed or drawn sideways to split off enamel that no longer has dentine behind it. It's most useful on the facial and lingual walls of a Class II box and on anterior proximal preparations, where a bur would risk nicking the neighbouring tooth.
Hatchets are made single or double-ended, and double-ended designs carry mirror-image blades for the right and left sides of a preparation. Typical sizes have blades between about 1 and 2 mm wide and blade angles in the low teens. Larger blades plane broad walls quickly; narrow blades reach into tight boxes without engaging the adjacent tooth.
Enamel hoe
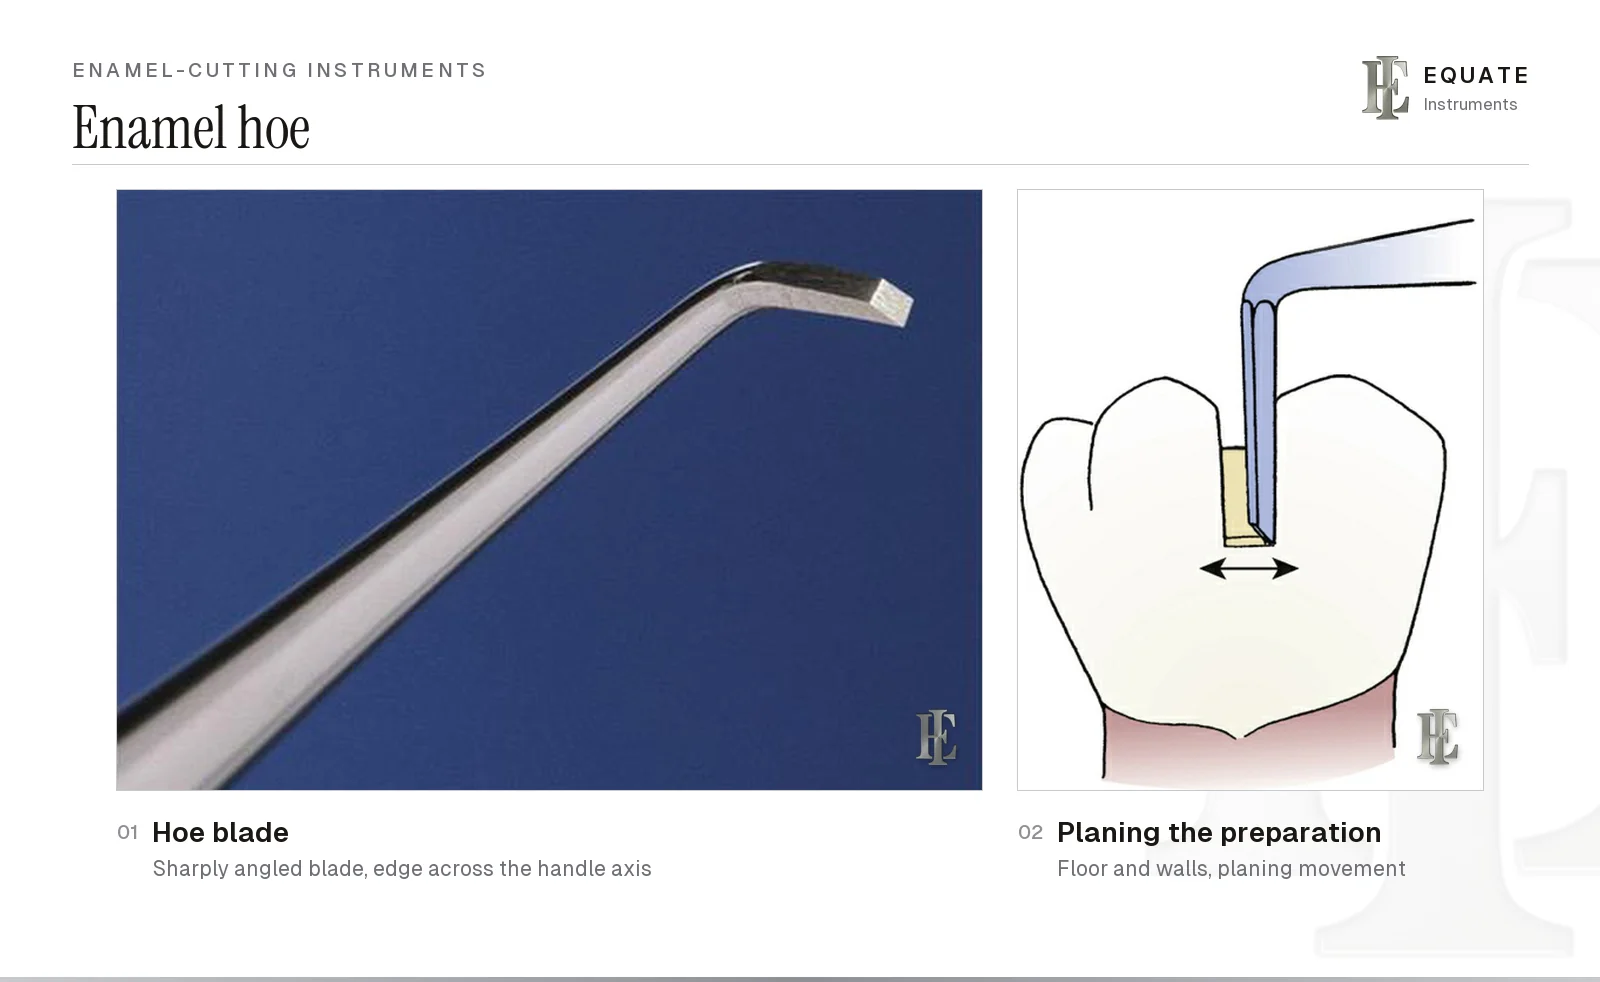
The enamel hoe has its blade bent sharply, so the cutting edge sits almost at right angles to the handle. It's pulled towards the operator, like a garden hoe, to plane the floor and walls of a preparation and leave them smooth and well defined. Sturdevant's textbook associates hoes with planing walls and forming line angles, and notes their common use in Class III and V preparations for direct gold restorations.
Don't confuse it with the periodontal hoe scaler, which is designed to remove calculus from root surfaces and has a different edge geometry; see the dental scalers guide and the periodontal instruments guide for those. An enamel hoe should never be used on root surfaces.
Chisels: straight, Wedelstaedt and binangle
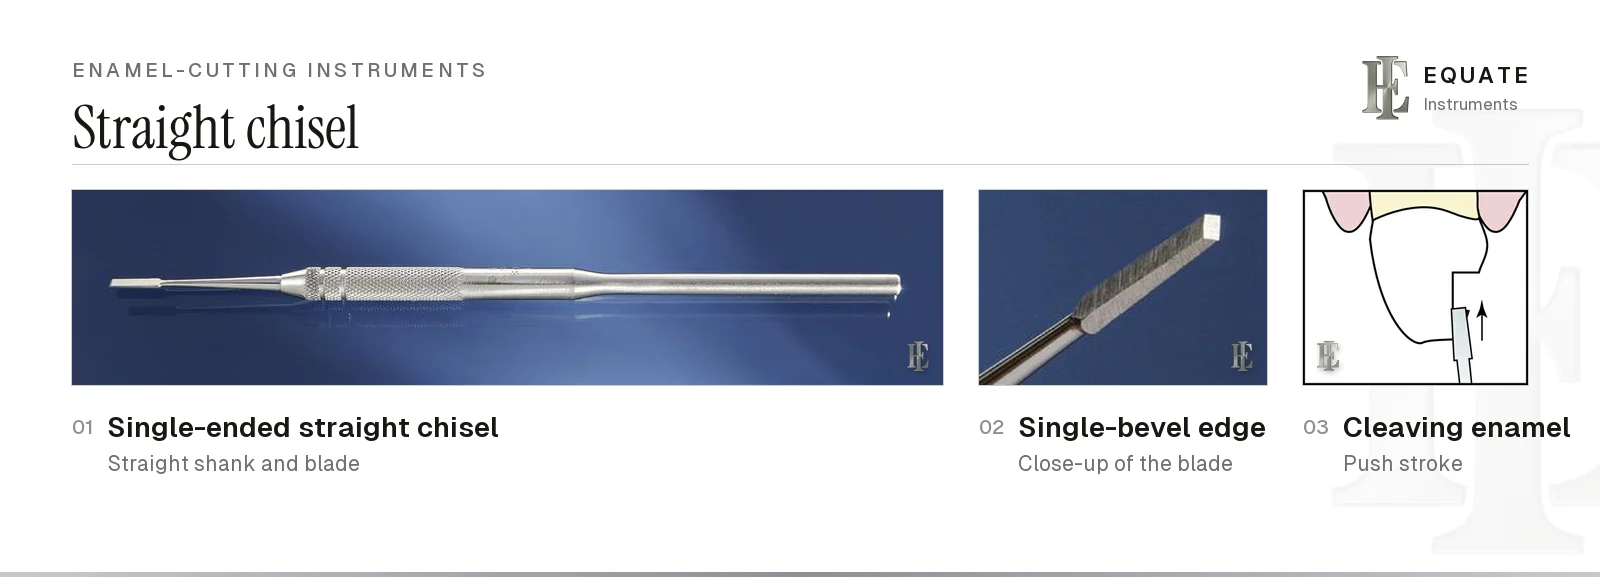
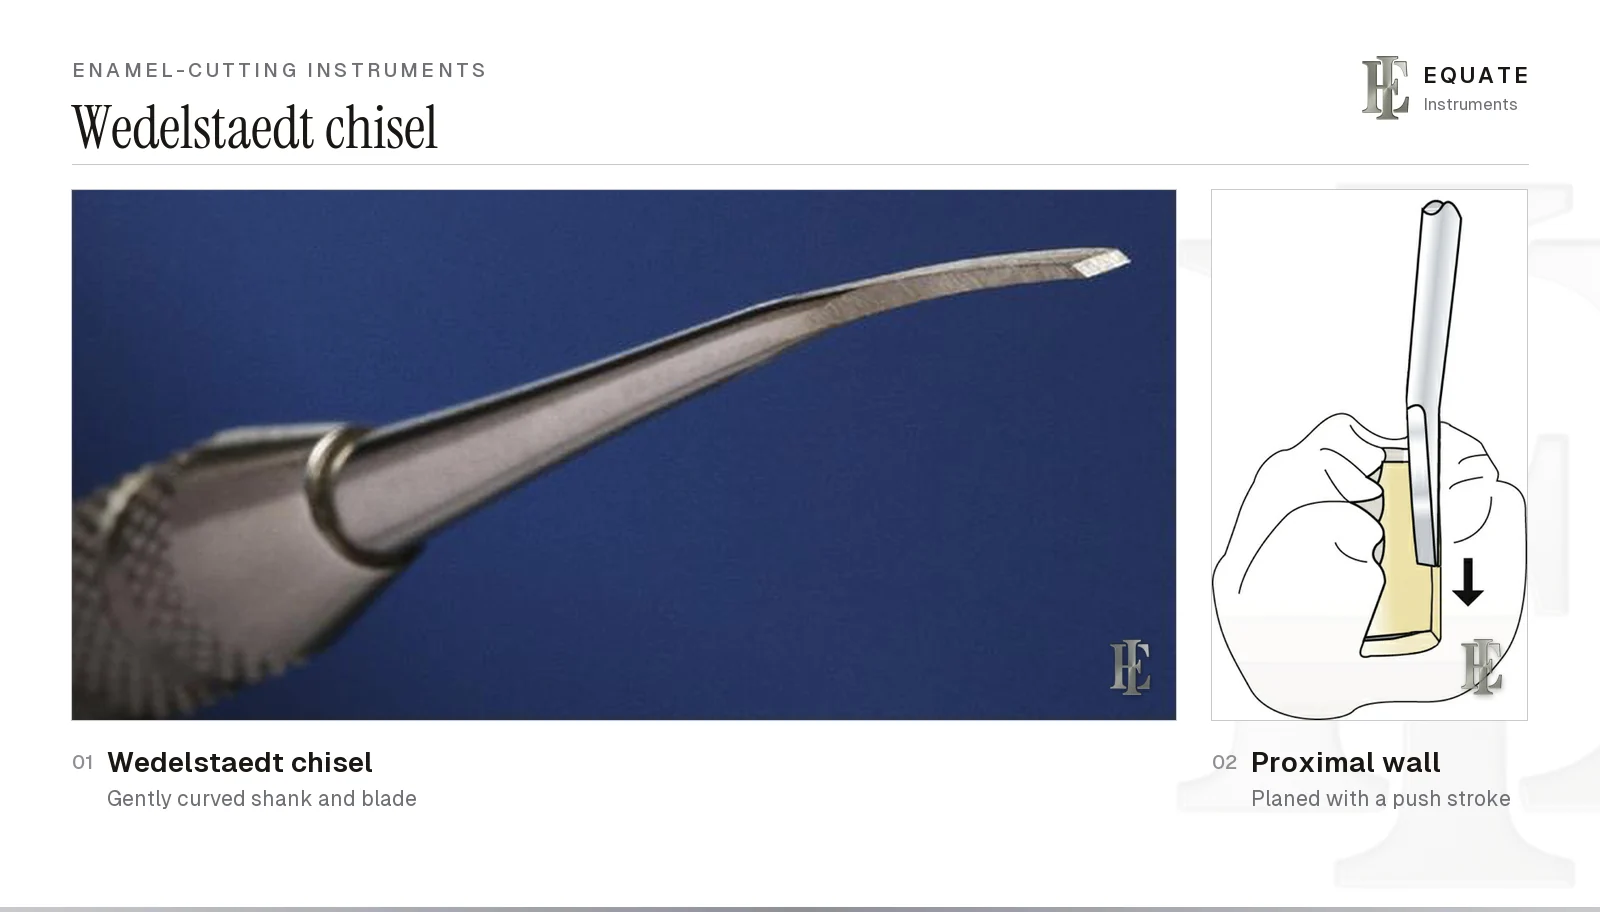
Enamel chisels split and plane enamel with a push stroke. All three have a single bevel. Curved and binangle chisels are made with a distal bevel or a reverse (mesial) bevel, so choose the version whose bevel lets the blade lie flat against the wall you are planing.
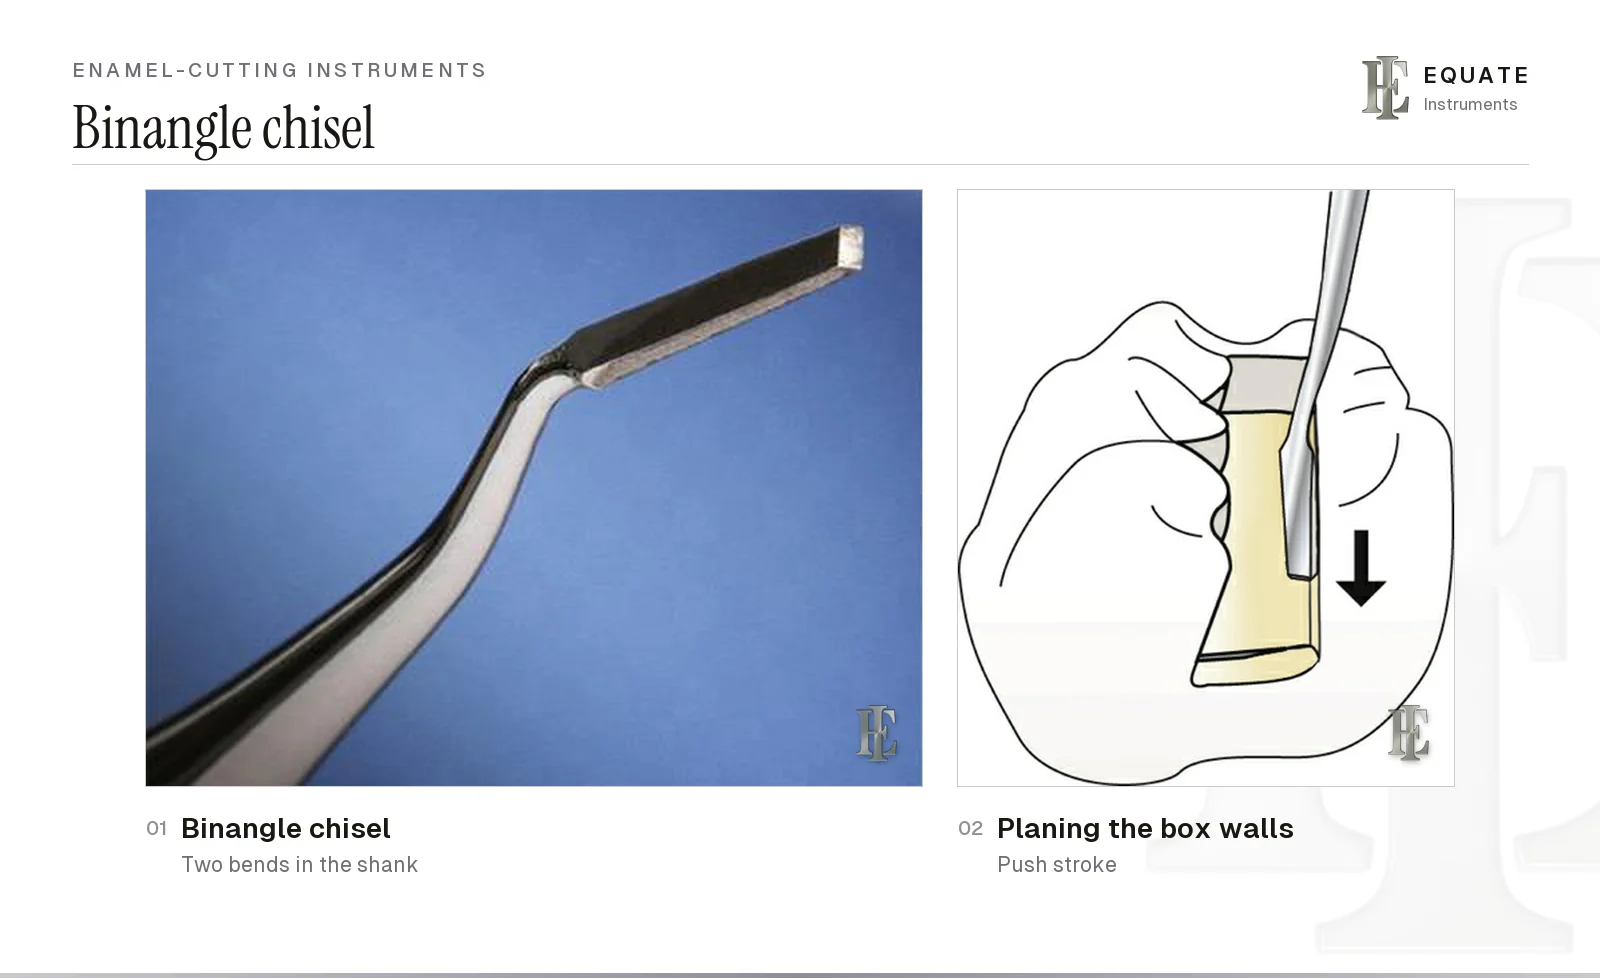
The straight chisel has no bend at all and works where there's a direct line of access, such as the labial and lingual walls of anterior preparations. Boyd lists simple sizes such as 15 and 20, which give the blade width in tenths of a millimetre. The Wedelstaedt chisel has a gentle curve in the shank and blade, which helps the edge meet facial and lingual walls of anterior teeth at the right angle. Equate lists Wedelstaedt patterns in 1.3, 1.6 and 2.1 mm with its interproximal carvers. The binangle chisel has two bends in the shank; the offset brings the blade into posterior preparations while the handle stays clear of the lips and cheeks.
Telling the versions apart takes a moment's practice. Hold the instrument with the inside of the blade's curve facing you: if you cannot see the bevel from that side, it is a distal-bevel blade, made for a wall that faces the inside of the curve; if the bevel is visible, it is a reverse-bevel blade for the opposite wall. Double-ended hatchets and trimmers work the same way with right and left blades, so check both ends before the instrument goes on the tray.
Chisels cut best with a short, controlled stroke and a firm finger rest on the same or an adjacent tooth. Pushing too hard without a rest is the usual cause of a slipped instrument and a damaged gingiva.
Angle former
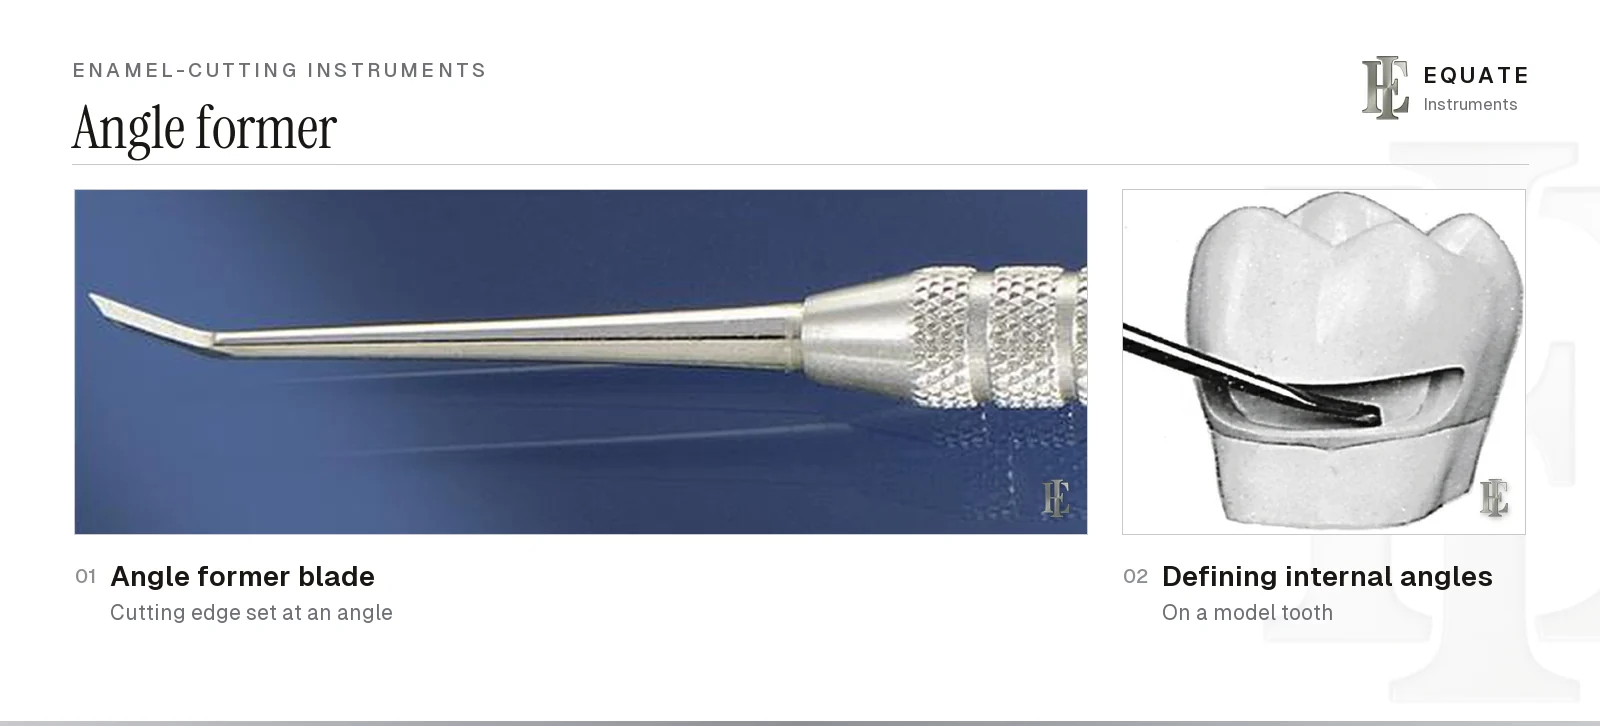
An angle former is a specialised chisel whose cutting edge is ground at an angle across the blade, giving it a pointed corner. It's used to sharpen the line angles and point angles inside a preparation and to cut small retentive features, mostly in preparations for direct gold and amalgam. Because the edge is angled, it's a four-number instrument, with an edge angle of around 80 in common patterns.
With adhesive composite restorations sharp internal angles are less important, so many general dental practices use the angle former less than they once did. It's still taught and found on traditional amalgam setups.
Gingival margin trimmers: mesial and distal
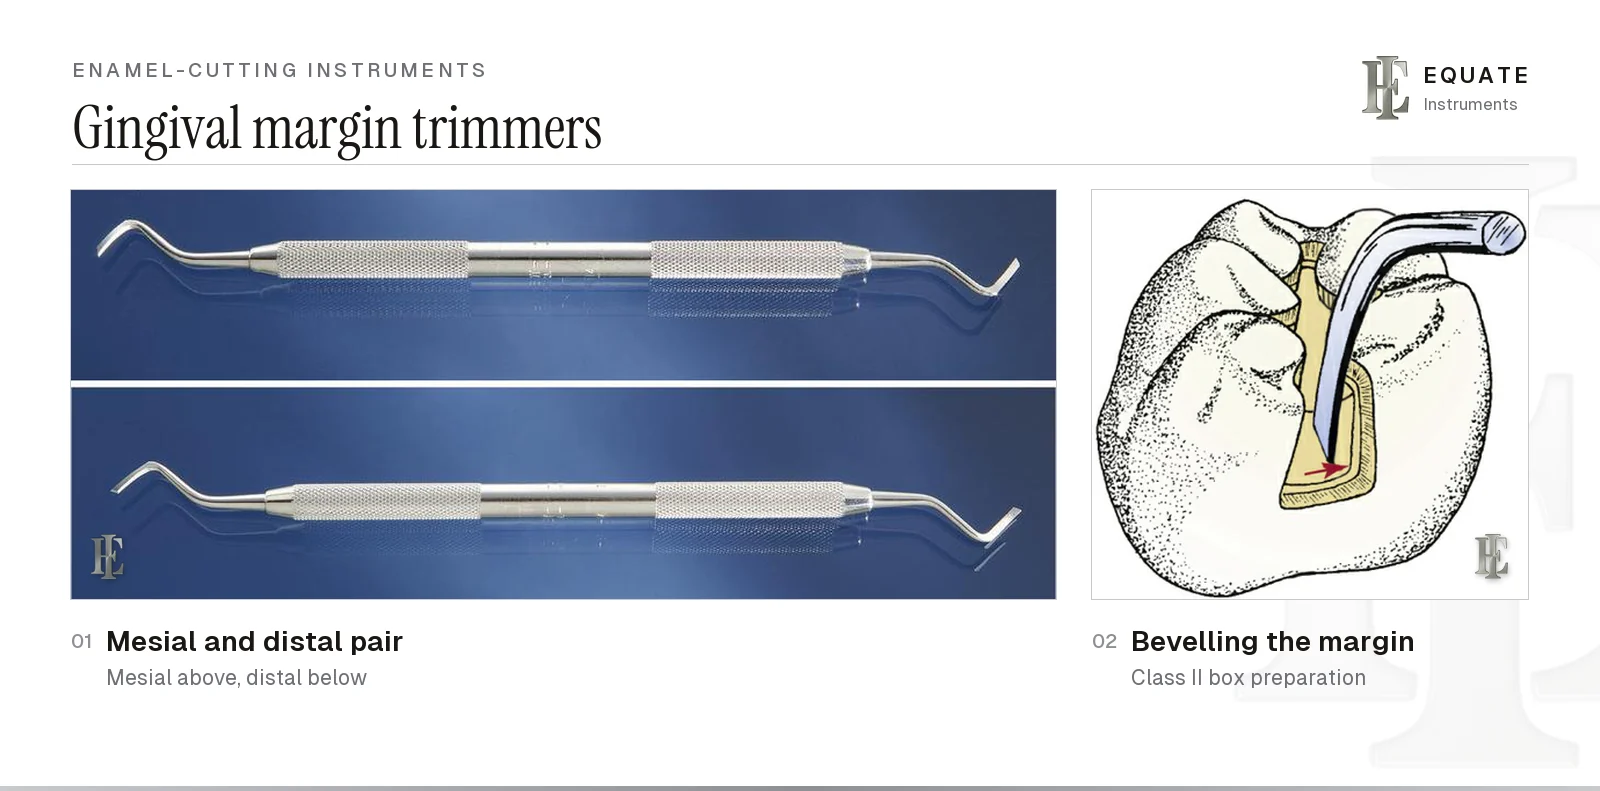
A gingival margin trimmer looks like a hatchet with a curved blade and a cutting edge set at an angle to the blade. It bevels or rounds the gingival enamel margin of a Class II preparation, removing the short, unsupported enamel rods there so that the restoration margin meets sound enamel. It is also used to round or bevel the axiopulpal line angle of two-surface preparations, so the restoration is less likely to fracture at that point.
Trimmers always come as a pair, one for the mesial and one for the distal margin, and each is usually double-ended with right and left versions of its blade. The second number tells them apart. In common patterns such as 13-80-8-14 and 13-95-8-14, an edge angle of 90 to 100 marks the distal trimmer and 75 to 85 the mesial trimmer, the ranges Sturdevant's textbook gives. Keep the pair together on the tray and in the cassette so the right one is to hand for each side of the box.
Sturdevant's textbook adds a practical pairing: trimmers with edge angles of 90 and 85 suit amalgam preparations, where the gingival bevel slopes only slightly, while 100 and 75 pairs suit inlay and onlay preparations that need a steeper gingival bevel.
Spoon excavators
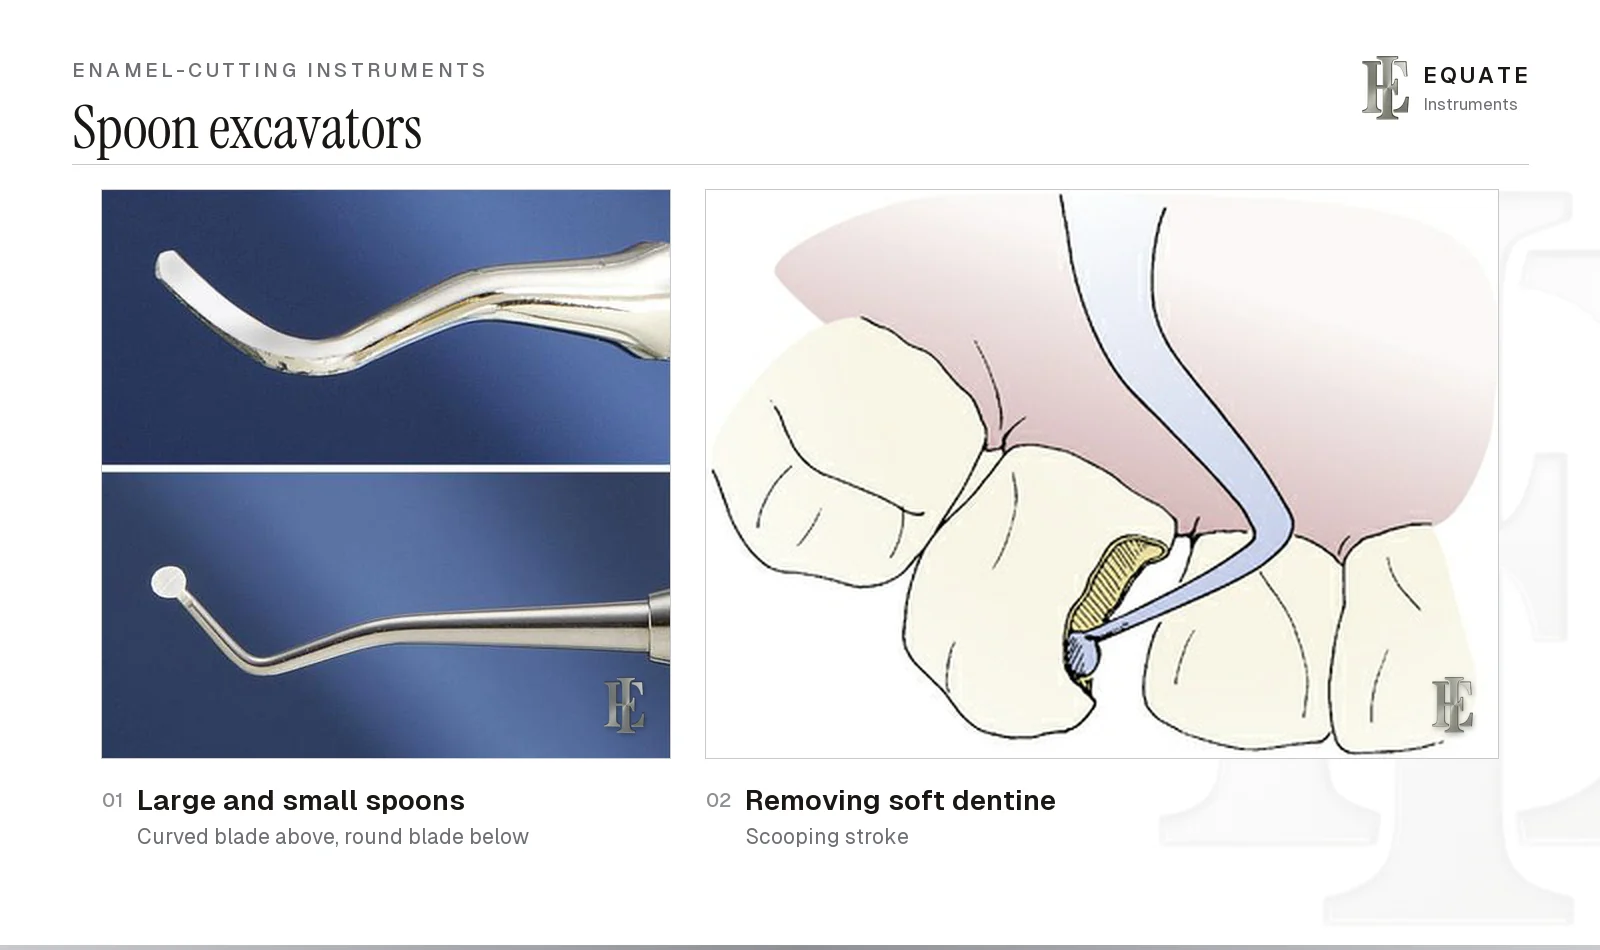
Spoon excavators aren't strictly enamel cutters, but they belong to the same family of sharp hand instruments and are on almost every restorative tray. The concave spoon has a sharp rim that's drawn through softened, carious dentine to lift it out in flakes. They also remove temporary cement and provisional restorations and help ease off a crown during try-in.
Sizes run from small round spoons of about 1 mm to larger curved spoons, often called Black spoons, and most are double-ended with mirror-image blades. The International Caries Consensus Collaboration (Schwendicke and colleagues, 2016) recommends selective removal of carious tissue rather than removing all softened dentine in deep lesions. In the UK, the Scottish Dental Clinical Effectiveness Programme (SDCEP) guidance on caries in children asks for any unsupported or undermined enamel to be removed and the cavity walls cleared to hard, 'scratchy' dentine for a good bond; over the pulp, removal usually stops at leathery or firm dentine in shallow to moderately deep lesions, and some soft dentine is left in deep ones. Hand excavators are one practical way to do this, because the operator can feel the change: SDCEP notes that soft dentine gives way and lifts out easily, while firmer dentine resists the instrument. Blade shapes and sizes are compared in the spoon excavators guide, and the composite tray setup shows where the excavator sits.
Sharpening, cleaning and sterilising cutting instruments
A blunt enamel instrument crushes rather than cleaves, needs more force and is more likely to slip. Check the edge under good light before each use: a sharp edge doesn't reflect light along its length, while a blunt one shows a bright line. Sharpen on a flat stone, keeping the original bevel angle, and don't change the blade's shape.
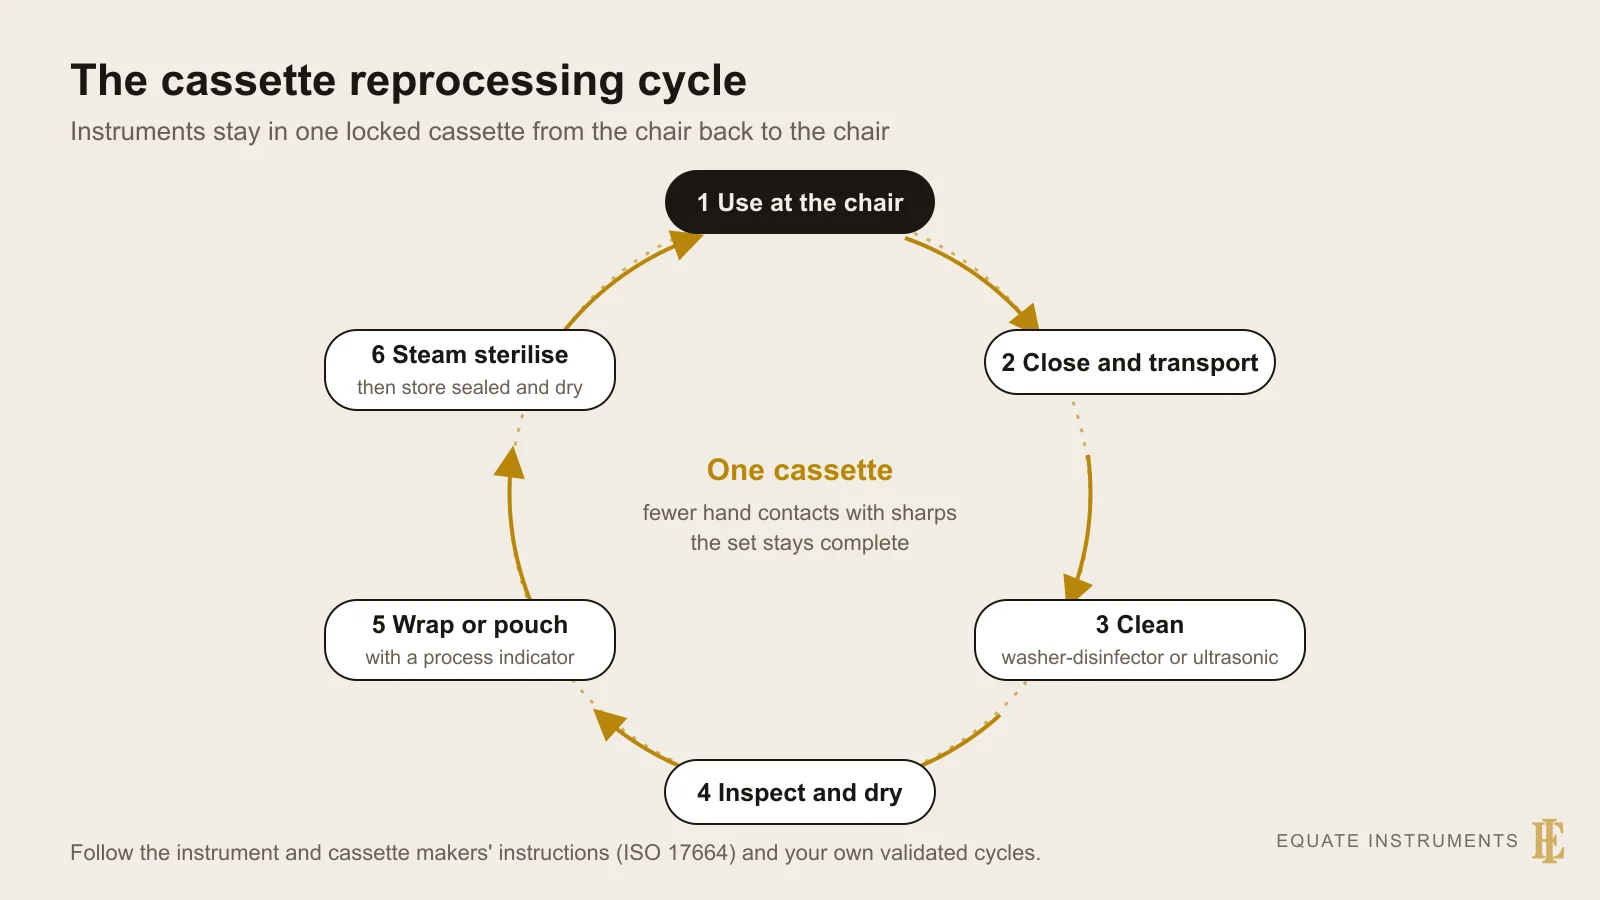
These instruments touch mucous membranes and can penetrate soft tissue, so they're treated as critical or semi-critical items. Guidance from the US Centers for Disease Control and Prevention (Kohn and colleagues, 2003) and the Department of Health's HTM 01-05 for dental practices in England both expect such items to be cleaned and heat sterilised between patients. Follow the maker's reprocessing instructions, supplied under ISO 17664-1, and your national regulations.
- Clean first: remove debris by ultrasonic or washer-disinfector cleaning; sterilisation doesn't work on soiled instruments.
- Sharpen clean instruments, then clean them again, and reprocess the sharpening stone as your national rules require.
- Package for sterilisation, in a pouch or a wrapped cassette, with a chemical indicator inside and an indicator outside, either tape or a pouch with a printed indicator.
- After a validated steam cycle, check that both indicators have changed and that the pack is dry and intact; treat any wet, torn or dropped pack as non-sterile and reprocess it. Keep cycle records as your national rules require.
- Store packs dry, closed and away from splashes until the tray is set up, and open them only at the chairside.
- Protect the edges: cassettes or racks stop sharp blades knocking together, which blunts them and can tear wraps.
Buying enamel-cutting instruments: what to check
- Formula on the handle: match the Black numbers to the instruments you already use, so replacements behave the same way.
- Pairs: buy margin trimmers as a mesial and distal pair, and hatchets in mirror-image right and left versions or as double-ended instruments.
- Edge quality: a straight, even cutting edge with a clean bevel and no burr; the blade should be hard enough to hold an edge after resharpening.
- Shank design: straight or Wedelstaedt shanks for anterior teeth, binangle or contra-angled designs for posterior teeth.
- Handle: a diameter, weight and knurl that suit the clinician's hand and give control without a tight pinch.
- Material: passivated stainless steel that tolerates repeated steam sterilisation without pitting or staining; carbon steel takes a fine edge but needs careful drying.
- Organisation: an instrument cassette and colour coding keep a restorative set complete through reprocessing.
The Equate difference
Equate's catalogue covers the enamel-cutting family only in part: 10 enamel hatchet references (including a mesial and distal gingival margin trimmer pair), two enamel chisels, three Wedelstaedt patterns filed with the interproximal carvers and 70 excavators (32 spoon, 36 round and 2 black spoon). It lists no enamel hoes, binangle chisels or angle formers.
Equate Enamel-Cutting Instruments and G.V. Black's Instrument Formula options

Excavator 65/66 - Titanium-Coated Double-Ended
EI-0020
Excavator 129/130 - Titanium-Coated Double-Ended
EI-0021
Excavator 1.0 mm - Double-Ended
EI-0082
Round Excavator 1.5 mm - Solid Handle 6 mm
EI-0083
Round Excavator 2.0 mm - Solid Handle 6 mm
EI-0084
Excavator 2.5 mm - Double-Ended
EI-0085
Excavator 3.0 mm - Double-Ended
EI-0086
Excavator 125/126 - Double-Ended Spoon
EI-0130
Spoon Excavator 1.0mm - Solid Handle 6mm
EI-0151
Round Excavator 1.5 mm - Solid Handle 6 mm
EI-0152
Round Excavator 2.0 mm - Solid Handle 6 mm
EI-0153
Round Excavator 2.2mm - Solid Handle 6mm
EI-0154Browse all restorative & operative instruments
Buying in your market
Frequently asked questions
What is the difference between an enamel hatchet and an enamel hoe?
A hatchet's cutting edge lies in the same plane as the handle and it's pushed or moved sideways against a wall. A hoe's blade is bent so the edge sits almost at right angles to the handle, and it's pulled towards the operator to plane floors and walls.
What do the three numbers on a dental hand instrument mean?
They follow G.V. Black's formula: the blade width in tenths of a millimetre, the blade length in millimetres and the angle of the blade to the handle's axis. A 10-4-8 instrument has a 1.0 mm wide, 4 mm long blade.
What is the difference between a three-number and a four-number instrument?
A fourth number is added only when the cutting edge isn't at right angles to the blade. It goes in second place and gives the edge angle, so angle formers and gingival margin trimmers carry four numbers, such as 12-80-5-8, while hatchets, hoes and most chisels carry three, such as 10-4-8 (some straight chisels are sized by a single width number).
What is an angle former used for?
An angle former is a chisel with its cutting edge ground at an angle, giving it a pointed corner. It sharpens the line and point angles inside a preparation and cuts small retentive grooves, mainly in traditional amalgam and direct gold preparations.
Are enamel-cutting hand instruments still used now that burs do most of the work?
Yes, though less than in the past. Burs remove most tooth structure, but hand instruments give finer control for removing fragile enamel next to an adjacent tooth, planing walls and bevelling gingival margins, and excavators remain standard for selective removal of soft dentine.
How often should enamel hatchets and chisels be sharpened?
Whenever the edge stops cleaving cleanly or shows a bright line under light. Check before each use, sharpen at the original bevel on a flat stone, then clean and sterilise the instrument again.
References
- Boyd LB. Dental Instruments: A Pocket Guide, 7th edition. Saunders/Elsevier, 2020 (photographs used under licence)
- Ritter AV, Boushell LW, Walter R (eds). Sturdevant's Art and Science of Operative Dentistry, 7th edition. Elsevier, 2019 (ch. 14, Instruments and Equipment for Tooth Preparation, online)
- Schwendicke F, Frencken JE, Bjørndal L, et al. Managing carious lesions: consensus recommendations on carious tissue removal. Advances in Dental Research 2016;28(2):58–67
- Kohn WG, et al. Guidelines for Infection Control in Dental Health-Care Settings, 2003. MMWR 52(RR-17), Centers for Disease Control and Prevention
- Department of Health (England). Health Technical Memorandum 01-05: Decontamination in primary care dental practices, 2013 edition
- ISO 17664-1:2021 Processing of health care products — Information to be provided by the medical device manufacturer for the processing of medical devices — Part 1: Critical and semi-critical medical devices
- Donovan TE, Eidson RS. Instruments and equipment for tooth preparation. In: Heymann HO, Swift EJ, Ritter AV (eds). Sturdevant's Art and Science of Operative Dentistry, 6th ed. Elsevier, 2013
- Columbia University. Operative Dentistry: Hand Instruments. Teaching notes, 2007
- Scottish Dental Clinical Effectiveness Programme (SDCEP). Prevention and Management of Dental Caries in Children: selective caries removal
I am a…
Related
- Restorative Dental Hand Instruments
- Spoon Excavators (Dental Excavators)
- Amalgam Restorative Instruments: What Each One Does
- Basic Dental Instruments: Mirror, Explorer, Cotton Forceps and Handles
- Dental Burs and Rotary Instruments: Types, Shanks and Uses
- Dental Scalers (Hand Scalers)
- Composite Restorative Instruments, from Matrix Band to Finishing Strip
- Fixed Prosthodontic Instruments for Crown and Bridge Work
- Dental Hand Cutting Instruments: How Hatchets, Hoes, Chisels and Trimmers Differ and How to Use Them
- Amalgam Restoration Tray Setup
- Composite Restoration Tray Setup (Class I to V)
- Dental Instrument Cassettes, Trays and Boxes
- Dental Carvers: Types of Carvers in Dentistry and the Lab