Dental Burs and Rotary Instruments: Types, Shanks and Uses
Written by the Equate Instruments Technical Team · Reviewed by the Medical & Dental Board, Equate Instruments · Updated ·
Dental burs are small rotary cutting and finishing instruments that fit into a dental handpiece. Each has a head that does the work, a neck and a shank that locks into the handpiece. Tungsten carbide and steel burs cut with blades, diamond burs grind with bonded diamond grit, and mandrels, discs and rubber points finish and polish restorations.
Key points
- The shank decides which handpiece a bur fits: friction grip for the high-speed handpiece, latch-type for the slow-speed contra-angle and a long straight shank for the straight handpiece.
- Head shape decides the job: round, pear and inverted cone burs open and refine cavities, fissure burs form walls, diamonds reduce teeth for crowns and multi-fluted finishing burs smooth restorations.
- Burs are hard to clean, so they are either cleaned and heat sterilised in a holder after every patient or treated as single-use and discarded in a sharps container.
What are dental burs and rotary instruments?
A bur is the cutting or finishing tip that a dental handpiece spins. Linda Bartolomucci Boyd's Dental Instruments: A Pocket Guide (Elsevier) groups them with the other rotary attachments that share the same chucks: mandrels, abrasive discs, rubber polishing points and laboratory burs. Where hand cutting instruments plane and cleave enamel by hand, rotary instruments remove tooth structure, old restorations and acrylic quickly, which is why they sit on almost every tray alongside the restorative dental instruments and the basic examination set.
Rotary instruments fall into a handful of families. Knowing which family a bur belongs to tells you most of what it is for before you read the number on the packet.
| Family | What it does | Typical examples |
|---|---|---|
| Carbide and steel cutting burs | Cut enamel and dentine with sharp blades | Round, pear, inverted cone, straight and tapered fissure, plain or crosscut |
| Finishing burs | Smooth and contour restorations with many fine blades | Flame, egg, needle and round shapes with many fine flutes |
| Diamond burs | Grind tooth structure with bonded diamond grit | Flat-end taper, flat-end cylinder, flame, wheel, chamfer |
| Mandrels and discs | Carry abrasive discs for contouring and polishing | Snap-on and screw-on mandrels, sandpaper and composite discs |
| Rubber polishers | Bring a restoration to a smooth, glossy surface | Points, cups and wheels in graded abrasives |
| Laboratory burs | Trim acrylic, appliances and stone models outside the mouth | Large carbide acrylic burs, diamond separating discs |
Parts of a bur, shank types and bur numbers
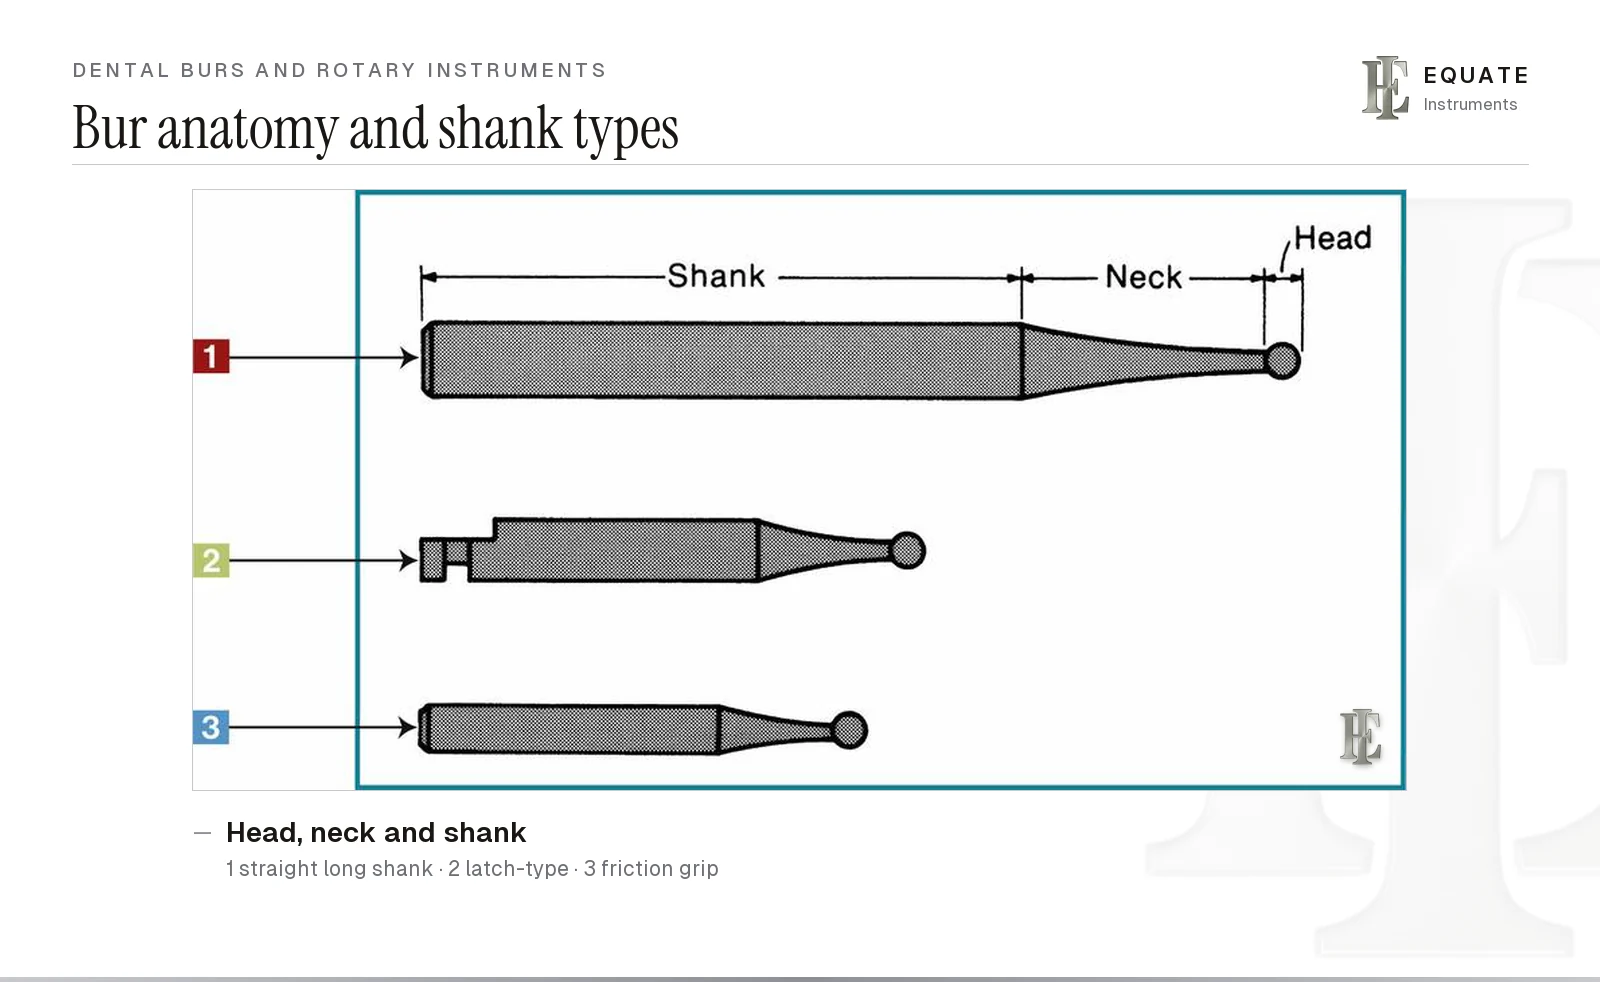
Every bur has three parts. The head is the working end that cuts, finishes or polishes. The neck narrows from the shank to the head and gives clearance so the head can reach into a preparation. The shank is the part gripped by the handpiece, and it is the only part that decides compatibility: the same No. 2 round head can be made on three different shanks.
Shank dimensions are set internationally by ISO 1797 (Dentistry: shanks for rotary and oscillating instruments), so a friction-grip bur from any maker should fit any friction-grip handpiece; the table below shows which shank goes with which of the dental handpieces. Long-shank versions of friction-grip and straight burs add reach for deep preparations and for surgical work. To remove bone and section teeth in oral surgery, surgical-length burs are run in a surgical (usually electric) handpiece that does not blow air into the wound, with sterile irrigant cleared by a surgical suction tip. The reason is safety: in a case report of third molar surgery, Romeo and colleagues describe air from a high-speed turbine being driven through the raised flap into the soft tissues, causing surgical emphysema. The surgical extraction tray setup shows where these burs sit in the set.
Bur numbers come from two systems. The traditional US numbers that Boyd uses identify shape and size together: Nos. 1/4 to 10 are round, Nos. 33½ to 39 inverted cone, Nos. 330 to 333 pear, Nos. 56 to 58 straight fissure, Nos. 168 to 171 tapered fissure, and adding 500 (556 to 558) or using the 699 to 703 range indicates crosscut blades. The ISO 6360 series gives every rotary instrument a 15-digit code covering material, shank, shape, blade or grit type and head diameter; the final three digits give the largest head diameter in tenths of a millimetre, so 010 is a 1.0 mm head. European catalogues usually show both.
| Shank | Common code | Fits | Typical use |
|---|---|---|---|
| Friction grip | FG, about 1.6 mm diameter | High-speed (air turbine or speed-increasing) handpiece; held by a push-button or lever chuck | Cavity and crown preparation, removing old restorations |
| Latch-type | RA or CA, about 2.35 mm with a notched end | Slow-speed contra-angle or right-angle attachment; held by a latch | Caries removal in dentine, finishing, polishing, mandrels |
| Straight (long) shank | HP, about 2.35 mm, plain end | Straight slow-speed handpiece | Laboratory trimming, adjusting dentures and appliances, some surgery |
Round, pear and inverted cone burs
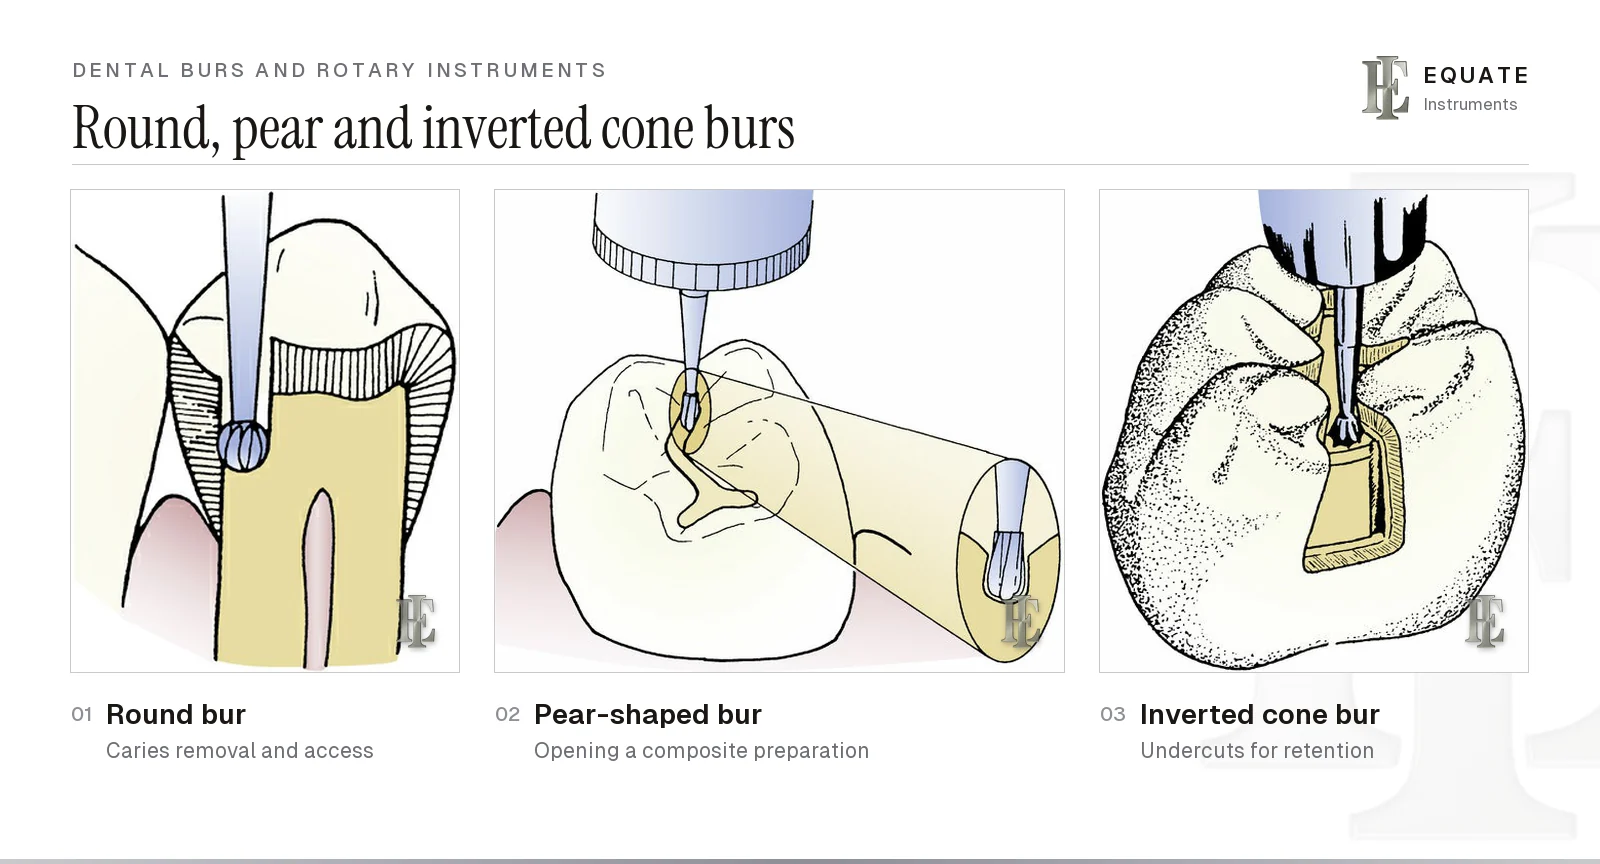
The round bur is the most versatile cutting bur. Its spherical head removes soft carious dentine, makes the first entry into a tooth, opens the pulp chamber for endodontic access (see the endodontic tray setup) and cuts small retention points. Boyd lists sizes from No. 1/4 up to No. 10; small heads work in narrow fissures and near the pulp, while large heads on a slow-speed latch shank remove deep caries with good tactile control.
The pear-shaped bur (Nos. 330 to 333, also available as long-head versions such as 333L) has a head that is wider at the end than at the neck and a rounded tip. It opens and outlines conservative preparations for both amalgam and composite restorations, and leaves rounded internal angles. Boyd lists it as a bur often chosen for composite preparations.
The inverted cone bur (Nos. 33½, 34, 37 and 39) is widest at its flat end. Run along the floor of a preparation it creates slight undercuts that lock a restoration in mechanically, and it can also flatten a pulpal floor. Modern adhesive dentistry needs fewer undercuts than amalgam-era preparations, so inverted cones are used less than they once were, but they remain on many amalgam restorative trays.
Fissure burs: straight, tapered, plain-cut and crosscut
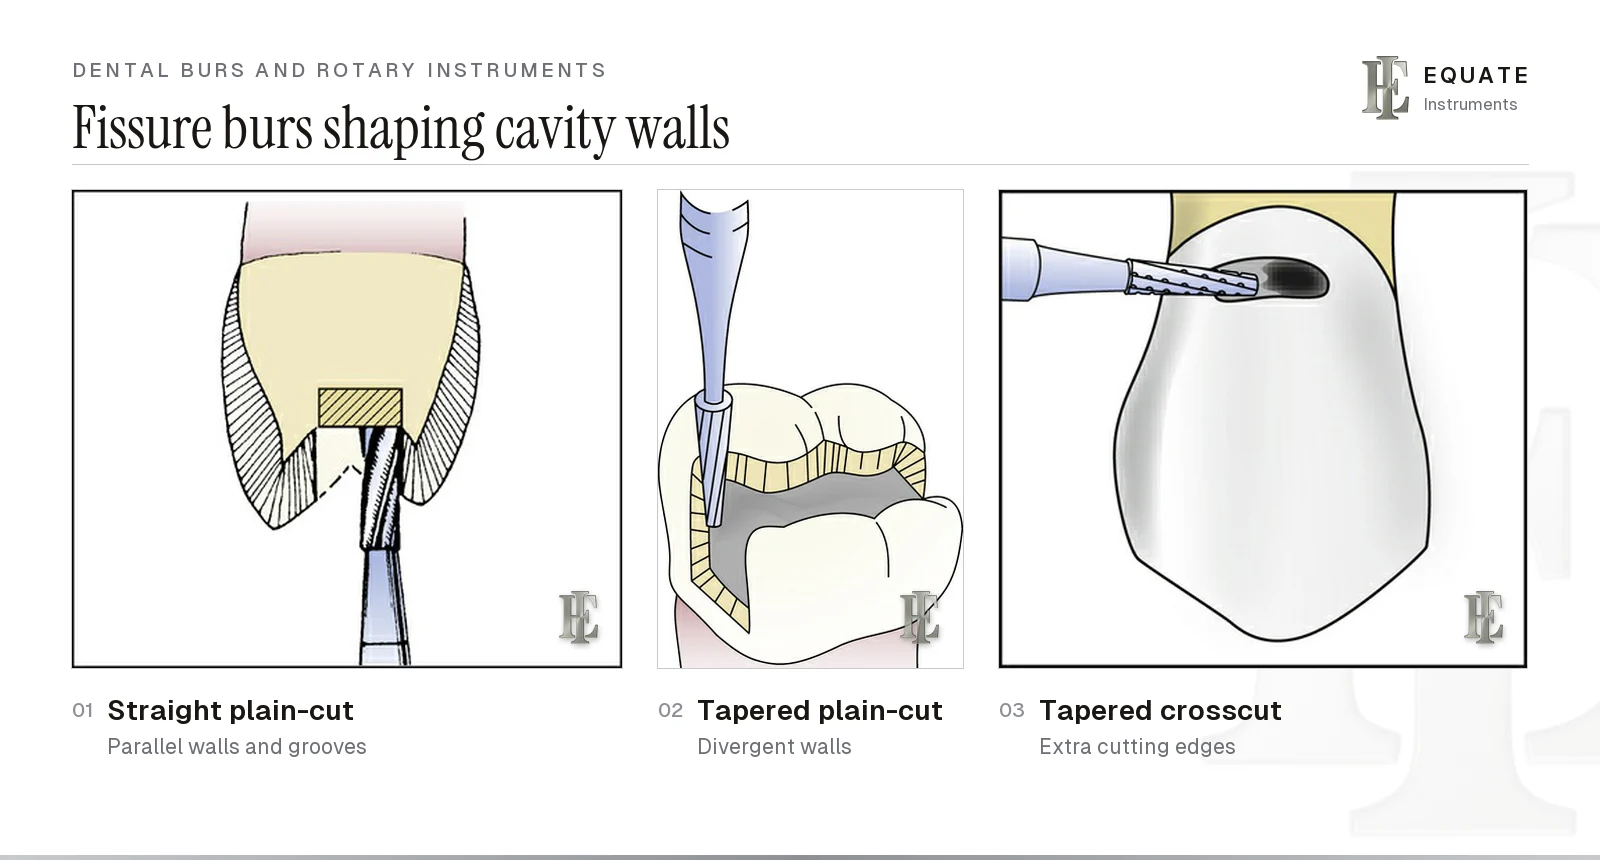
Fissure burs have a cylindrical or conical head and form the walls of a preparation. A straight fissure bur (plain-cut Nos. 56 to 58) produces parallel walls and flat floors and cuts retention grooves. A tapered fissure bur (Nos. 168 to 171) narrows towards the tip, giving walls that converge or diverge depending on how it is held, which is useful when the preparation must draw, as for an inlay.
Plain-cut fissure burs have smooth, continuous blades and leave a finer surface. Crosscut versions (straight Nos. 556 to 558, tapered Nos. 699 to 703) have notches across the blades that break the chip into small pieces, so they cut faster and clog less in dentine and old restorations, at the cost of a rougher wall. Suffixes such as S and L mark shorter and longer versions (in most catalogues L is a longer head, and surgical-length shanks are listed separately), so check the maker's dimension chart.
The wall a fissure bur leaves is refined afterwards with enamel hatchets, chisels and margin trimmers (see also the hand cutting instruments page), and caries left on the floor is checked with spoon excavators.
Finishing burs: carbide versus steel
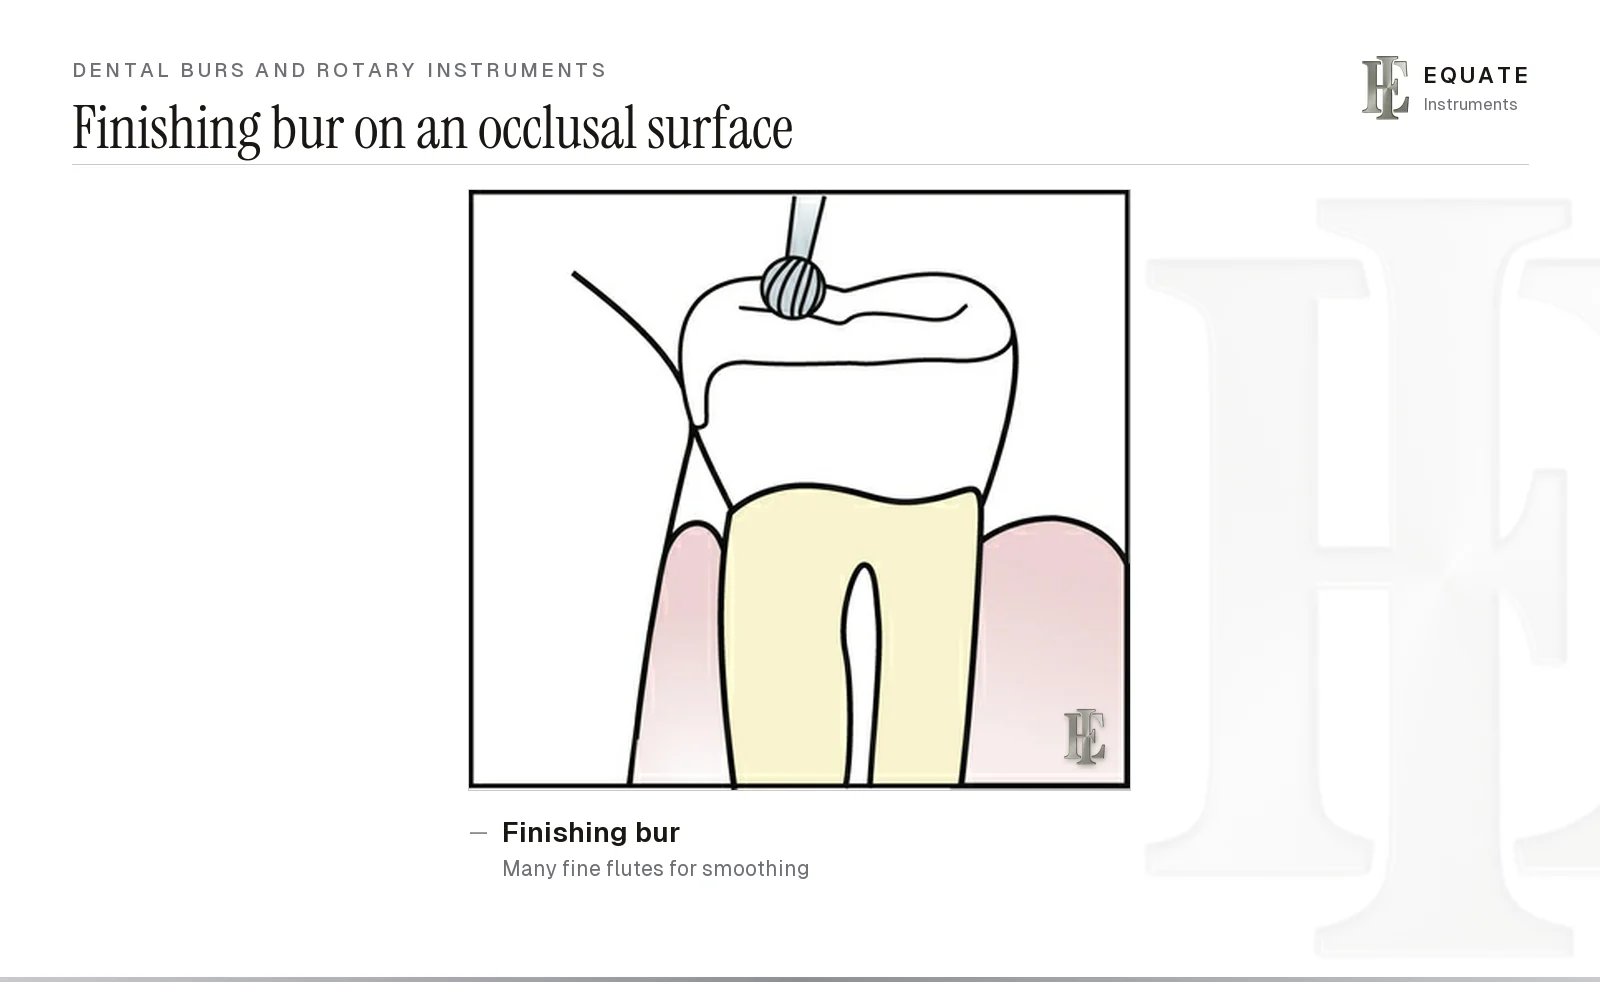
A finishing bur looks like a cutting bur but has many more blades, for example 12, 15 or 30 flutes in the multiblade burs Ehrmann and colleagues (2019) tested. More flutes take off less material per turn and leave a smoother surface, so the higher the flute count, the finer the finish. Finishing burs come in flame, egg, round, needle and taper shapes to follow occlusal anatomy and margins, and they are used to contour composite, adjust occlusion after a restoration is placed and refine margins before polishing.
The order of finishing burs matters. In a laboratory study on five resin composites, Ehrmann, Medioni and Brulat-Bouchard compared going straight from a 12/15-fluted finishing bur to a polisher with adding a 30-fluted bur in between; the extra 30-fluted step left surfaces that were both smoother and harder. Less finishing is needed in the first place when composite is built up in small increments, as described on the composite instruments page.
Most burs today have tungsten carbide heads, which keep a sharp edge far longer than steel and cut efficiently at high speed. Carbide is hard but brittle, so a sideways jolt or a dropped bur can chip a blade. Steel burs are cheaper and less brittle and still have a place at slow speed in soft dentine, but they dull quickly and carbon steel corrodes in a steam steriliser unless protected.
Diamond burs: shapes and grit colour codes
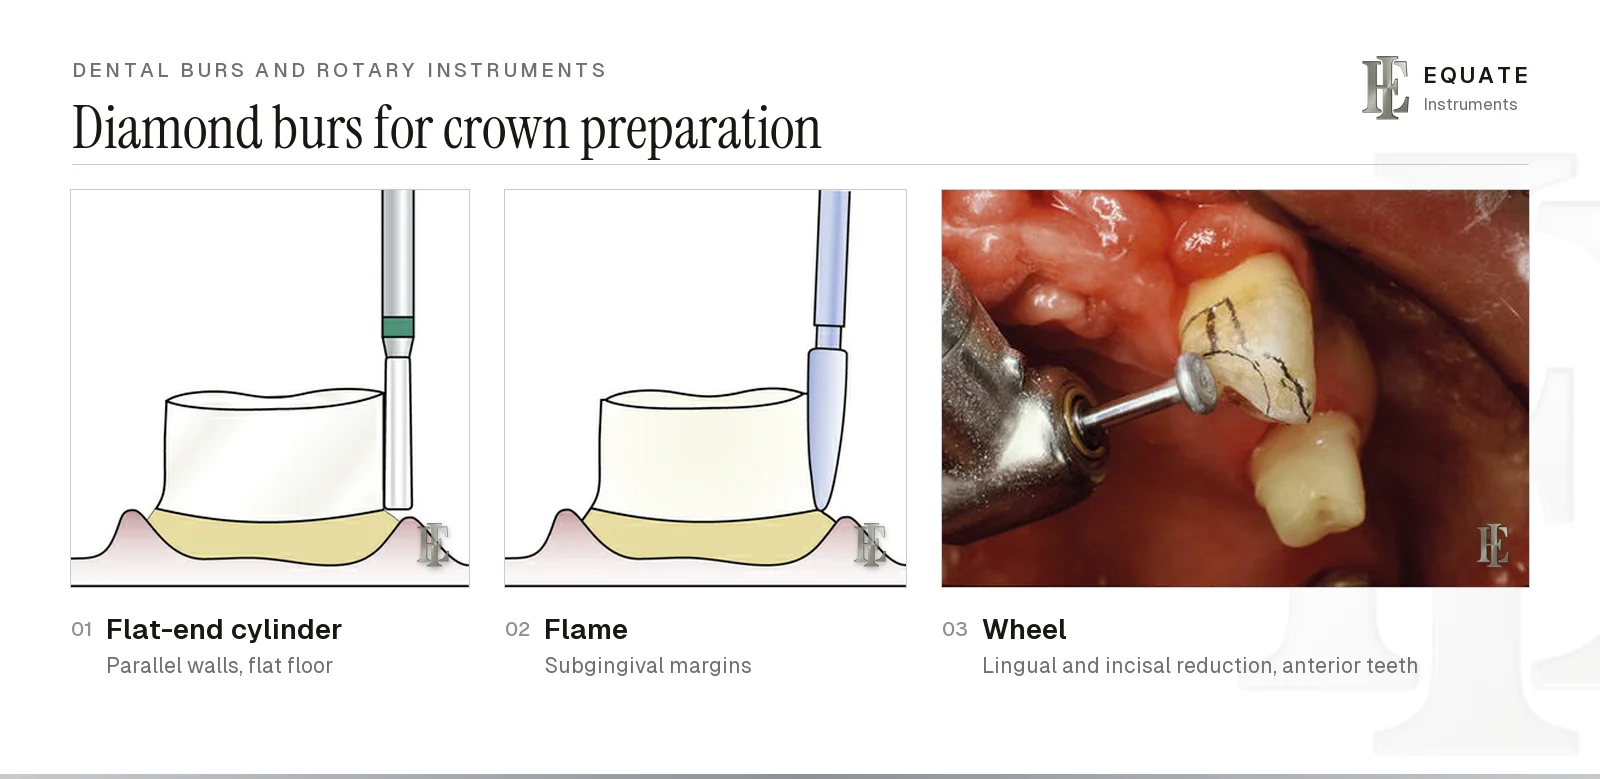
Diamond burs have no blades. Industrial diamond particles are bonded to a metal blank, and they grind rather than cut, which makes them efficient on enamel, ceramics and zirconia-based materials. They are the standard instrument for reducing teeth for crowns, veneers and bridges (the rest of that set is on the crown and bridge tray setup page). A tungsten carbide or diamond bur also cuts the slot used to section an old crown before it is spread apart and lifted off, as explained on the crown removers page.
Shape follows the margin or surface you want. Boyd shows four classic forms: a flat-end taper for a shoulder margin, a flat-end cylinder for parallel walls and a flat floor, a flame for preparations that extend below the gumline, and a wheel for reducing the lingual (palatal) concavity and incisal edges of anterior teeth. Round-end tapers and torpedo shapes are used for chamfer margins.
Grit is marked by a coloured ring on the shank or by a letter after the bur name. ISO 7711-1 (which absorbed the former ISO 7711-3) sets the grit designations and an optional colour code; the colour code is left to the manufacturer and not every maker follows it, so always check the manufacturer's chart. Superfine and extra-fine diamonds are finishing instruments, not cutting ones.
| Ring colour (common convention) | Grit | Typical use |
|---|---|---|
| Black | Super coarse | Rapid bulk reduction, removing old crowns |
| Green | Coarse | Gross reduction in crown preparation |
| Blue (or no ring) | Medium (standard) | General preparation |
| Red | Fine | Refining margins and walls |
| Yellow | Extra fine | Finishing composite and preparation surfaces |
| White | Ultra fine | Final finishing before polishing |
Mandrels, abrasive discs and rubber polishers
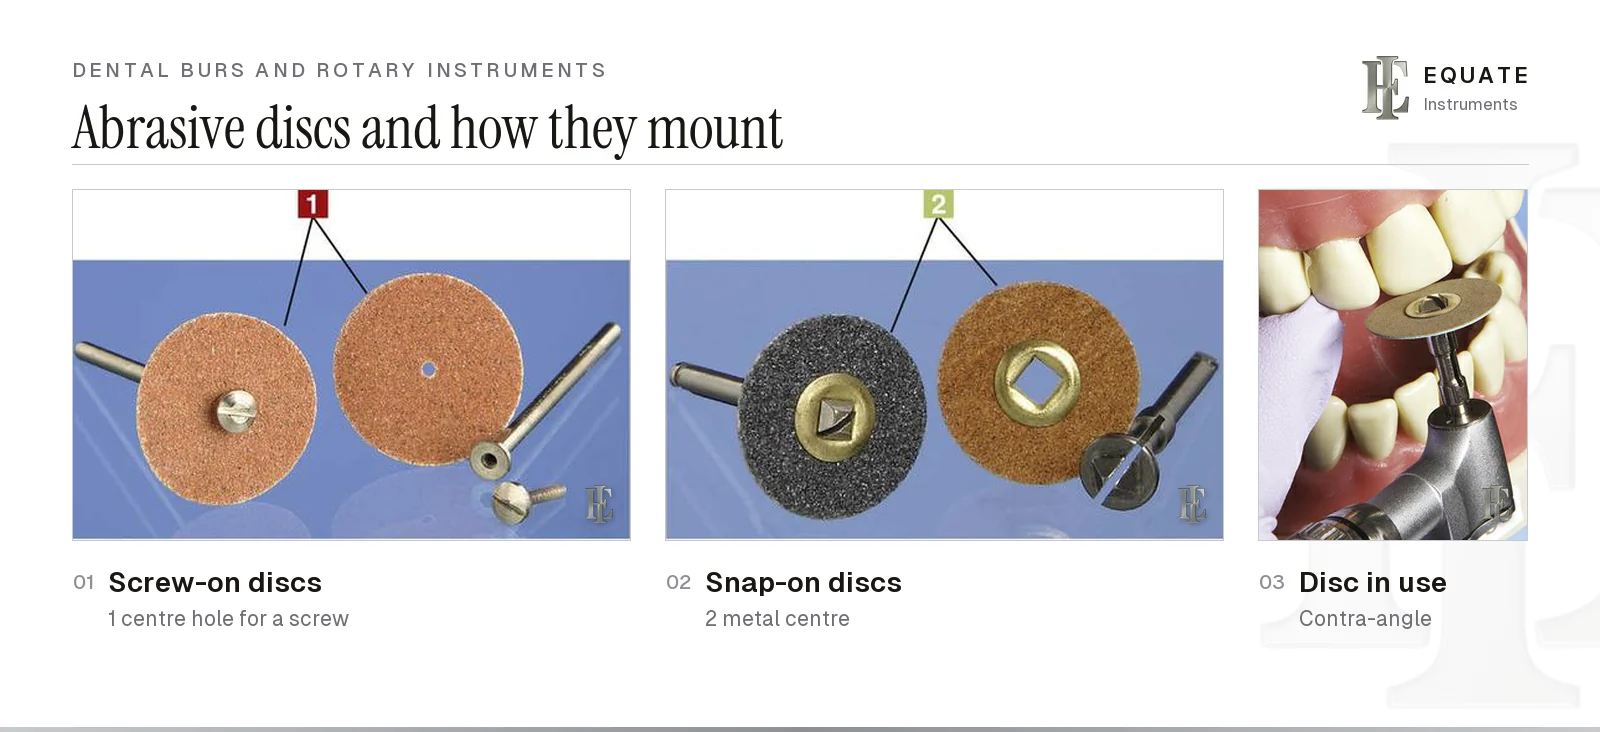
A mandrel is a shank with a fitting on the end that holds a disc, wheel or cup which has no shank of its own. Snap-on mandrels take discs with a metal or plastic centre that clicks over a square or button head; screw-on mandrels clamp a disc with a small screw through its centre hole. Both come with straight, latch-type and friction-grip shanks, and plastic single-use snap-on mandrels are available.
Abrasive discs contour proximal surfaces, embrasures and margins, finish composite restorations in the mouth and are used on work outside the mouth too. Sandpaper-type discs and synthetic composite discs (often snapped onto a square centre or supplied on a disposable mandrel) come in grades from coarse to extra fine; in the convention Boyd describes, a darker disc is more abrasive. Work from coarse to fine, keep the disc moving and use light pressure, because a disc can nick soft tissue or a neighbouring tooth very quickly.
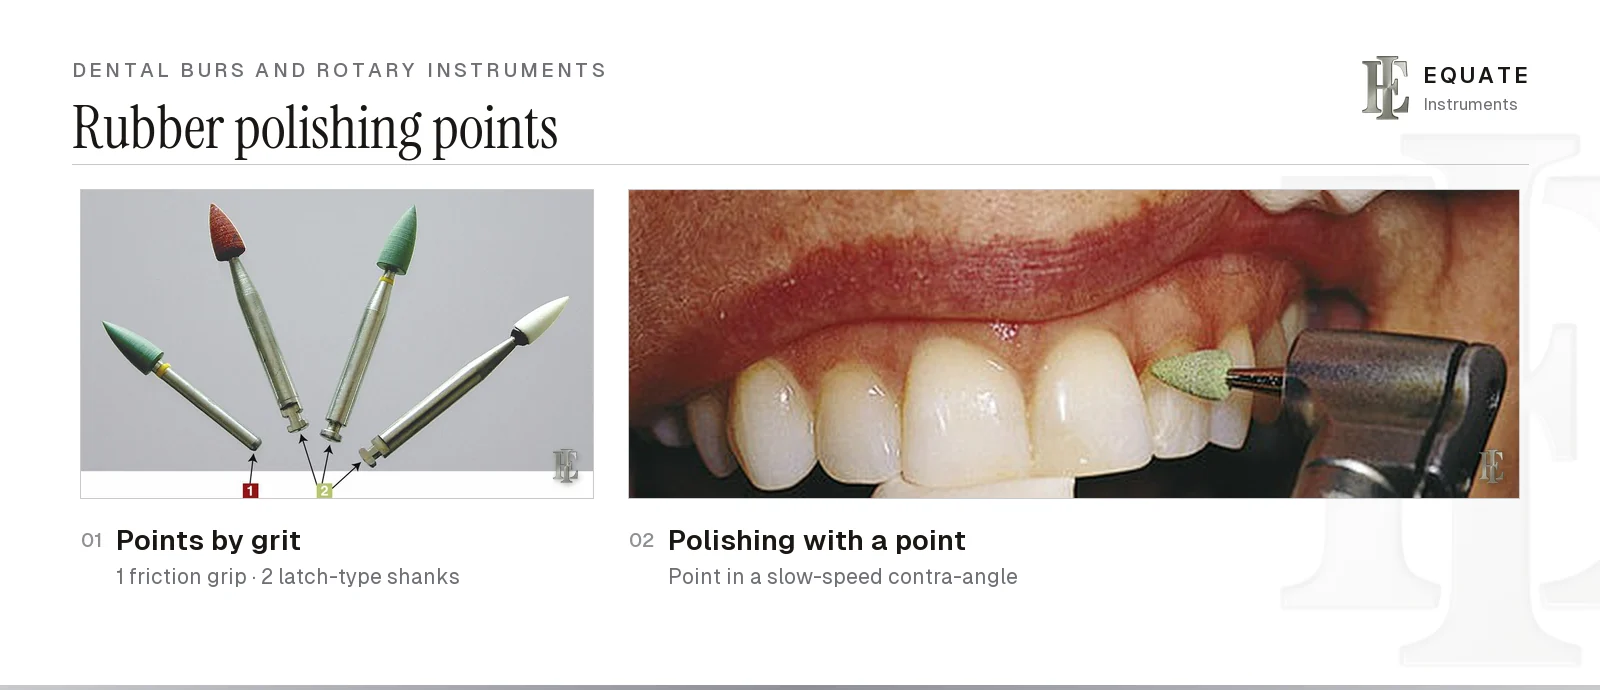
Rubber points, cups and wheels are impregnated with abrasive and bring a finished restoration to a smooth, glossy surface. Systems are graded, and in the common three-step convention brown points are the most abrasive, green points are finer and white points polish. They are run at slow speed with light, intermittent contact so the surface does not overheat.
Laboratory burs and diamond discs
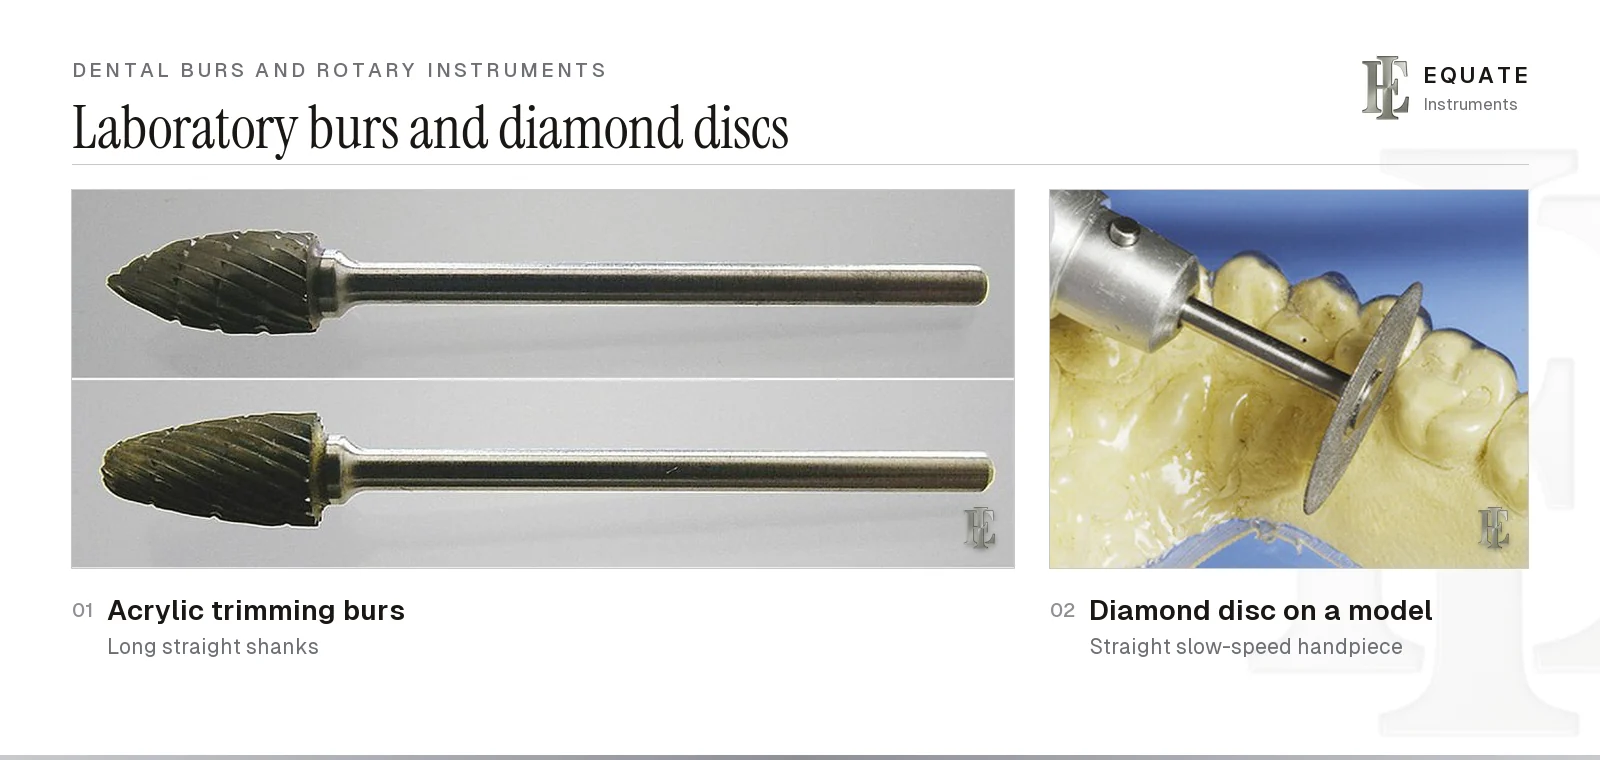
Laboratory burs are larger than clinical burs and have long straight shanks for the straight slow-speed handpiece or a bench motor. Acrylic trimming burs have coarse, spiralled carbide blades that remove acrylic quickly from dentures, custom trays, night guards and orthodontic appliances. Diamond discs, with one or both faces coated, cut and contour stone models and separate dies.
Keep laboratory burs apart from clinical ones. They are not designed for use in the mouth, and a laboratory bur that has touched a patient's appliance or denture is contaminated: CDC guidance expects such items to be heat sterilised, disinfected between patients, or discarded, and heat sterilisation is the sensible default for heat-tolerant metal burs. Boyd likewise advises sterilising them when they are used on patients' appliances.
Bur blocks, cleaning and sterilising burs
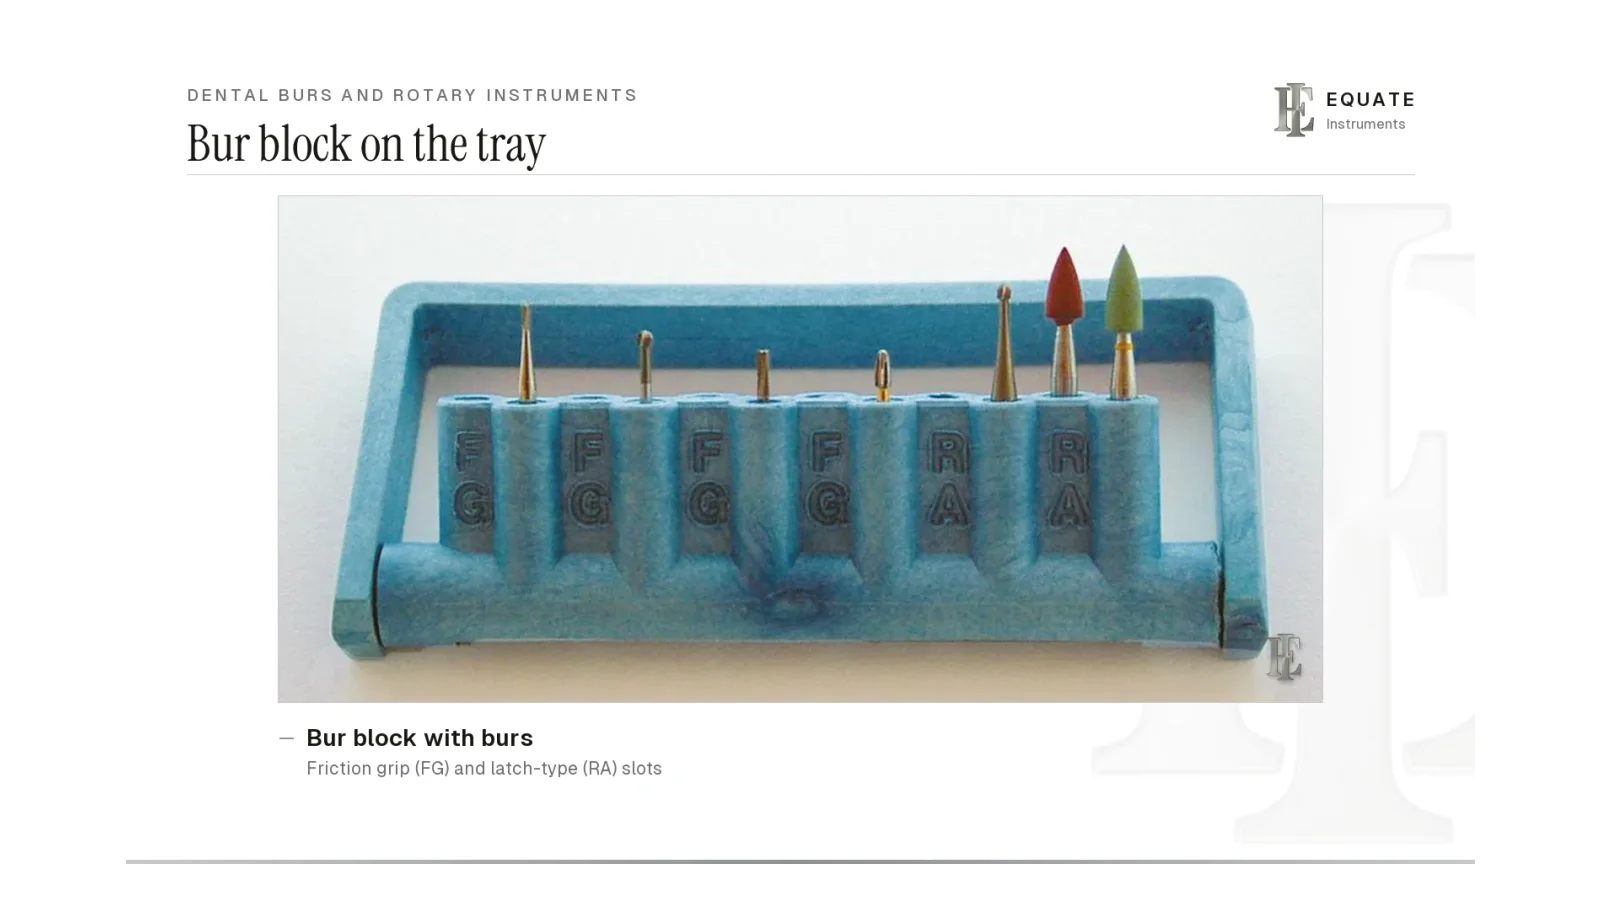
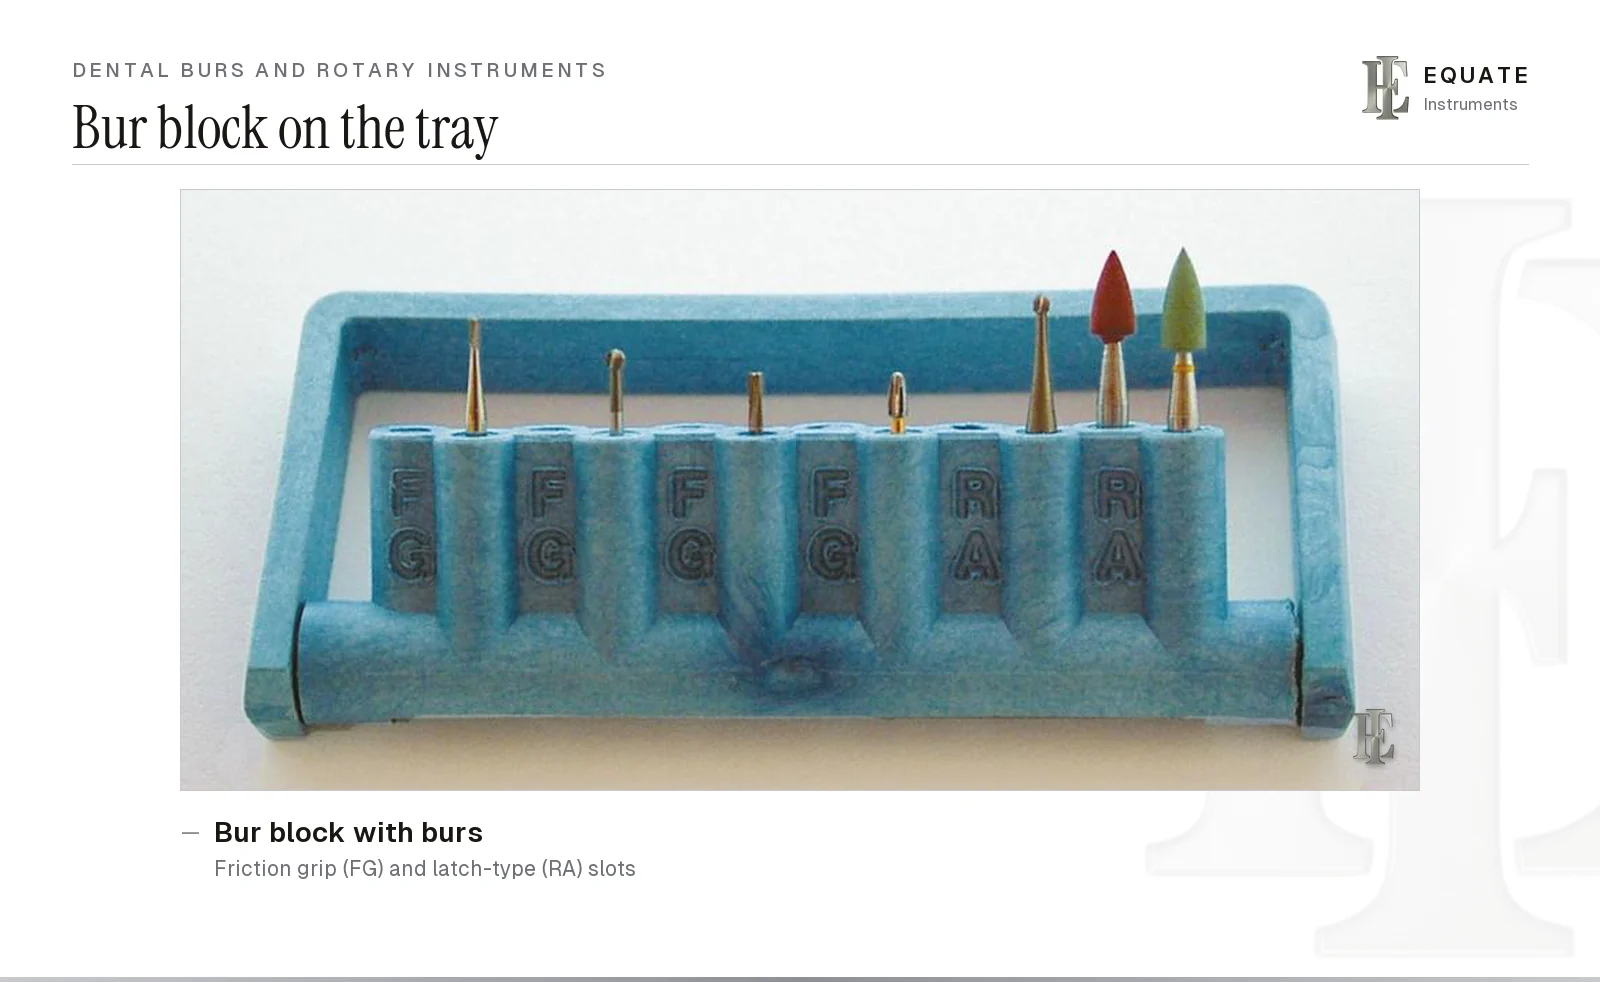
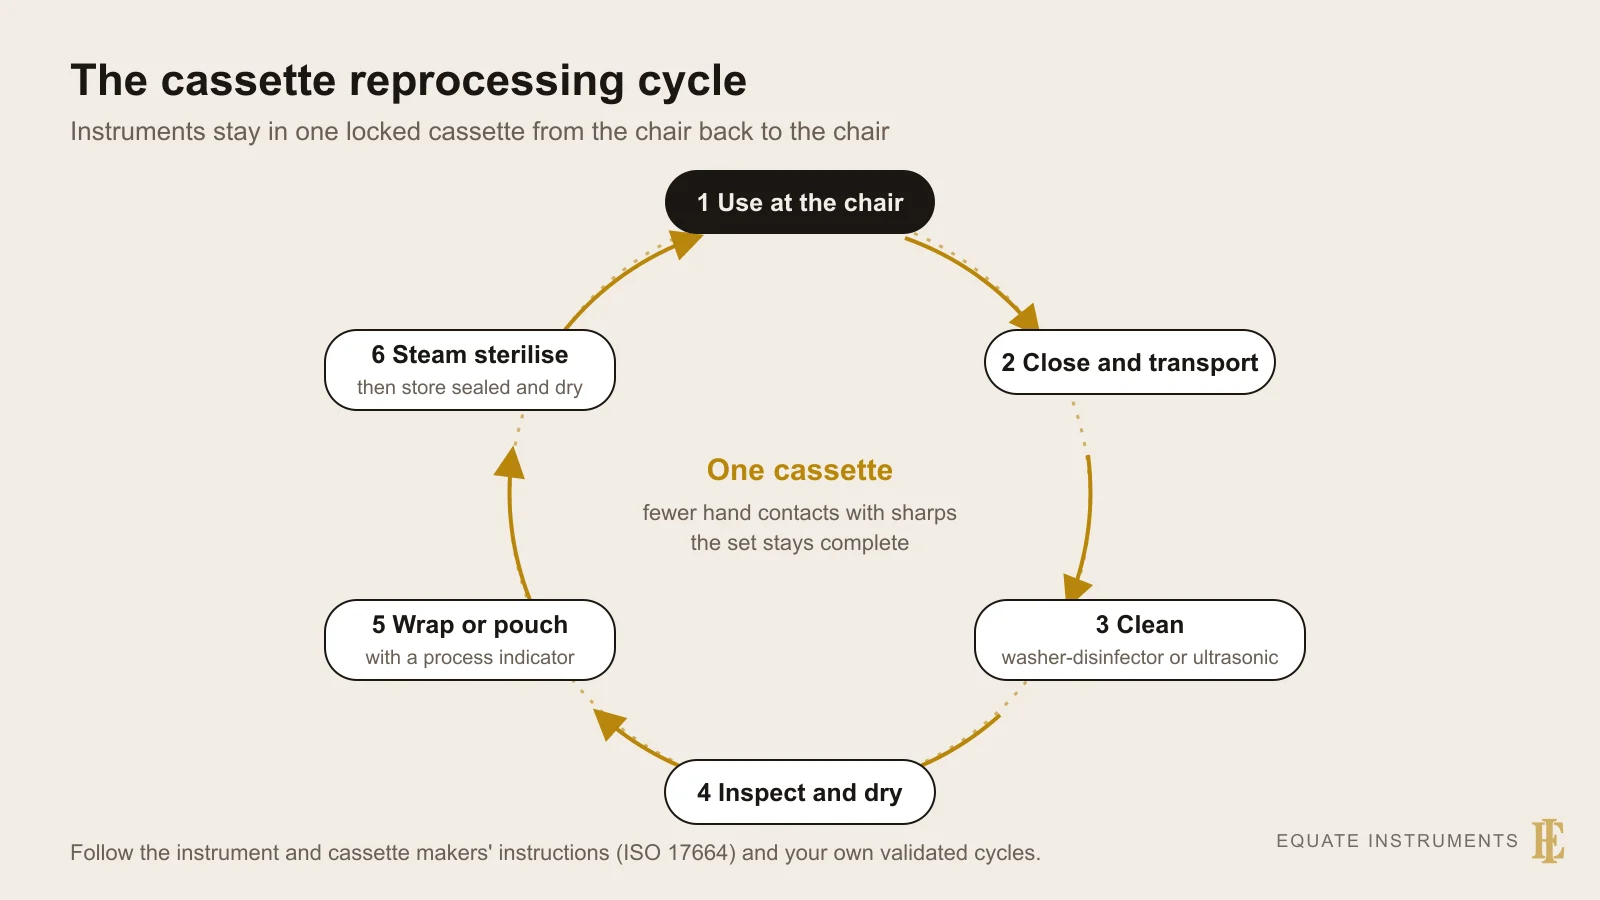
A bur block or bur holder keeps a tray's burs upright, sorted and protected. Magnetic blocks hold steel shanks, and silicone or stainless-steel holders grip each shank in a separate slot, often marked FG or RA. Keeping burs in the same holder from tray to cleaning to steriliser, with the holder clipped into an instrument cassette if the practice uses them, means burs are handled less, sharp heads stay apart and the set can be checked at a glance.
CDC guidelines (Kohn and colleagues, 2003) note that burs are hard to clean and that their cutting surfaces wear with use and reprocessing, which is why many practices choose single-use burs; for patients with known or suspected prion disease, CDC advises treating carbide and diamond burs as single-use. Under the Spaulding classification the CDC applies, items that penetrate soft tissue or bone are critical, which takes in surgical burs, and heat-tolerant items that touch mucous membranes are also expected to be heat sterilised. In England, HTM 01-05 does not name burs, but it applies the same clean, inspect, sterilise and store sequence to reusable dental instruments, asks practices to consider single-use replacements for instruments that are difficult to clean (para 2.17) and makes endodontic files and reamers single use or single patient use (para 2.18). Follow the manufacturer's reprocessing instructions and your national regulations.
A 2023 evidence brief from Public Health Ontario adds detail. It treats burs as critical items that need cleaning followed by sterilisation. In the studies it reviewed, washer-disinfectors and ultrasonic baths cleaned burs best and hand scrubbing was the least consistent method, while steam autoclaving was the most effective way to sterilise them. It also repeats the Ontario advisory committee (PIDAC) position that glass-bead sterilisers, ultraviolet light, microwave ovens and boiling are not acceptable. New burs should be treated as non-sterile unless the packet says otherwise: one study it cites grew microbes from 8 of 100 new, unsterilised burs, and another from 42%.
- Remove the bur from the handpiece as soon as the procedure ends and before the handpiece is taken off its hose, so no one is cut while handling it.
- Place used burs in a holder and clean them promptly: a bur brush, an ultrasonic bath or a washer-disinfector removes debris trapped between blades and diamond grit.
- Inspect under good light. Discard burs with dull, chipped or clogged heads, bent shanks or worn diamond coating.
- Sterilise burs packaged in their holder (pouch or wrapped cassette) with chemical indicators inside and out; confirm the outside indicator has changed when unloading, and the inside one when the pack is opened at the chair. Carbon steel burs corrode in steam; the CDC notes dry heat or unsaturated chemical vapour cause less corrosion.
- Burs go into a sharps container; single-use discs, plastic mandrels and other disposable polishers are discarded as clinical waste under national regulations, and reusable metal mandrels and points are reprocessed like burs.
Choosing burs and avoiding common mistakes
- Match the shank to the handpiece first: friction grip for high speed, latch-type for the slow-speed contra-angle, straight shank for the straight handpiece (see dental handpieces).
- Seat the bur fully and test that it is held before running it; a partly seated bur runs eccentrically and can loosen.
- Never use a bent or eccentric bur. It vibrates, heats the tooth and can fracture.
- Use water coolant at high speed with high-volume evacuation, and light, intermittent pressure; heat and pressure damage the pulp and wear the bur faster. A 2023 review by Lau and colleagues names friction during cavity preparation and polishing among the main sources of pulpal heat, and in laboratory studies a rise of more than 5.5 °C (to above about 42.4 °C inside the pulp) is taken as the point where harm becomes possible.
- For oral surgery, the CDC recommends sterile water or sterile saline as the coolant and irrigant, delivered by a device that allows it.
- Do not use a fine diamond or finishing bur for bulk reduction, or a coarse diamond for finishing; follow the grit sequence.
- Keep a standard bur kit per procedure in a labelled holder so the assistant can set up and the clinician can find each bur by position.
- Replace burs on a schedule rather than when they fail: a sharp bur cuts cooler and faster.
The Equate difference
Equate does not sell burs, diamonds or polishers. For organising and reprocessing them, its catalogue lists 3 stainless-steel bur holders (for 4, 8 or 12 burs) that grip friction-grip and latch-type shanks in silicone inserts, 4 packs of 20 replacement silicone bur holder inserts (blue, green, red and yellow), 26 sterilisation cassettes (19 instrument cassettes and 7 sterilisation cassettes and cassette trays) and a solid-base sterilisation tray.
Equate Dental Burs and Rotary Instruments: Types, Shanks and Uses options

Sterilization Cassette for 5 Instruments - 182 x 72 x 34 mm
EI-0229
Medium Sterilization Cassette with Removable Top - 10 Instruments, 192 x 144 x 34 mm
EI-0230
Sterilization Cassette for 20 Instruments - 288 x 182 x 34 mm
EI-0231
Sterilization Cassette for 5 Instruments
EI-0232
Sterilization Cassette for 7 Instruments
EI-0233
Sterilization Cassette for 10 Instruments
EI-0234
Sterilization Cassette for 20 Instruments
EI-0235
Solid Base Sterilisation Tray
EI-0517
Stainless Steel Tweezer Holder - X-Mini
EI-0536
Stainless Steel Tweezer Holder - Mini
EI-0537
Stainless Steel Tweezer Holder - Small
EI-0538
Stainless Steel Tweezer Holder - Large
EI-0539Browse all restorative & operative instruments Browse all sterilization & organization instruments
Buying in your market
Frequently asked questions
What is the difference between FG and RA burs?
FG (friction grip) burs have a short, smooth shank of about 1.6 mm and fit the high-speed handpiece. RA (right-angle or latch-type) burs have a thicker shank of about 2.35 mm with a notch at the end and lock into a slow-speed contra-angle. The head may be identical; only the shank differs.
What is the difference between carbide and diamond burs?
Carbide burs have tungsten carbide blades that cut tooth structure in chips and leave a relatively smooth surface. Diamond burs have bonded diamond grit that grinds, which suits enamel, ceramics and crown preparation. Many preparations use both: a diamond for reduction and a carbide or finishing bur for refinement.
What do the coloured rings on diamond burs mean?
The ring shows the grit. A common convention is black for super coarse, green for coarse, blue or no ring for medium, red for fine, yellow for extra fine and white for ultra fine, but manufacturers differ, so check the maker's chart.
What is a No. 330 bur used for?
A small pear-shaped carbide bur used to open and outline conservative cavity preparations for both amalgam and composite; its rounded corners leave rounded internal angles. Long-head versions of the pear bur, such as the 333L, are used where a deeper outline is needed.
Can dental burs be sterilised and reused?
Many carbide and diamond burs can be cleaned, packed and heat sterilised between patients if the manufacturer allows it. CDC guidance notes that burs are hard to clean and their cutting surfaces wear, so many practices choose single-use burs, and for patients with known or suspected prion disease CDC advises treating carbide and diamond burs as single-use. Worn or damaged burs go into a sharps container.
What do the numbers on dental burs mean?
Traditional US numbers name the shape and size together, for example 1/4 to 10 for round burs and 330 for a pear bur. The ISO 6360 system uses a 15-digit code for material, shank, shape, cut or grit and size; its last three digits give the head diameter in tenths of a millimetre, so 010 is a 1.0 mm head.
Do new dental burs need to be sterilised before first use?
Yes, unless the packet states that the burs are sterile. Public Health Ontario's 2023 evidence brief says new burs should be inspected, cleaned and sterilised before they are first used, and it cites studies that found microbial growth on 8 of 100 new, unsterilised burs and on 42% of new burs in another study.
How many times can a diamond bur be reused?
There is no fixed number. Gureckis and colleagues (1991) found no difference in diamond cutting efficiency between four sterilisation methods after 10 cycles, although individual burs varied, while Gonzaga and colleagues (2019) found that medium-grit diamonds cut more slowly after repeated autoclaving. Follow the manufacturer's instructions, inspect the bur before each use and discard it once the grit looks worn or clogged.
References
- Boyd LB. Dental Instruments: A Pocket Guide, 7th edition. Saunders/Elsevier, 2020 (photographs used under licence)
- Kohn WG, et al. Guidelines for Infection Control in Dental Health-Care Settings, 2003. MMWR 52(RR-17), Centers for Disease Control and Prevention
- Department of Health and Social Care. Health Technical Memorandum 01-05: Decontamination in primary care dental practices (2013 edition)
- Spaulding EH. Chemical disinfection of medical and surgical materials. In: Lawrence CA, Block SS (eds). Disinfection, Sterilization, and Preservation. Lea & Febiger, 1968
- ISO 1797:2017 Dentistry: shanks for rotary and oscillating instruments
- ISO 6360-1:2004 Dentistry: number coding system for rotary instruments, Part 1: general characteristics
- ISO 7711-1:2021 Dentistry: diamond rotary instruments, Part 1: general requirements
- Public Health Ontario. Evidence brief: Dental burs – cleaning and sterilization. November 2023
- Gureckis KM, Burgess JO, Schwartz RS. Cutting effectiveness of diamond instruments subjected to cyclic sterilization methods. J Prosthet Dent 1991;66(6):721-6
- Gonzaga CC, et al. Cutting efficiency of different diamond burs after repeated cuts and sterilization cycles in autoclave. Indian J Dent Res 2019;30(6):915-9
- Lau XE, et al. Heat generated during dental treatments affecting intrapulpal temperature: a review. Clin Oral Investig 2023;27(5):2277-97
- Ehrmann E, Medioni E, Brulat-Bouchard N. Finishing and polishing effects of multiblade burs on the surface texture of 5 resin composites: microhardness and roughness testing. Restor Dent Endod 2019;44(1):e1
- Romeo U, et al. Subcutaneous emphysema during third molar surgery: a case report. Braz Dent J 2011;22(1):83-6
I am a…
Related
- Dental Handpieces: Types, Attachments and Reprocessing
- Dental Evacuation Devices, the Air/Water Syringe and the Dental Unit
- Enamel-Cutting Instruments and G.V. Black's Instrument Formula
- Amalgam Restorative Instruments: What Each One Does
- Restorative Dental Hand Instruments
- Basic Dental Instruments: Mirror, Explorer, Cotton Forceps and Handles
- Fixed Prosthodontic Instruments for Crown and Bridge Work
- Endodontic Instruments for Root Canal Treatment
- Crown and Bridge Tray Setup: Preparation and Cementation
- Dental Instrument Cassettes, Trays and Boxes