Surgical Extraction Tray Setup
Written by the Equate Instruments Technical Team · Reviewed by the Medical & Dental Board, Equate Instruments · Updated ·
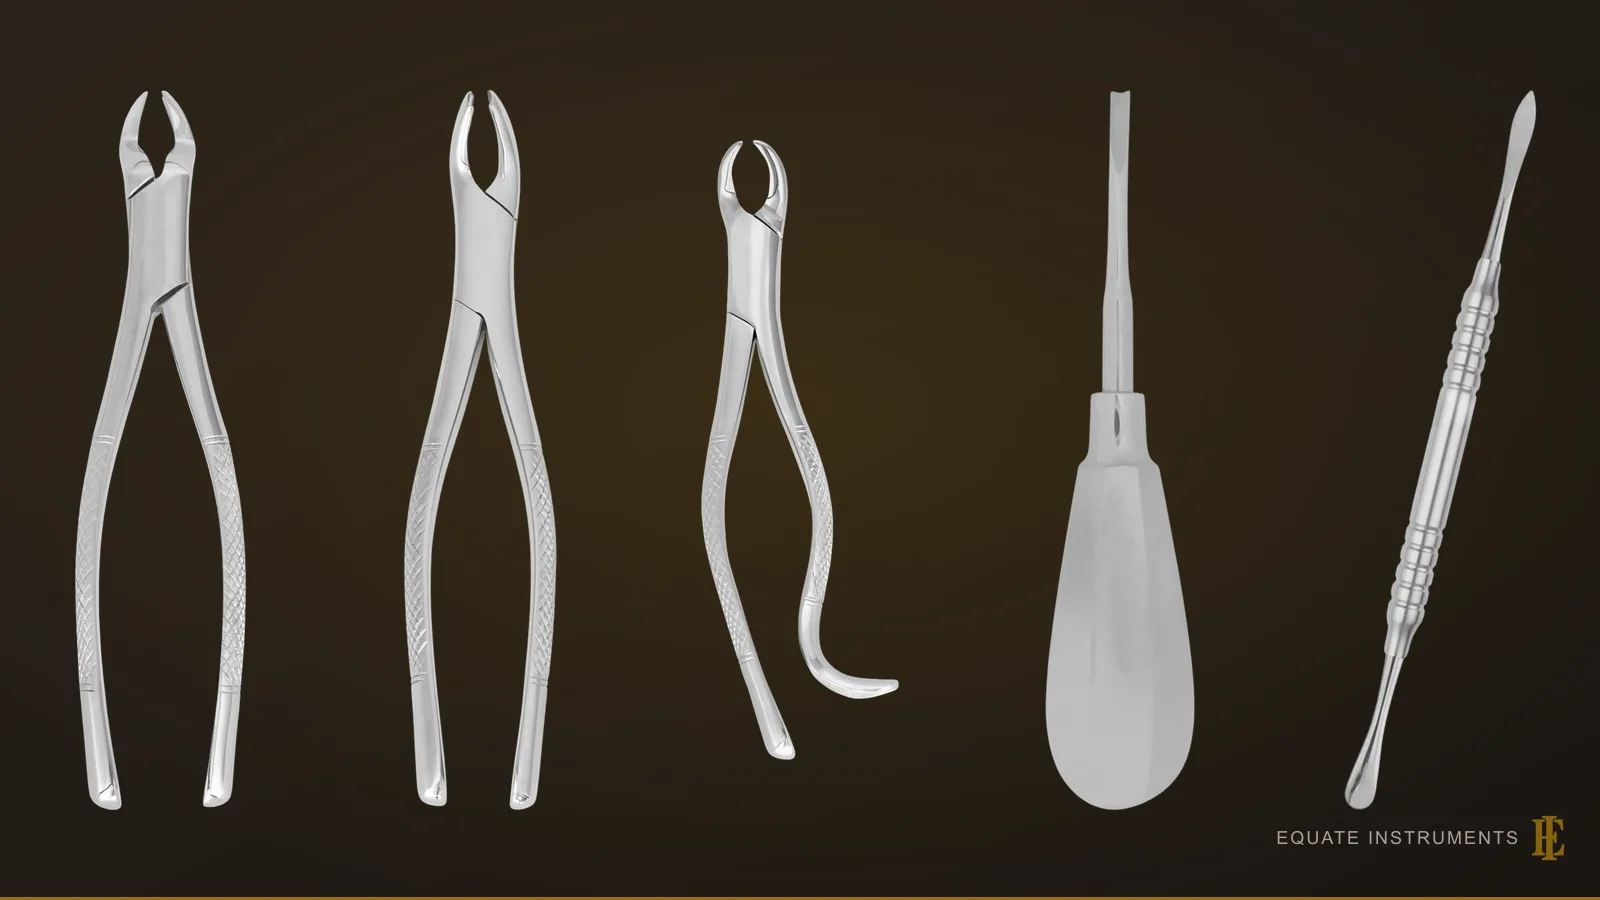
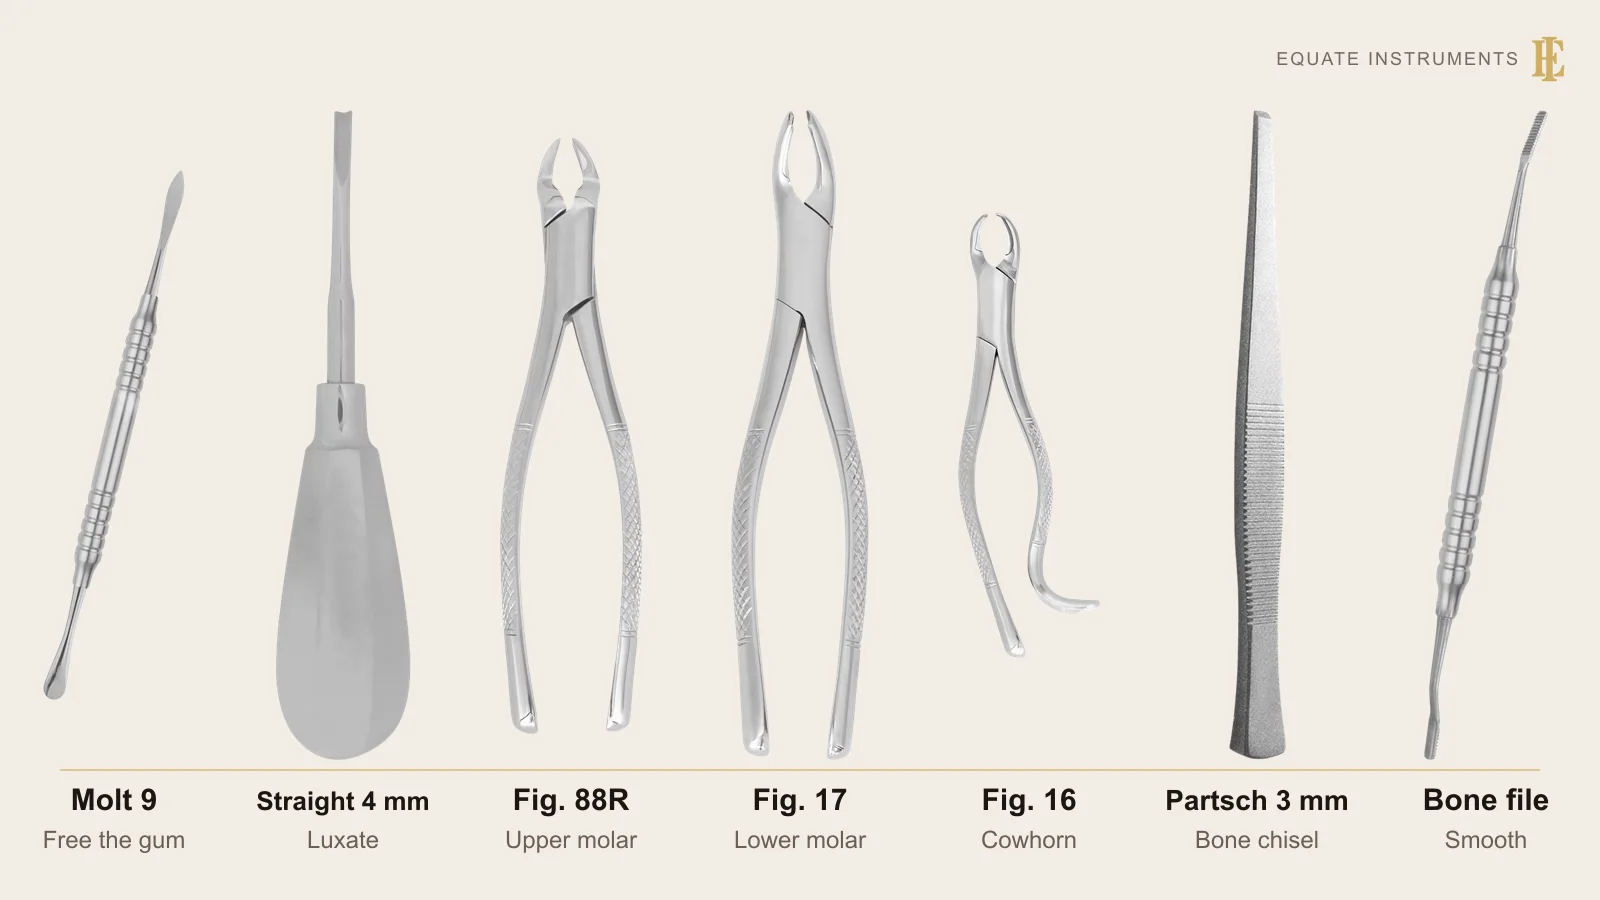
A surgical extraction tray setup is the universal surgical tray plus the instruments that loosen and deliver the tooth. For a simple upper right first molar that means a straight elevator and No. 88R forceps. For an impacted lower molar, add a scalpel, root-tip elevators, a rongeur, bone file, chisel and mallet, a surgical handpiece and No. 16 forceps, then close with sutures.
Key points
- The simple and surgical trays share one core; the surgical tray adds instruments for a flap, bone removal and sectioning.
- Forceps are chosen by tooth and by pattern number, and English and American numbers don't match, so order by both.
- For the instruments themselves, in order of use, see the tooth extraction instruments guide; this page covers the tray and the procedure.
Step by step
- 1
Confirm the tooth and the plan
Check the radiograph, the tooth number and the consent against the tray. For an impacted molar, note the depth, the angulation and how close the roots are to the inferior alveolar canal.
- 2
Anaesthetise and seat the mouth prop
Give buccal and palatal infiltration for an upper molar, or an inferior alveolar block with buccal infiltration for a lower molar. Place the mouth prop on the opposite side to support the jaw.
- 3
Free the gingiva or raise a flap
For a simple extraction, detach the gingival cuff with the periosteal elevator; where an implant is planned, a periotome can cut the ligament first to spare the socket walls. For an impacted molar, make a two- or three-sided incision with a buccal relieving cut and reflect a full-thickness flap.
Dental Scalpel Handles and BladesPeriosteal Elevators: Molt 9, Freer, Buser and Other PatternsPeriotomes for Atraumatic Extraction
- 4
Retract and remove bone
Hold the flap with a Minnesota or Austin retractor resting on bone. Cut a buccal gutter with a surgical bur under sterile saline irrigation, or use a chisel and mallet where that is the surgeon's preference.
Dental and Oral Surgery RetractorsBone Chisels and Surgical Mallets in DentistrySurgical Suction Tips for Oral Surgery
- 5
Section and elevate
Divide a multi-rooted impacted tooth at the furcation if it will not lift out whole. Luxate with a straight elevator, fulcrum on bone and never on the adjacent tooth, and use Cryer elevators for the remaining roots.
- 6
Deliver with forceps
Seat the forceps as far apically as possible on root surface. Deliver an upper first molar with steady buccal and palatal pressure, and a lower molar with No. 17 or No. 16 cowhorn forceps.
- 7
Debride and smooth the socket
Remove the follicle and granulation tissue with a surgical curette, without curetting the apex of a lower third molar socket. Trim sharp margins with a rongeur and finish them with a bone file.
Surgical Curettes (Bone Curettes) for Oral SurgeryDental Rongeurs and Bone Files
- 8
Irrigate and close
Irrigate with sterile saline and check for fragments. Replace the flap, close with sutures using the needle holder and tissue forceps, and cut the tails with suture scissors.
Dental Needle Holders (Needle Drivers)Dental Tissue Forceps (Toothed and Non-Toothed)Dental Surgical Scissors
- 9
Pressure and aftercare
Have the patient bite on a damp gauze pack for at least five minutes and check haemostasis before they leave. Give written aftercare and book suture removal on its own small tray if non-resorbable sutures were used.
Dental Cotton Pliers (Dental Tweezers)Suture Removal Tray Setup
Tray checklist: simple upper molar extraction
A routine extraction of an upper right first molar uses the universal surgical tray with one elevator and the forceps for that tooth. For a lower first or second molar the tray is identical except that No. 17 lower molar forceps replace the 88R.
| Instrument | What it is for | Guide |
|---|---|---|
| Mouth mirror, probe, cotton pliers | Confirm the tooth and test anaesthesia | Mouth mirrors |
| Periosteal elevator | Detach the gingival cuff | Periosteal elevators |
| Straight elevator | Luxate the tooth and expand the socket | Dental elevators |
| No. 88R upper right molar forceps | Deliver the tooth | Extraction forceps |
| Surgical curette | Clean the socket | Surgical curettes |
| Tissue forceps, haemostat, tissue scissors | Handle and trim soft tissue | Tissue forceps, hemostats |
| Mouth prop, Minnesota retractor | Support the jaw, protect cheek and tongue | Dental retractors |
| Needle holder, sutures, suture scissors | Close the socket if needed | Needle holders |
| Surgical suction tip | Keep the field clear | Surgical suction tips |
| Absorbent gauze and haemostatic packing (oxidised cellulose or collagen sponge, with a non-animal option) | Local haemostasis; SDCEP advises having them ready for patients on anticoagulants or antiplatelet drugs | Consumables, not on Equate's list |
What is added for an impacted lower molar?
Lower third molars are the teeth most often impacted; a StatPearls review by Muhsin and Brizuela puts the share with some degree of impaction at 17% to 69%. The surgical tray adds instruments for the flap, bone removal and sectioning.
| Instrument | What it is for | Guide |
|---|---|---|
| Scalpel handle and No. 15 or 12 blade | Incision and buccal relieving cut | Scalpel handles |
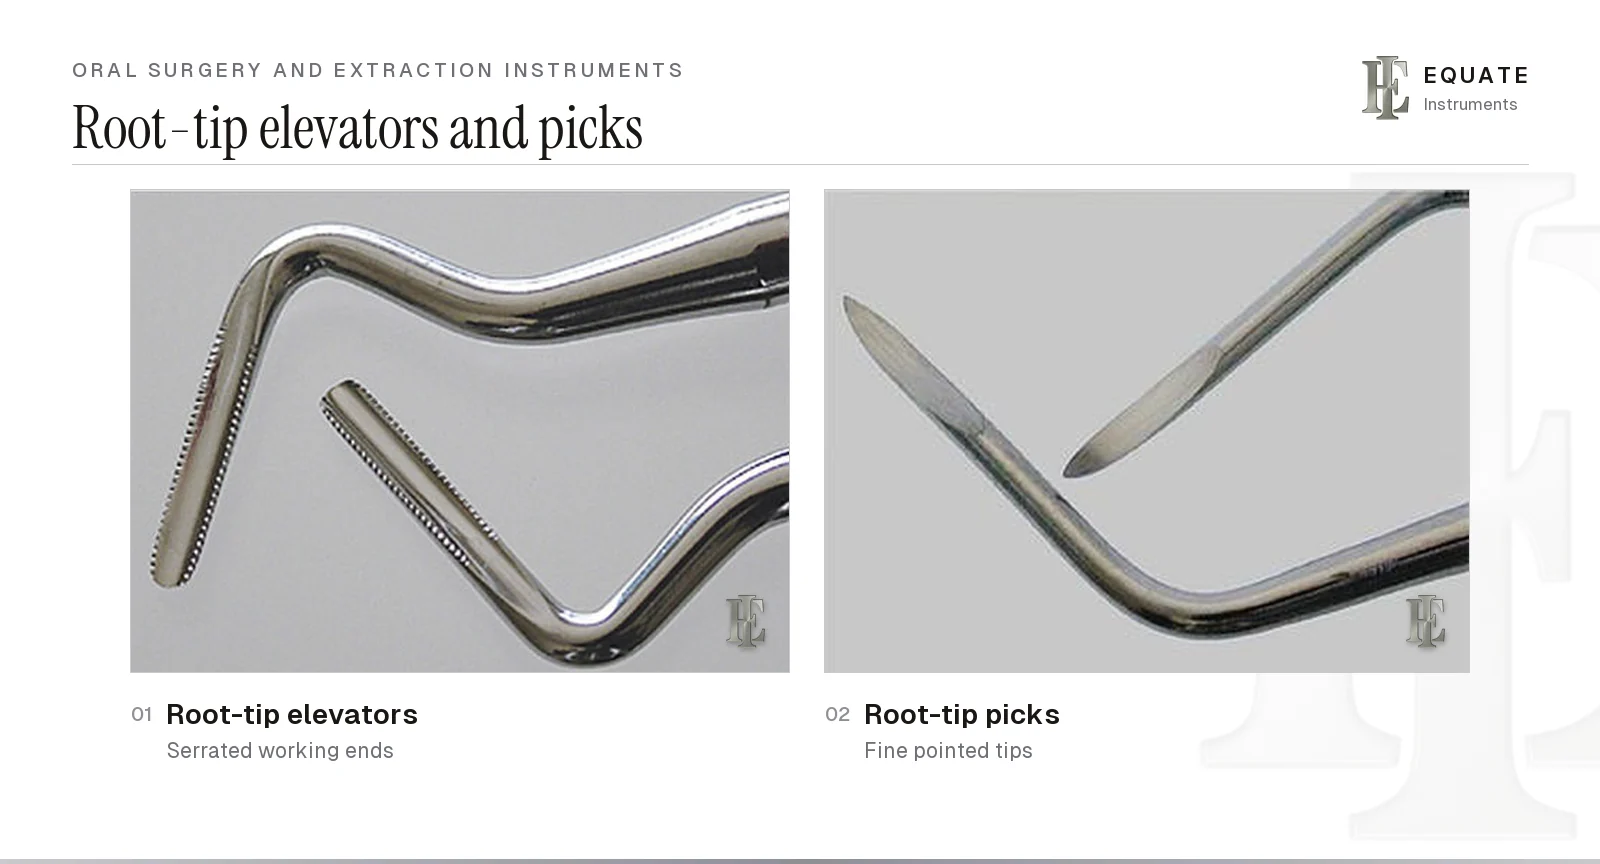
| Right and left root-tip elevators | Lift fractured root tips gently; never lever near the sinus or the inferior alveolar canal | Dental elevators, root-tip instruments |
| Cryer root elevators, right and left | Turn out the remaining root after sectioning, with the point on the inter-radicular bone | Dental elevators |
| Rongeur | Trim sharp socket margins | Dental rongeurs |
| Bone file | Smooth bone edges before closure | Dental rongeurs |
| Surgical chisel and mallet | Remove thin bone or split the tooth | Bone chisels and mallets |
| Surgical handpiece (electric, or one that exhausts to the rear, not a forward-venting high-speed air turbine) and long-shank burs | Buccal gutter and sectioning under sterile saline, without blowing air into the tissues | Equipment, not on Equate's list |
| No. 16 lower cowhorn forceps | Engage the furcation and lift the tooth | Extraction forceps |
Which forceps go on which tray?
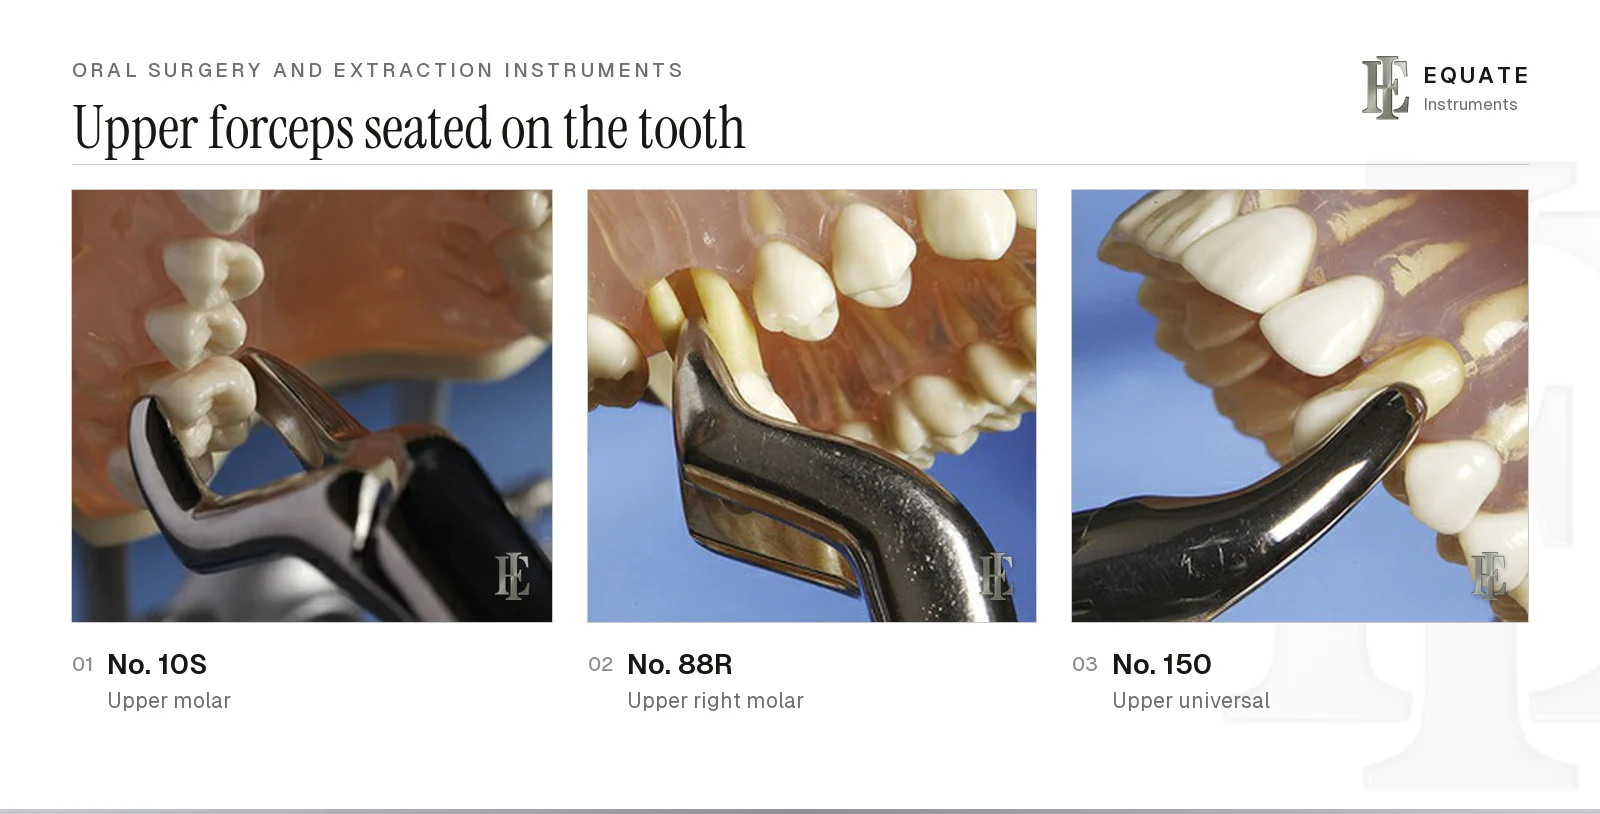
Forceps numbers belong to a pattern, not to a tooth. Equate's catalogue shows the trap: an English-pattern Fig. 17 is an upper right molar forceps, while an American-pattern Fig. 17 is a lower molar forceps. State the pattern and the figure when ordering or restocking a tray. The table lists only the forceps these trays use; the full numbered forceps table is in the oral surgery and extraction instruments guide.
| Tooth | American pattern | Tray |
|---|---|---|
| Upper first and second molar, either side | 10S | Simple extraction |
| Upper right first and second molar | 88R, 53R or 18R | Simple extraction |
| Upper left first and second molar | 88L | Simple extraction |
| Upper incisors, premolars and roots | 150 | Simple extraction |
| Lower incisors, premolars and roots | 151 | Simple extraction |
| Lower first and second molar | 17 | Simple extraction |
| Lower molar after sectioning or with a sound furcation | 16 or 23 cowhorn | Surgical extraction |
How are the trays laid out and reprocessed?
Lay each tray out left to right in the order of the steps above: examination, flap, bone removal, elevators, forceps, debridement, closure. Keep the mallet and chisel together at the far end so the chisel is never struck by mistake when not in use, and keep the burs in a bur block rather than loose on the tray.
Every instrument here enters bone or soft tissue, so the CDC's 2003 guidelines class it as critical: clean, then heat-sterilise, and store it wrapped. The same guidelines call for sterile saline or sterile water as the irrigant for surgical procedures and sterile surgeon's gloves. Open forceps, rongeurs and needle holders for cleaning, brush bone debris out of rongeur jaws and file teeth, lubricate the joints and check the cutting edges before packing. Follow each manufacturer's ISO 17664-1 instructions and, in England, HTM 01-05.
What are the common mistakes in extraction tray setup?
- Picking forceps by figure number alone and getting the wrong pattern.
- Using the adjacent tooth as a fulcrum for the elevator.
- Turning a T-bar elevator hard before the root is free: the torque can fracture the buccal plate or the mandible (see the oral surgery and extraction instruments guide).
- Using a root-tip elevator or pick as a lever against the sinus floor or near the inferior alveolar canal.
- Cutting bone with an air turbine instead of a surgical handpiece, which can force air into the tissues.
- Seating the forceps on crown instead of root, which fractures the crown.
- Removing lingual bone near a lower third molar, which puts the lingual nerve at risk.
- Curetting the apex of a lower third molar socket, close to the inferior alveolar nerve.
- Leaving sharp bone edges that the patient feels through the healing gum.
Build these trays with Equate
Equate covers both trays from its oral surgery range. For the upper molar there are 6 upper right molar forceps, including American-pattern Fig. 88R, 53R and 18R, plus 18 universal forceps, among them Fig. 150 and 151. The 27 lower molar forceps include Fig. 16, 17 and 23 American patterns. There are 24 straight elevators, including 2, 3 and 4 mm blades and a 13 mm Walter pattern, and 12 Cryer elevators, left and right, in 8 and 12 mm.
For bone work there are 9 side-cutting and 6 end-cutting rongeurs, 23 straight bone chisels from 1 to 9 mm and 6 surgical mallets, 4 with replaceable plastic faces, plus bone file rasps and 10 surgical suction tubes from 1.5 to 5 mm. Instruments are designed in Finland. Clinics can request samples and a quote, or compare the ready-made sets on the tooth extraction instruments page.
The Equate difference
Equate lists 159 references across the 12 subcategories on these trays, including American-pattern Fig. 88R, 53R and 18R upper right molar forceps, Fig. 150 and 151 universals, Fig. 16 and 23 lower cowhorns, Cryer elevators in 8 and 12 mm, 15 bone rongeurs, 23 straight bone chisels and 6 surgical mallets.
Equate Surgical Extraction Tray Setup options

Hirschfeld File 3/7 - Anatomical Solid Handle 6 mm
EI-1958
Hirschfeld File 5/11 - Anatomical Solid Handle 6 mm
EI-1959
Hirschfeld File No. 9 - Solid Handle 6mm
EI-1960
Sugarman File 1S/2S - Solid Handle 6 mm
EI-2159
Sugarman File 3S/4S - Solid Handle 6 mm
EI-2160
Schluger File 9/10 - Solid Handle 6 mm
EI-2161
Back File 11/12 - Solid Handle 6 mm
EI-2162
Cryer Elevator Fig.31 - Right, 12 mm
EI-0324
Cryer Elevator Fig.32 - Left, 12 mm
EI-0325
Bone Chisel Double Cut 3 mm
EI-0554
Bone Chisel Double Cut 6 mm
EI-0555
Extraction Forceps - Fig. 17 Upper Right Molars
EI-0641Browse all oral surgery instruments Browse all accessories & supplies instruments Browse all endodontic instruments Browse all restorative & operative instruments
Buying in your market
Frequently asked questions
What is the difference between a simple and a surgical extraction tray?
A simple tray removes a visible tooth with an elevator and forceps. A surgical tray adds a scalpel, flap retractors, bone-removal instruments, root elevators and a suture kit for teeth that need a flap, bone removal or sectioning.
Which forceps are used for an upper right first molar?
American-pattern No. 88R, 53R or 18R upper right molar forceps are the usual choices. Each is paired right and left, with a beak shaped to engage the furcation between the two buccal roots. The No. 10S universal upper molar forceps fits either side.
Why is a chisel and mallet on an impacted molar tray?
They remove thin bone or split a tooth along a line of weakness. Many surgeons now do most bone removal with a surgical handpiece under sterile irrigation and keep the chisel for specific cuts.
What irrigation should be used during a surgical extraction?
Sterile saline or sterile water. The CDC's 2003 guidelines also call for devices made to deliver sterile fluid, such as a bulb syringe, a single-use product or sterilisable tubing.
How is a lower third molar socket closed?
The flap is repositioned and closed with sutures, commonly resorbable, after the socket has been debrided and irrigated. Gauze pressure then controls bleeding.
How common is dry socket after a wisdom tooth extraction?
Much more common than after other extractions. The systematic reviews cited by StatPearls put alveolar osteitis at around 30% of lower third molar extractions, against under 5% for extractions overall, with pain usually starting one to five days after surgery.
References
- Hupp JR, Tucker MR, Ellis E. Contemporary Oral and Maxillofacial Surgery, 7th edition. Elsevier, 2018 (principles of routine and complicated exodontia; management of impacted teeth)
- Muhsin H, Brizuela M. Oral Surgery, Extraction of Mandibular Third Molars. StatPearls, StatPearls Publishing, 2023
- Gadhia A, Pepper T. Oral Surgery, Extraction of Teeth. StatPearls, StatPearls Publishing, 2023
- Kohn WG, Collins AS, Cleveland JL, Harte JA, Eklund KJ, Malvitz DM. Guidelines for Infection Control in Dental Health-Care Settings, 2003. MMWR Recommendations and Reports 52(RR-17), Centers for Disease Control and Prevention, 2003
- Department of Health. Health Technical Memorandum 01-05: Decontamination in primary care dental practices, 2013 edition
- ISO 17664-1:2021 Processing of health care products: information to be provided by the medical device manufacturer for the processing of medical devices, Part 1
- Boyd LB. Dental Instruments: A Pocket Guide, 7th edition. Saunders/Elsevier, 2020. Chapter 17, Oral Surgery Extraction Instruments (photographs used under licence)
- Rohe C, Schlam M. Alveolar Osteitis. StatPearls, StatPearls Publishing, updated 29 May 2023
- Scottish Dental Clinical Effectiveness Programme. Management of Dental Patients Taking Anticoagulants or Antiplatelet Drugs, 2nd edition, 2022
- Canadian Dental Association. Oasis Discussions: which handpiece for surgical extractions? Answer by Dr Suham Alexander and Dr George Sandor, 20 March 2014
I am a…
Related
- Tooth Extraction Instruments
- Dental Extraction Forceps
- Dental Elevators and Luxators
- Oral Surgery Tray Setup
- Suture Removal Tray Setup
- Dental Rongeurs and Bone Files
- Oral Surgery and Extraction Instruments
- Surgical Curettes (Bone Curettes) for Oral Surgery
- Bone Chisels and Surgical Mallets in Dentistry