Oral Surgery and Extraction Instruments
Written by the Equate Instruments Technical Team · Reviewed by the Medical & Dental Board, Equate Instruments · Updated ·
Oral surgery and extraction instruments are the hand instruments used to free a tooth or root from its socket and tidy the bone afterwards. Elevators, luxators and periotomes loosen the tooth by working in the periodontal ligament space; extraction forceps, shaped and numbered for particular teeth, grip and deliver it; root-tip elevators and picks recover fragments; and rongeurs, bone files, chisels and mallets reshape the alveolar bone.
Key points
- Elevators loosen and forceps deliver: most extractions start with an elevator, luxator or periotome in the ligament space before forceps are applied.
- Forceps are identified by number (10S, 88R, 150, 151, 16, 17 and so on). Each pattern is shaped for one area of the mouth; some upper molar patterns (88R and 88L) are made in right and left versions, while others (10S) fit either side.
- The instruments that cut tissue or touch bone, such as elevators, forceps, curettes, rongeurs, chisels and bone files, are critical items under the Spaulding classification and are heat sterilised after every patient; single-use items such as the surgical suction tip are discarded.
The instrument families of exodontia
A simple extraction and a surgical one use the same core families. Linda Bartolomucci Boyd's Dental Instruments: A Pocket Guide (Elsevier) groups them into elevators of several designs, extraction forceps numbered for particular teeth, and the bone instruments used to smooth or remove alveolar bone. Standard oral surgery texts such as Hupp, Tucker and Ellis's Contemporary Oral and Maxillofacial Surgery describe the same sequence: loosen the tooth, deliver it, then clean and shape the socket.
Around these sit the general surgical instruments covered in the universal surgical instruments guide: a scalpel, a periosteal elevator (a Molt 9 for most flaps, a finer Freer for papillae), surgical curettes, tissue forceps, haemostat, scissors, needle holder and retractors. Surgical suction and irrigation are covered in the dental evacuation guide, and local anaesthetic equipment in the local anaesthetic guide. For a ready-to-buy kit list, see the tooth extraction instruments page.
| Family | What it does | Typical variants |
|---|---|---|
| Straight elevator | Wedges into the ligament space to loosen and lift a tooth | A range of blade widths, narrow to broad; concave (gouge-shaped) blade |
| Luxating elevator | Severs ligament fibres with a thin, sharp blade before luxation | Straight or curved; several blade widths |
| Periotome | Cuts the ligament with minimal force to protect the socket walls | Straight or angled; single or double-ended |
| Root and T-bar elevators | Lift roots of multi-rooted teeth by turning against bone or root | Cryer (triangular blade), T-handle; right and left pairs |
| Root-tip elevators and picks | Recover small fractured root tips | Serrated or pointed tips; straight, right and left |
| Extraction forceps | Grip the tooth or root and deliver it from the socket | Upper and lower, anterior, premolar, molar, root and universal patterns |
| Rongeur | Nibbles away sharp or excess alveolar bone | Side-cutting, end-cutting, single or double action |
| Bone file | Smooths bone edges after rongeurs or extraction | Straight-cut or crosscut teeth; single or double-ended |
| Surgical chisel and mallet | Remove or reshape bone, or split a tooth | Single-bevel (bone) or bi-bevel (splitting); mallet with metal, nylon or plastic faces |
Straight elevators, luxators and periotomes
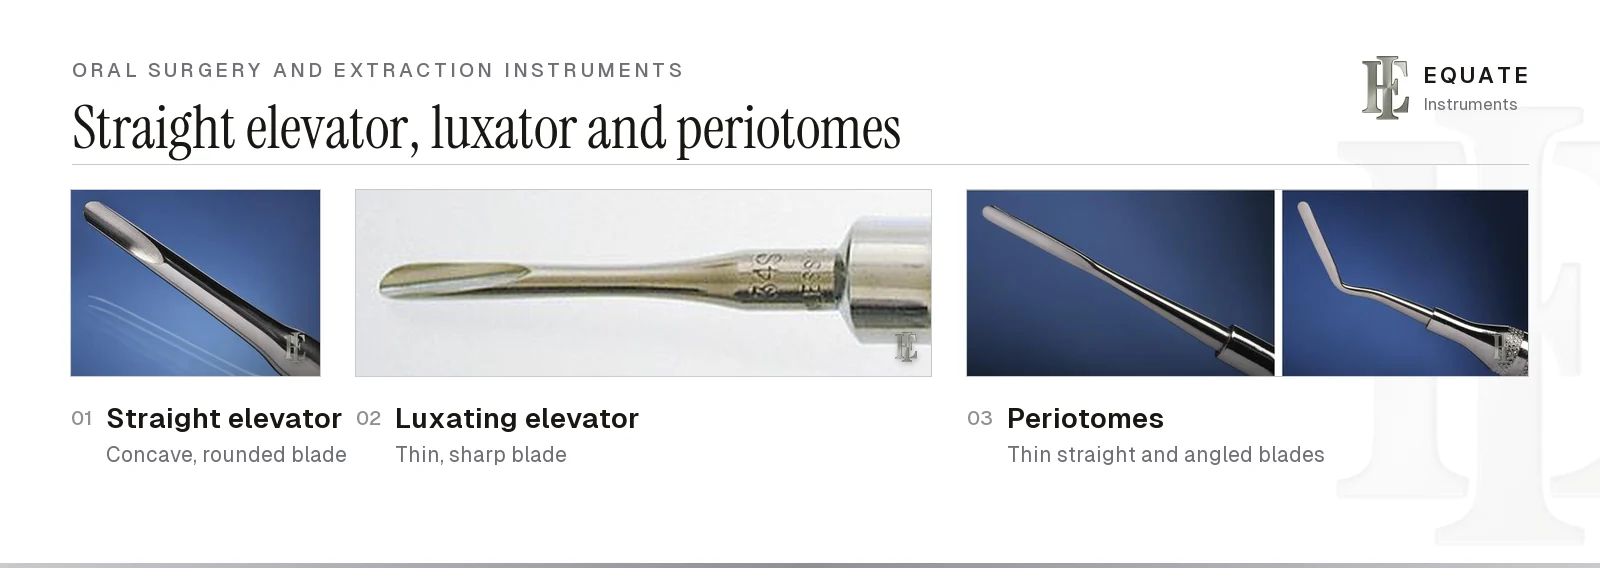
The straight elevator is the workhorse of exodontia. Its blade is concave on one side, and it is seated in the ligament space at the mesial or distal surface with the concave face towards the tooth. Rotating the handle wedges the root away from the bone, expands the socket and starts the tooth moving. A wider blade gives more purchase on large roots; a narrow blade reaches into tight interproximal spaces. UK clinicians often work with other patterns for the same jobs: Gadhia and Pepper's StatPearls review describes Coupland elevators in three graded straight widths used in sequence, Warwick James elevators in straight, left and right forms, the curved ones used with a scooping action, and left and right Cryers whose sharp triangular tips lift retained apices.
A luxating elevator looks similar but works differently. Its blade is thinner and sharpened, and it is advanced gently down the root surface to cut ligament fibres before the tooth is rocked. The most common mistake is to use a luxator as a lever: the fine blade bends or chips, and the instrument loses the edge that makes it worth having. Use a straight elevator for leverage and keep the luxator for cutting.
Periotomes are thinner still. They are slid into the ligament space with light pressure and worked around the tooth to detach it with as little damage as possible to the thin buccal plate. This matters when an implant is planned: Araújo and Lindhe's 2005 experimental study in dogs showed that the thin buccal crest loses the most height as the socket heals, and an intact socket wall makes immediate or early placement more predictable. Periotomes come straight for anterior teeth and angled for posterior access, and some designs have replaceable tips. See the dental elevators guide for blade patterns and sizes.
Root elevators, T-bar elevators and root-tip instruments
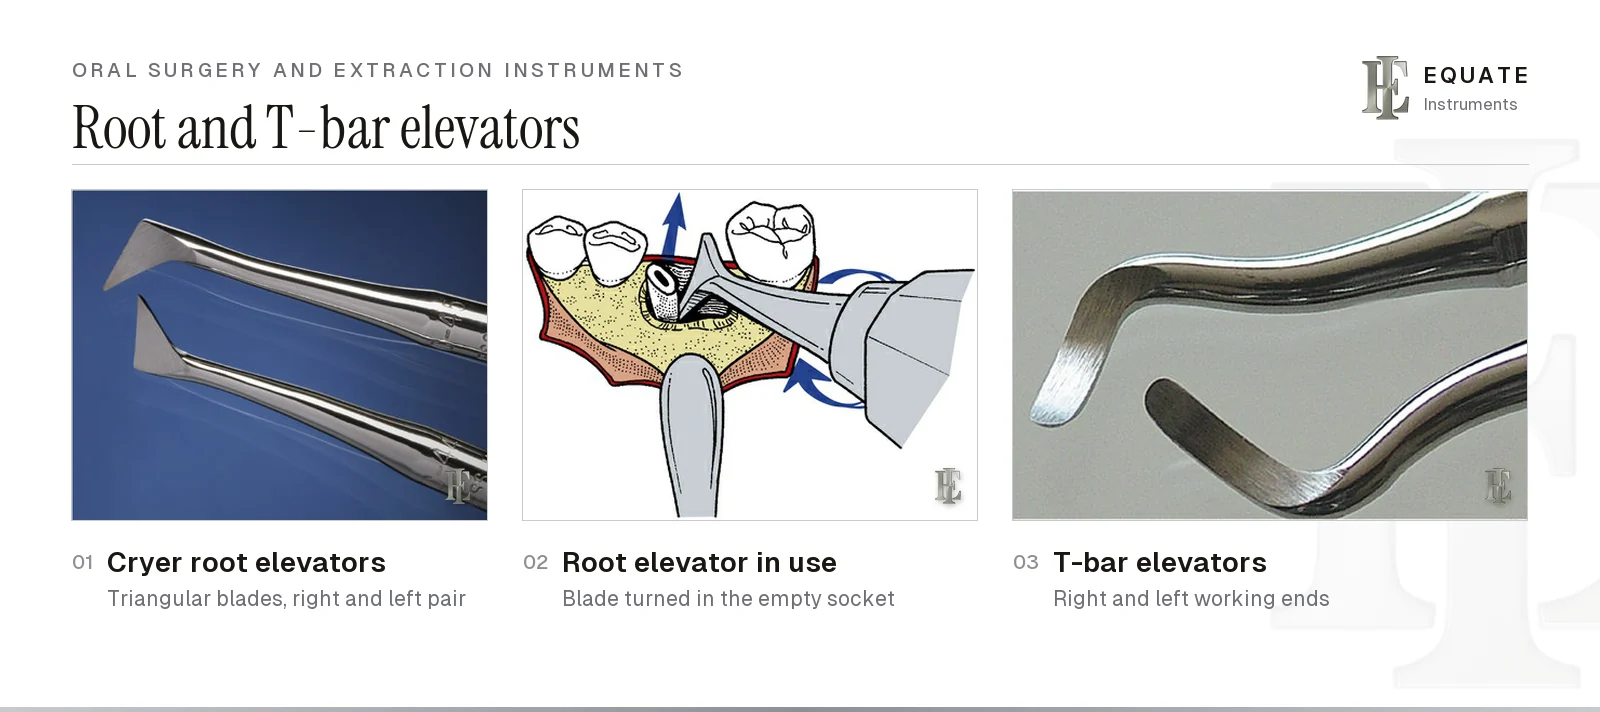
When a lower molar has been sectioned or one root has come out and the other has not, a root elevator with a triangular blade does the work. The Cryer pattern, sold as right and left pairs and sometimes called east-west elevators, is placed into the empty socket so that its point engages the inter-radicular bone and the remaining root. Turning the handle lifts the root out like a wheel and axle. The choice of right or left depends on which way the blade must turn, not only on the side of the mouth.
T-bar elevators use the same idea with a cross-bar handle that the whole hand can turn. They give more torque, so they are used with care: the force they can generate is enough to fracture the mandible or the buccal plate if the root has not been freed first. With any elevator, rest the fulcrum on bone and never on the neighbouring tooth, a point the StatPearls review stresses; the other technique points are on the surgical extraction tray setup page.
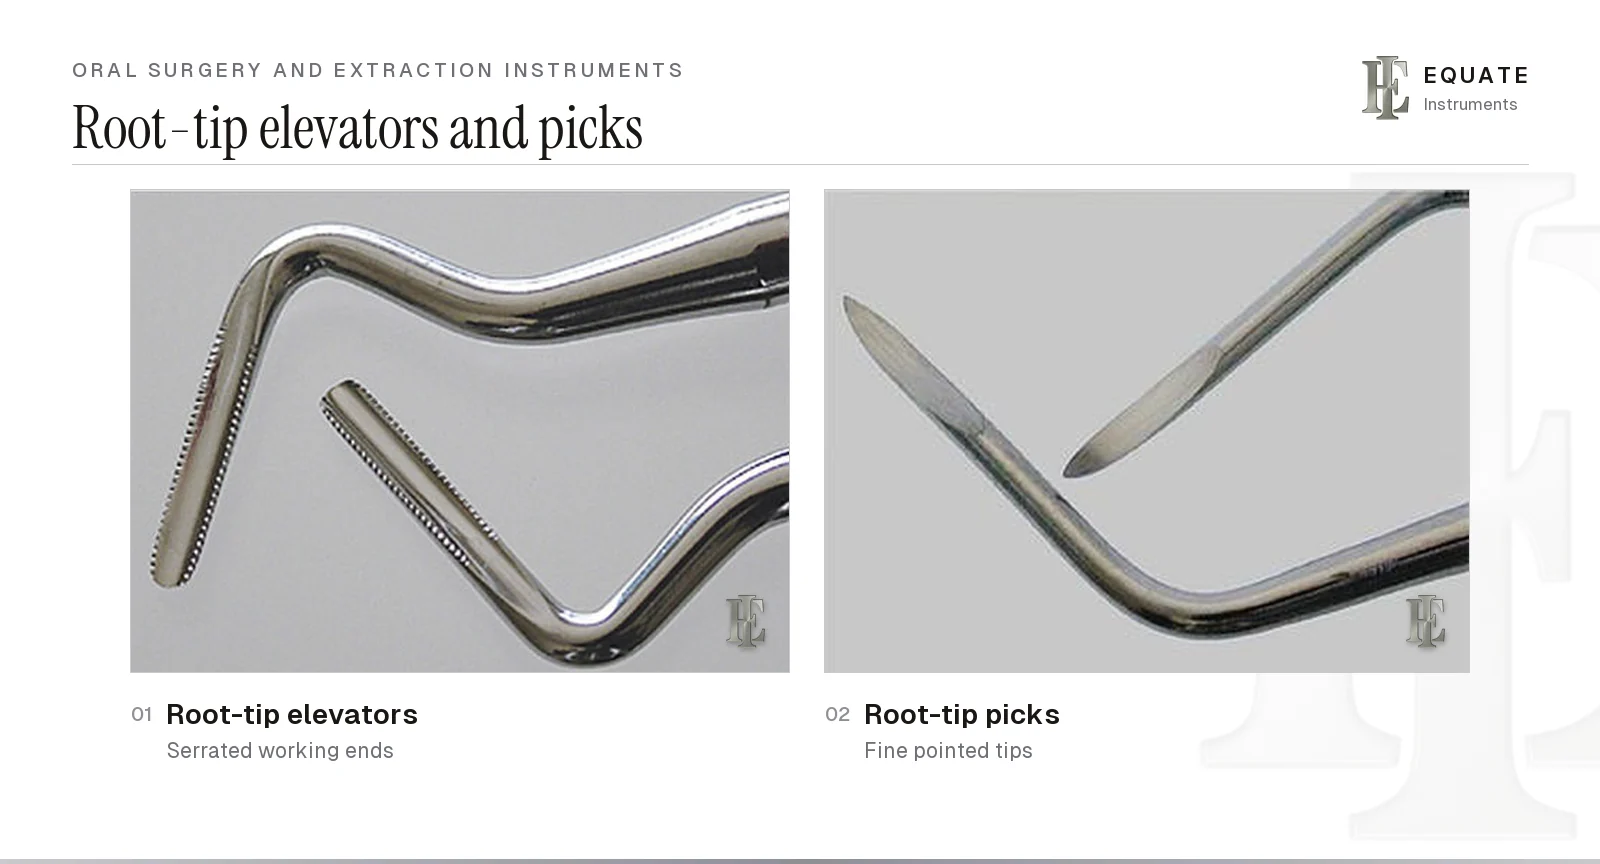
For fractured apical fragments, root-tip elevators have small serrated working ends that catch the root surface, while root-tip picks have fine pointed tips for very small fragments in narrow sockets. Both are delicate. Use them with a gentle lifting action and good suction and light, never as levers against the sinus floor or close to the inferior alveolar canal.
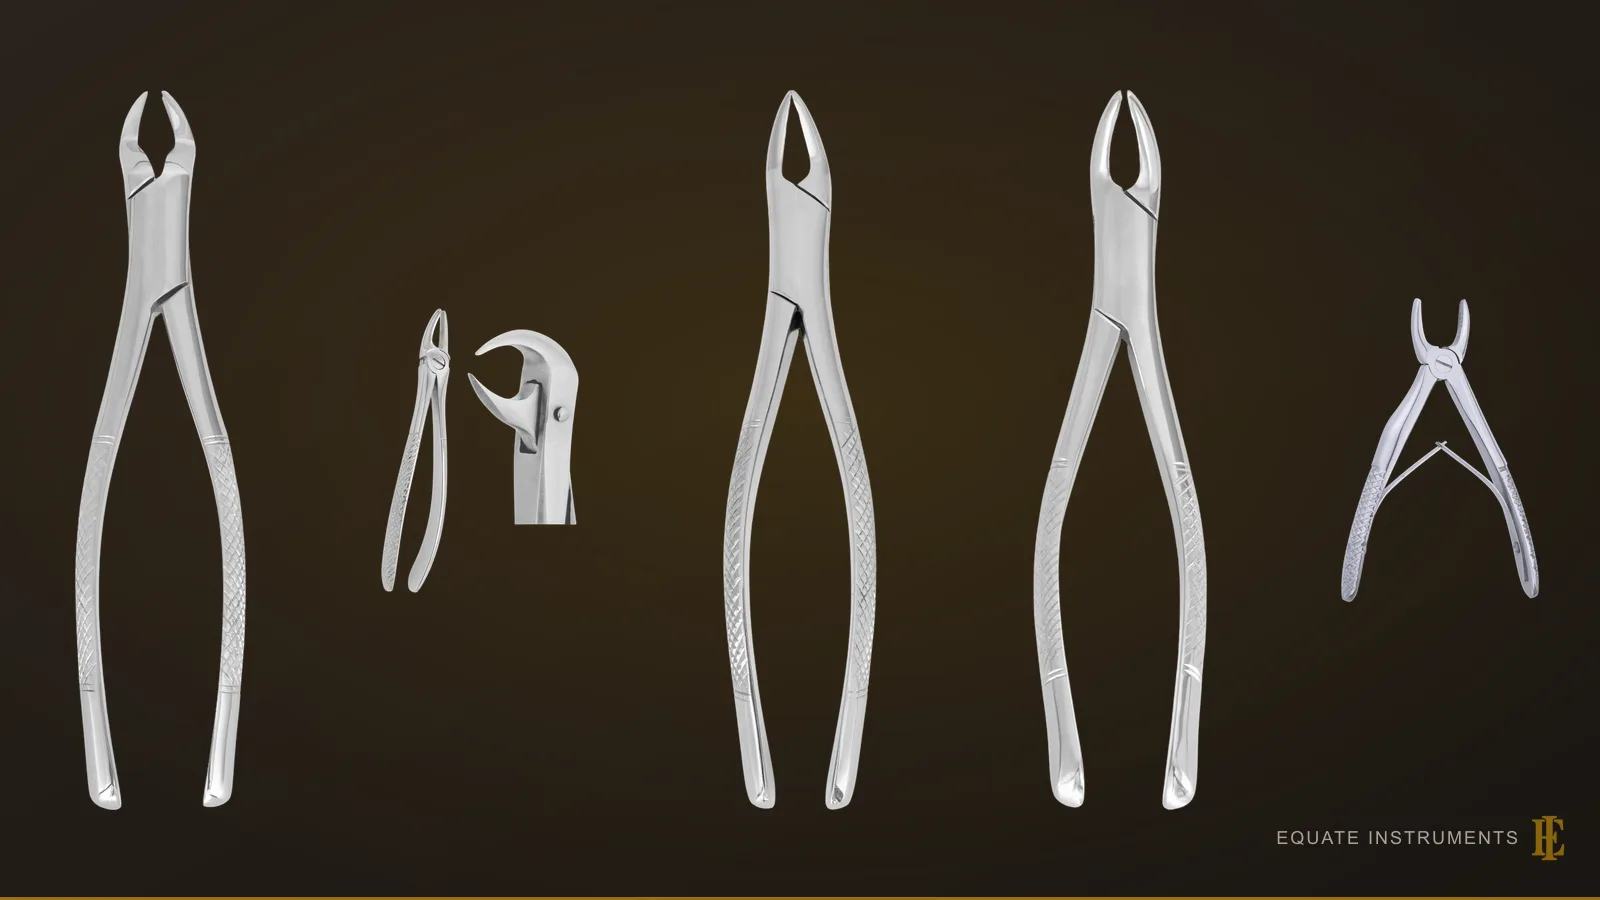
Upper (maxillary) extraction forceps
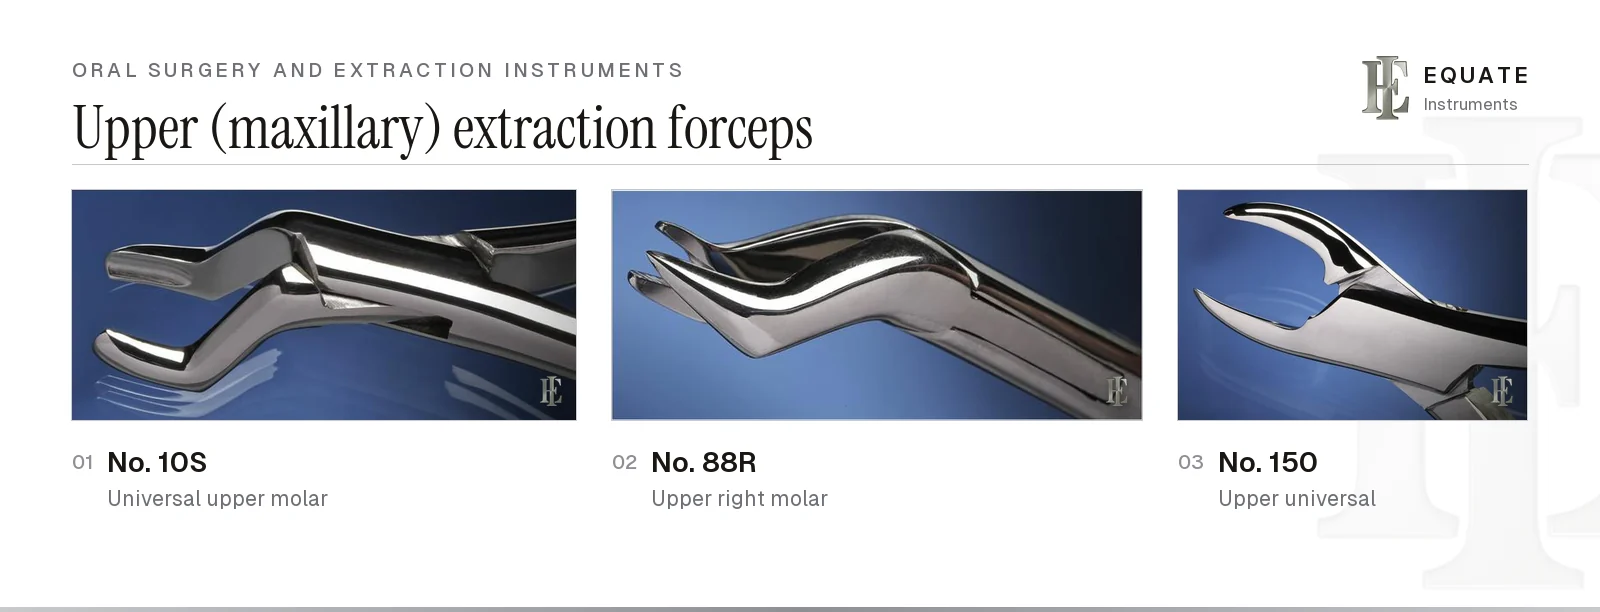
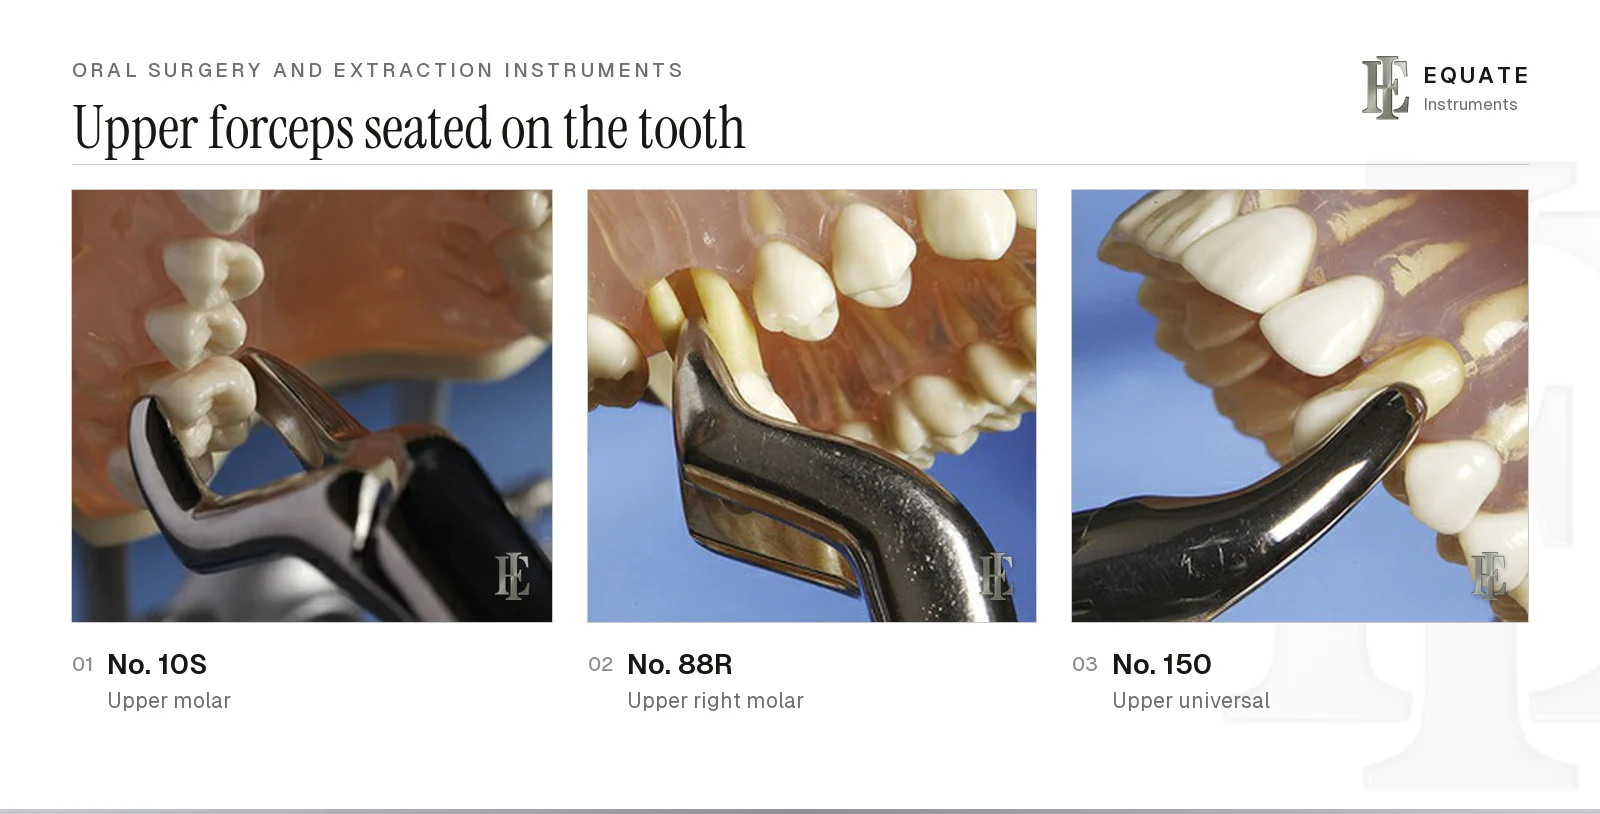
Forceps are numbered by pattern, and the number tells you the tooth. Upper forceps have beaks roughly in line with the handles, or offset, so they can reach the maxillary arch with the clinician standing in front of or beside the patient.
The No. 10S is a universal upper molar forceps that fits either side. The No. 88R and No. 88L are sided upper molar forceps with long, pointed beaks shaped to reach into the root furcation of an upper first or second molar, so the right and left versions are not interchangeable. The No. 150 (Cryer pattern) is the upper universal for incisors, canines, premolars and roots. For the full choice of patterns, see the dental extraction forceps guide.
The numbers on this page belong to the American pattern, in which the hinge lies horizontally, in line with the handles. English-pattern forceps, familiar in the UK and parts of Europe, have a vertical hinge with the joint closer to the beaks, which changes how the hand holds and drives them. Neither is clinically better in itself: the choice mostly follows training and the operator's preferred working position. Figure numbers do not carry across the two patterns: in Equate's catalogue an English-pattern Fig. 17 is an upper right molar forceps, while an American-pattern Fig. 17 is a lower molar forceps, so order by pattern and figure together. The numbers in the table below are American.
Lower (mandibular) extraction forceps
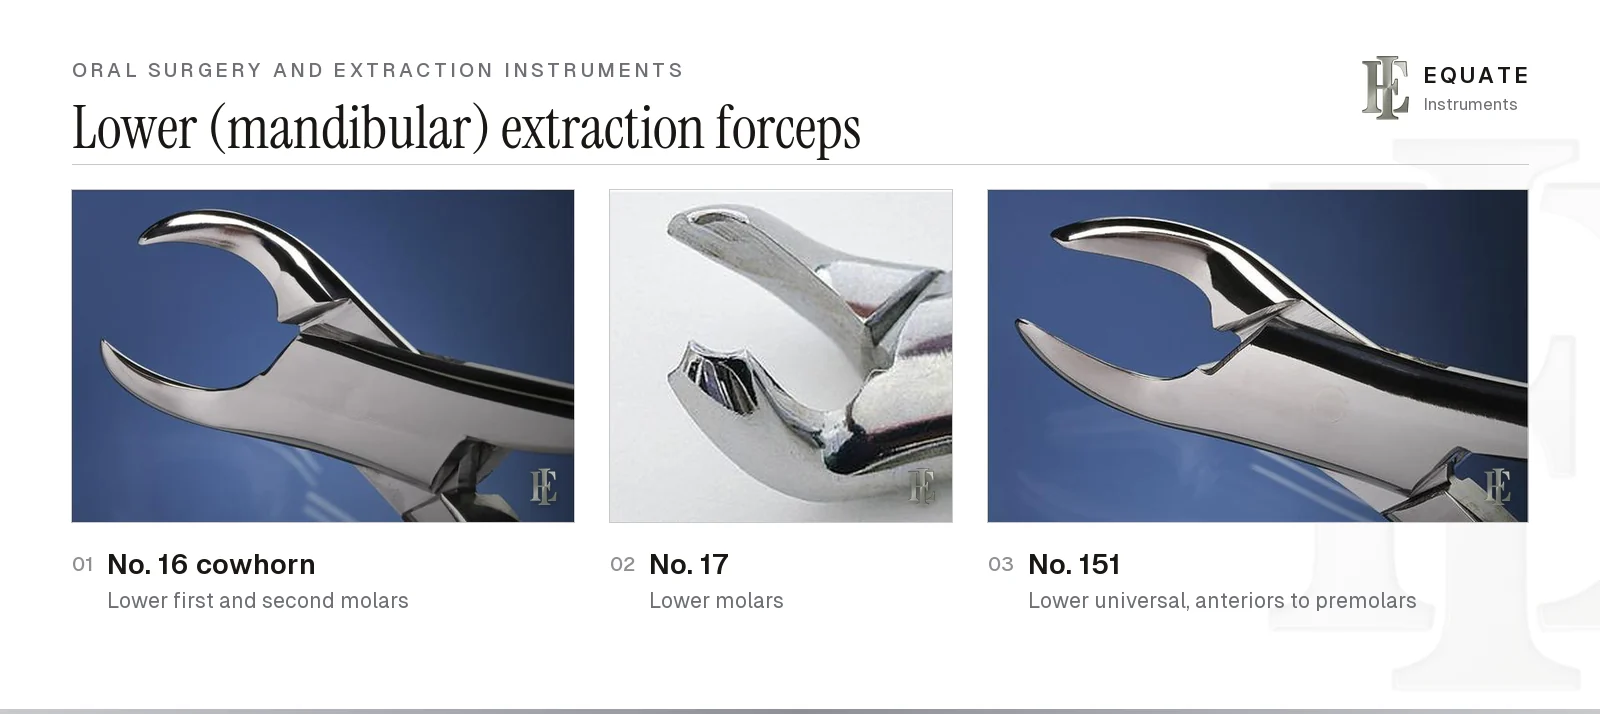
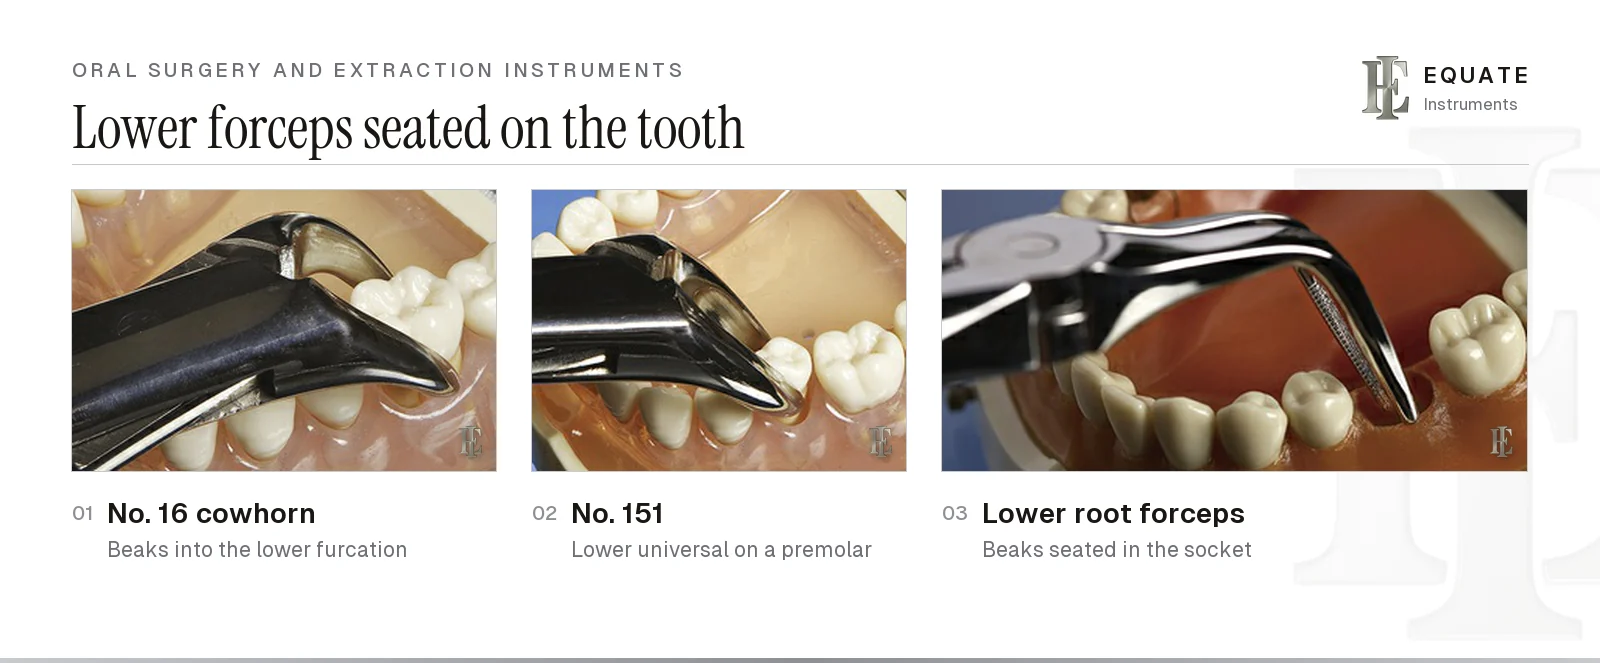
Lower forceps have beaks set at roughly a right angle to the handles so they can grip teeth in the lower arch. The No. 16, known as the cowhorn, has two pointed, curved beaks that are placed into the furcation of a lower first or second molar; closing the handles wedges the tooth upwards as well as gripping it. Because it applies force directly between the roots, it is used with care where the bone is thin.
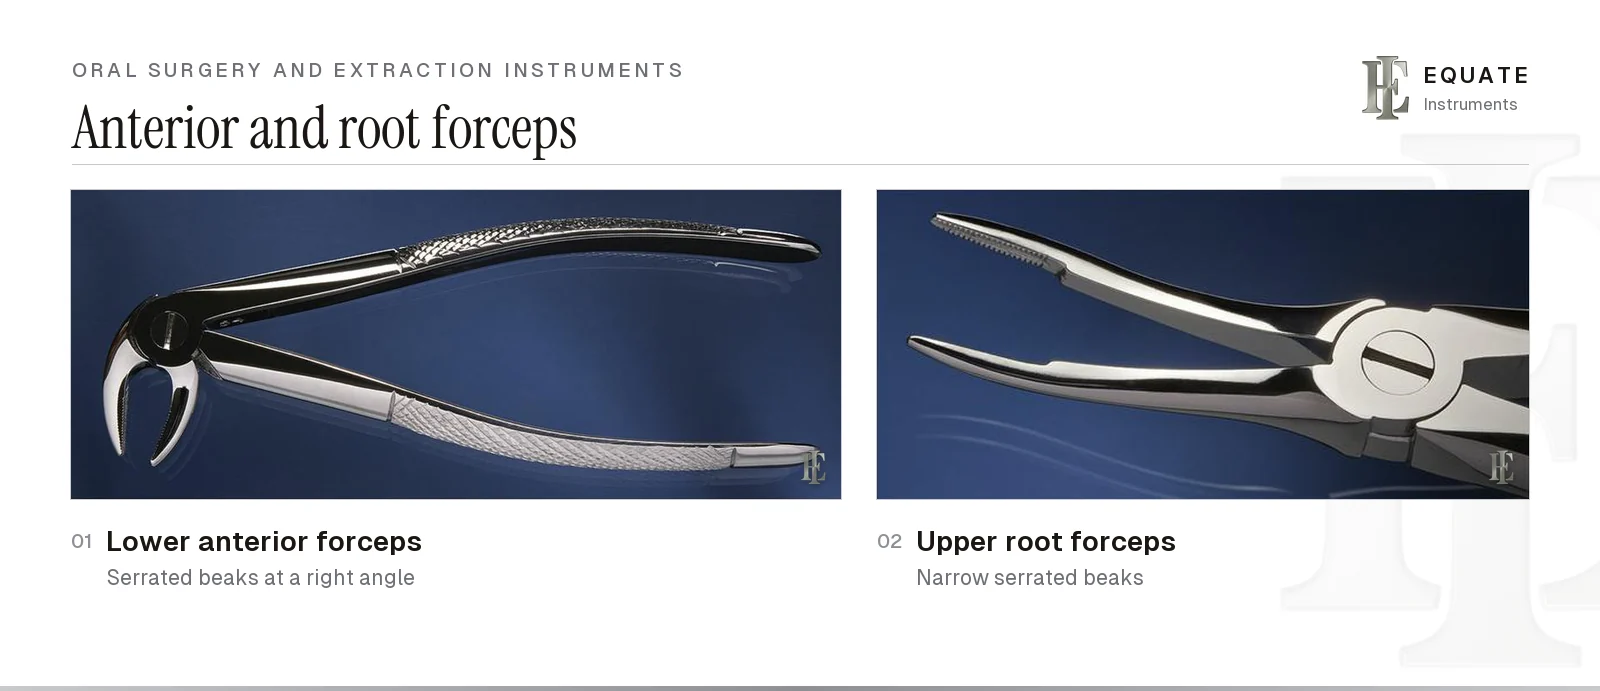
The No. 17 is also a lower molar forceps, with a small central point on each beak that engages the furcation without the deep wedge of the cowhorn. The No. 151 is the lower universal for incisors, canines, premolars and roots. Lower anterior forceps have narrow serrated beaks for the small, single-rooted lower incisors, and root forceps for both arches have long, narrow serrated beaks that can reach down the socket to a retained root.
Children's (deciduous) forceps follow the same logic in a smaller size. Their beaks are narrower to fit primary crowns, and their shorter handles suit a child's small mouth and reduce the leverage that can be applied over developing permanent teeth.
| Forceps | Arch | Teeth | Key feature |
|---|---|---|---|
| No. 10S | Upper | First and second molars, either side | Universal molar beaks; straight handles |
| No. 88R / 88L | Upper | Right or left first and second molars | Long pointed beaks; sided |
| No. 150 | Upper | Incisors, canines, premolars, roots | Universal; straight or one curved handle |
| No. 16 (cowhorn) | Lower | First and second molars | Pointed curved beaks into the furcation |
| No. 17 | Lower | First and second molars | Beaks with a central point for the furcation |
| No. 151 | Lower | Incisors, canines, premolars, roots | Universal; beaks at a right angle to handles |
| Lower anterior | Lower | Incisors | Narrow serrated beaks |
| Root forceps | Upper or lower | Retained roots | Long, narrow serrated beaks |
Rongeurs, bone files, chisels and mallets
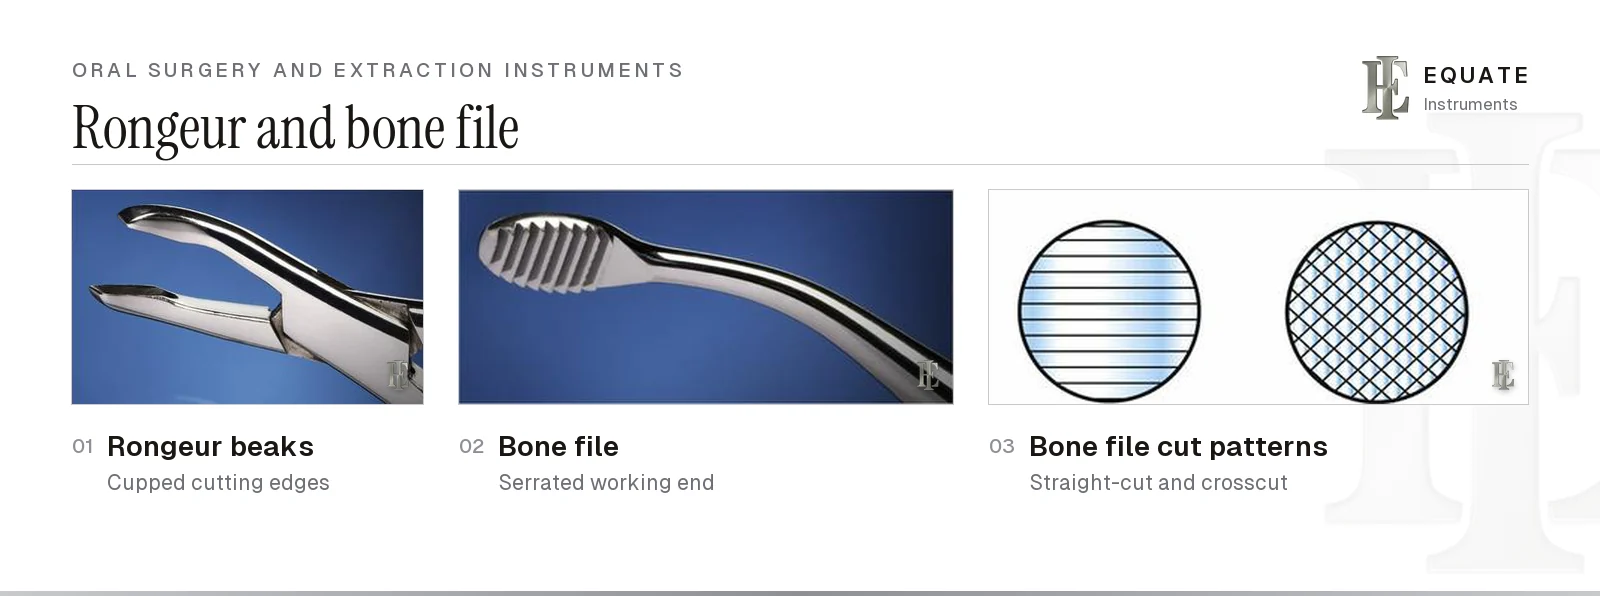
After extraction, sharp edges of the socket and thin projections of bone are smoothed so the tissue heals over a rounded ridge and a future denture sits comfortably. Rongeurs do the bulk of this. Their cupped beaks have sharpened edges that nibble away small bites of bone; side-cutting and end-cutting patterns reach different contours, and double-action designs multiply the cutting force through a second joint. Take small bites, and never use a rongeur to remove a tooth or to twist off a large block of bone, which blunts the beaks and can fracture the ridge. A rongeur can also take small chips of the patient's own bone for a graft: Hashemi and Beshkar found rongeur-harvested bone less contaminated than debris caught in a suction filter (see bone graft instruments).
A bone file finishes the job. Its working end carries rows of teeth, either straight-cut or crosscut. Boyd describes a push-and-pull action; standard oral surgery texts such as Hupp, Tucker and Ellis note that the teeth of most files are set to remove bone on the pull stroke, so check the direction of the teeth and use short, controlled strokes.
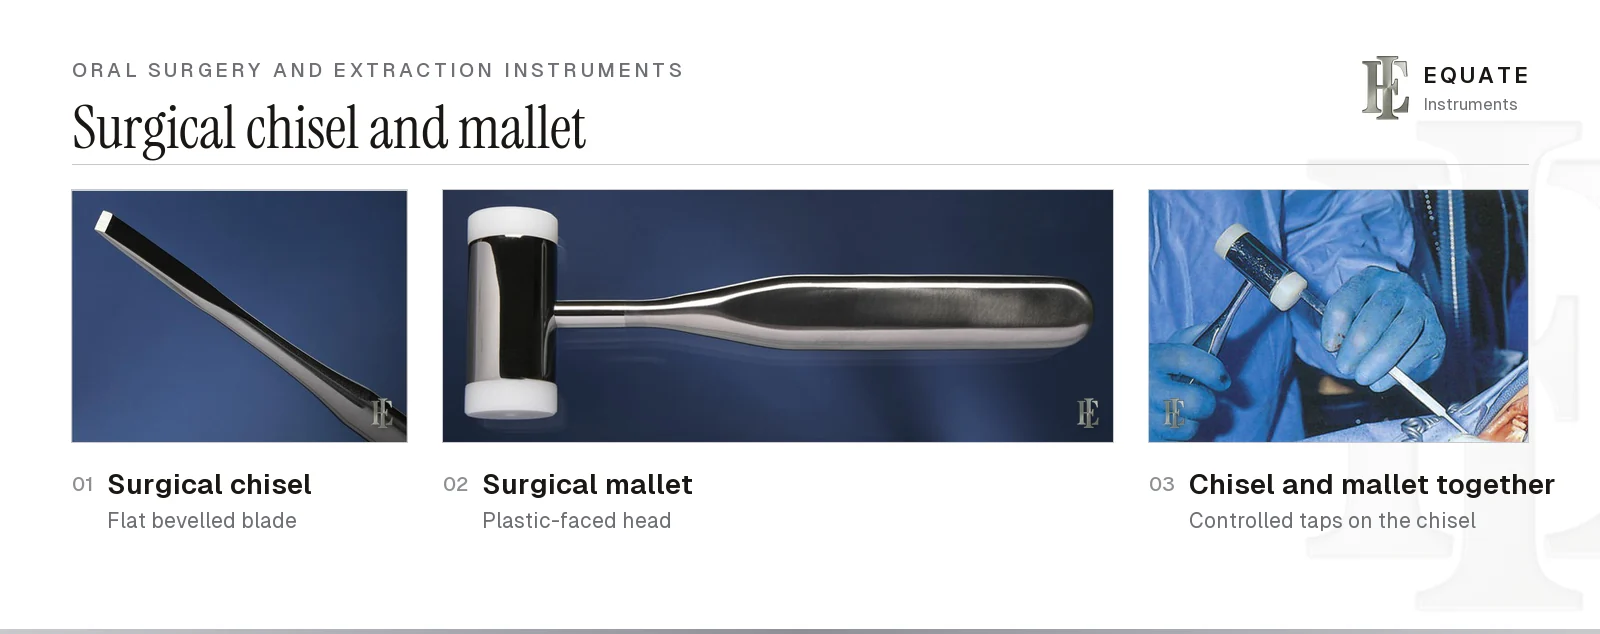
Surgical chisels remove or recontour bone and can split a multi-rooted tooth. A single-bevel chisel is used for bone, with the bevel set to control the depth of cut; a bi-bevel chisel splits teeth. The chisel is driven by light, controlled taps of a surgical mallet, often with replaceable nylon or plastic faces, while the head and mandible are supported; Peñarrocha and colleagues have reported benign paroxysmal positional vertigo after osteotome and mallet work in the upper jaw. Many clinicians now section teeth and remove bone with surgical burs instead, covered in the burs guide and the handpieces guide, but a chisel and mallet remain on most surgical trays. When bone is cut with a bur, use a surgical handpiece rather than an air turbine, because the turbine's exhaust air can be forced into the tissues and cause surgical emphysema, and cool the bur with sterile saline. Dr George Sandor, an oral and maxillofacial surgeon answering in the Canadian Dental Association's Oasis Discussions, recommends electric surgical handpieces or ones that exhaust to the rear.
Setting up an extraction tray
Boyd's extraction trays add to the basic setup and the universal surgical core. The two simple trays differ only in the forceps for the tooth, while the impacted lower molar tray brings in a scalpel, root-tip elevators and the bone instruments needed for a flap, bone removal and recovering roots. The full checklists, with the forceps for each tray, are on the surgical extraction tray setup and oral surgery tray setup pages.
- Lay instruments out in order of use, from examination and soft-tissue instruments through elevators to forceps and bone instruments, then closure.
- Pick forceps for the tooth and side before the appointment, and have a root forceps and root-tip elevators ready in case a root fractures.
- Curette the socket only where there is granulation tissue, a lesion or debris, and leave a healthy socket to fill with clot (surgical curettes).
- Treat procedures that cut, excise or reflect tissue to expose normally sterile areas, such as flap extractions, biopsies and implant surgery, as oral surgery, as CDC guidance does: irrigate with sterile water or sterile saline through a sterile syringe or irrigation system, and use surgical hand antisepsis and sterile surgeon's gloves. The oral surgery tray setup page covers the rest.
- Keep suture removal on its own small tray, with a mirror, explorer, cotton forceps, suture scissors and suction; see the suture removal tray setup.
Implant surgical kits
Boyd closes the chapter with the implant system: the cassette of depth drills, thread formers, a hand wrench, a ratchet with its adapter and a hex driver used to prepare the site and seat an endosteal implant, the titanium fixture that sits in the bone and integrates with it (osseointegration). Subperiosteal and transosteal implants are older, far less common designs. Each implant system has its own drill sequence and drivers, so kits are not interchangeable between systems.
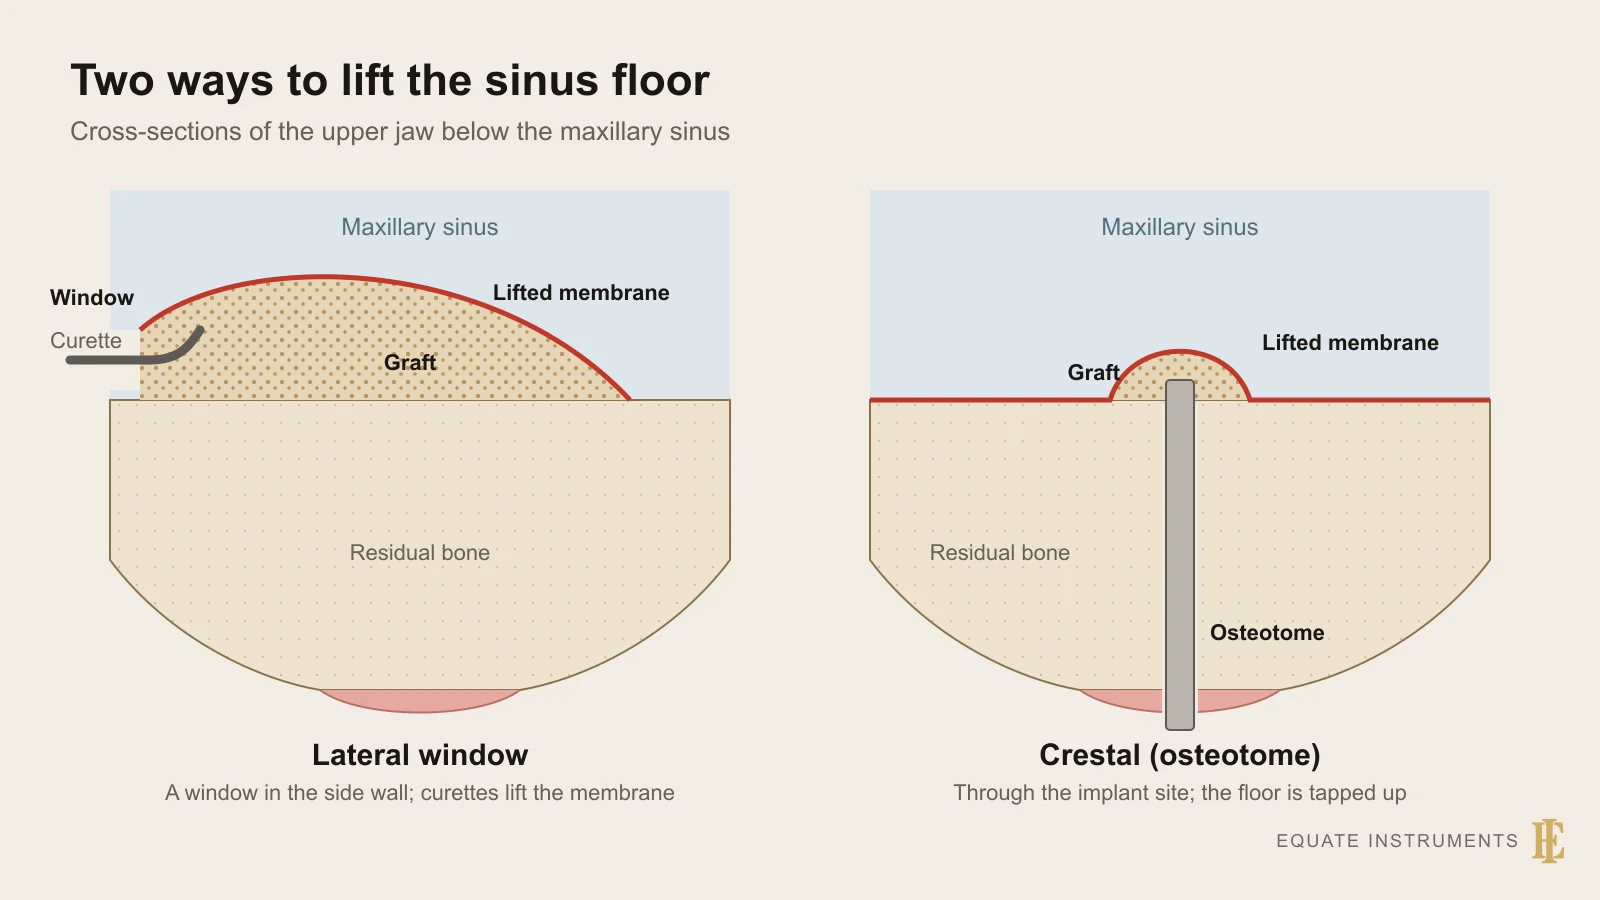
Implant surgery is carried out with sterile technique throughout. CDC guidance asks for a biological indicator in every steriliser load that contains an implantable device, with the result checked before the device is used whenever possible (Category IB). Drills need careful cleaning of their flutes and internal channels and are replaced when worn, because a blunt drill heats the bone. Equate does not supply implant drill systems; its implantology section lists 4 hand-instrument sets for implant surgery, and the oral surgery section adds 23 sinus-lift elevators. The sinus floor can be raised by two routes: a crestal lift, in which osteotomes tap bone and graft up through the implant site, or a lateral window, in which sinus curettes lift the membrane under direct vision; Al-Dajani's 2016 meta-analysis found the membrane perforated in about one lift in four. The graft is harvested with scrapers, mills or suction collectors and packed with carriers and compactors (bone graft instruments). Flap and soft-tissue instruments are covered in the universal surgical instruments guide and the periodontal instruments guide.
Cleaning, sterilising and maintaining surgical instruments
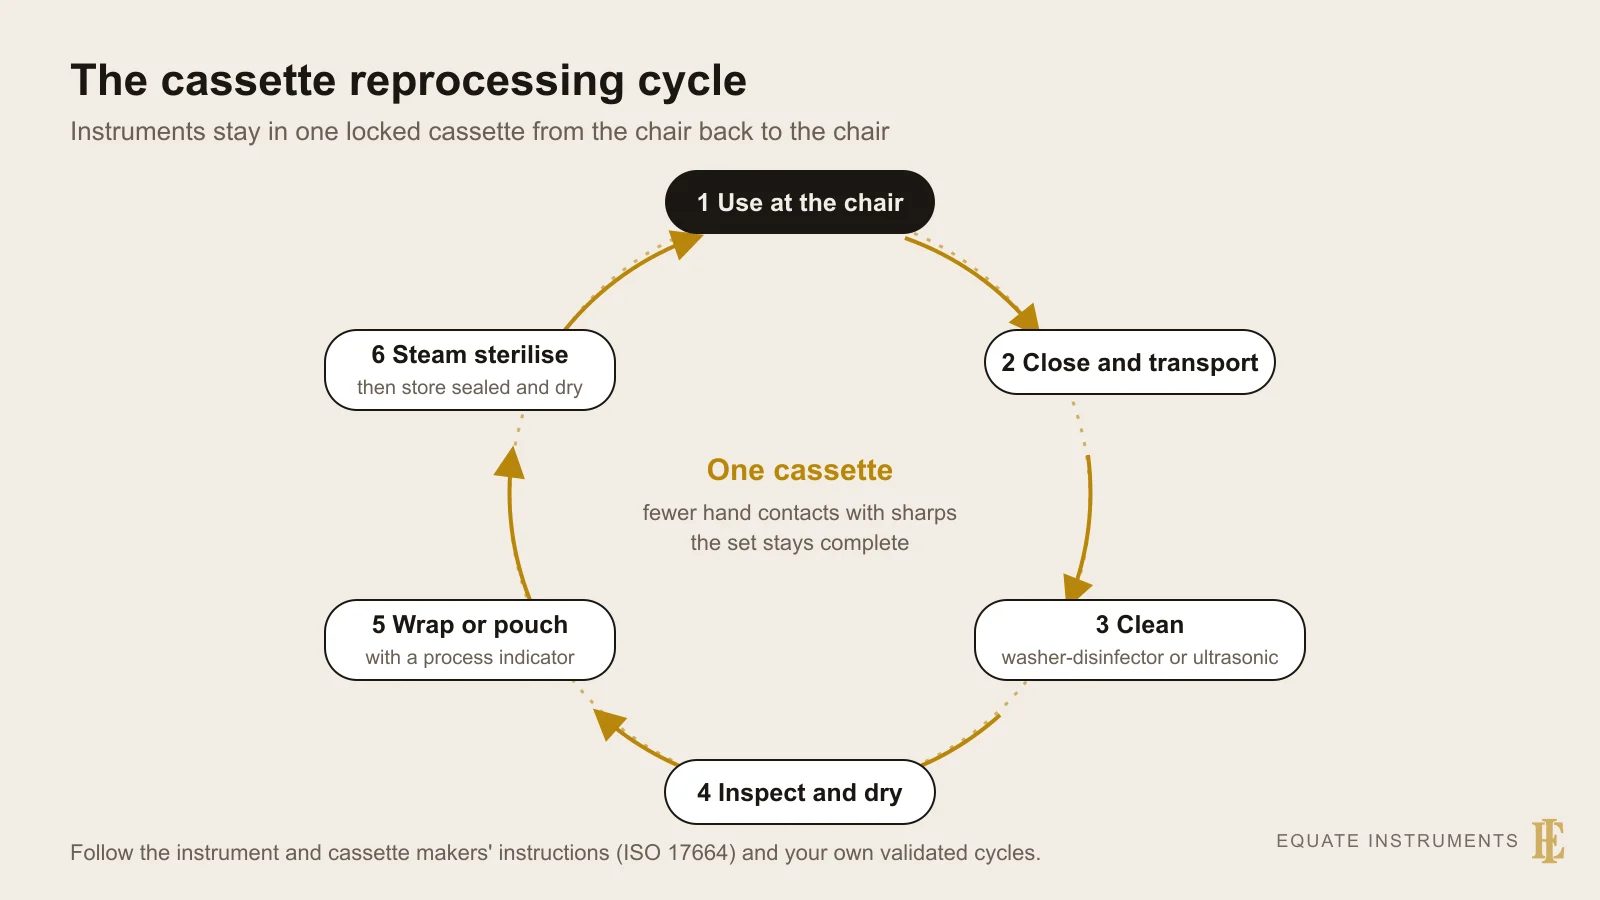
The instruments that cut tissue or touch bone (elevators, forceps, curettes, rongeurs, chisels and bone files) are critical items under the Spaulding classification. Reusable semicritical items on the same tray, such as mirrors, mouth props and retractors, are heat sterilised too, and single-use items such as the surgical suction tip and packaged sutures are discarded. The US Centers for Disease Control and Prevention guidelines for dental settings (Kohn and colleagues, 2003) and HTM 01-05 for dental practices in England both expect reusable surgical instruments to be cleaned and then heat sterilised between patients. Follow the reprocessing instructions the manufacturer supplies under ISO 17664-1 and your national regulations.
- Clean promptly: blood and bone dust that dry in serrations and hinges are hard to remove. Use an ultrasonic cleaner or washer-disinfector, with a brush for the beaks of forceps and rongeurs and the teeth of bone files.
- Open all hinged instruments: forceps, rongeurs, haemostats and needle holders are cleaned and sterilised open and unlocked so steam reaches the joint.
- Inspect before packing: look for chipped luxator and periotome blades, bent root-tip picks, blunted rongeur edges, loose joints and forceps beaks that no longer meet evenly.
- Lubricate joints with a steam-permeable instrument lubricant and keep the springs of rongeurs in place.
- Pack with an internal process indicator, ideally in a locked instrument cassette, sterilise in a validated steam cycle and check the indicators before use.
Buying extraction instruments: what to check
- Forceps numbers: start with the core patterns (upper and lower universals, upper molar right and left or a universal upper molar, a lower molar, and root forceps for both arches), then add special patterns as your case mix demands.
- Pattern: decide between American pattern (horizontal hinge, the numbering used here) and English pattern (vertical hinge) according to training and working position, then check that handle shape and length suit your grip.
- Children's forceps: if you treat children, add paediatric upper and lower patterns with smaller beaks and shorter handles rather than using adult forceps on primary teeth.
- Beaks: they should meet evenly along their length, with serrations that grip without crushing, and pointed beaks that are symmetrical.
- Elevator blades: sharp, thin and true on luxators and periotomes; firm but not brittle on straight and Cryer elevators. Buy in right and left pairs where the design is sided.
- Handles: a wider, textured handle gives control and torque with wet gloves; check that it is comfortable for repeated rotation.
- Bone instruments: rongeur springs that open cleanly, chisel edges that are straight and sharp, and bone file teeth in the direction you expect.
- Material: surgical-grade stainless steel that takes repeated steam sterilisation, with a supplier who can also sharpen or replace worn items.
The Equate difference
In its oral surgery section, Equate's catalogue lists 206 extraction forceps (including 50 paediatric patterns), among them the American-pattern Fig. 10S, 16, 17, 88R, 88L, 150 and 151 described here; 434 exodontia elevators (not counting periosteal and sinus-lift elevators), of which 73 are luxating elevators, 12 are right or left Cryer elevators and 24 are apical root-tip elevators; 14 root-tip picks; 17 rongeurs; 35 straight, curved and periodontal bone chisels (2 Ochsenbein chisels are listed separately); and 15 adult, paediatric and full extraction sets. Other sections of the catalogue add 17 bone files, 23 periotomes (5 of them sets), 6 surgical mallets, a pack of replacement inserts and 2 surgical hammers, and 4 implant surgery instrument sets.
Equate Oral Surgery and Extraction Instruments options

Periotome Curved / Straight 2.2 mm - Hollow Handle
EI-0051
Periotome Curved / Curved 2.2 mm - Blue Plasma Hollow Handle
EI-0052
Periotome 1 - Curved and Straight
EI-1003
Periotome 2 - Double-Curved
EI-1004
Flexible Periotome Kit for Dental Extraction - Set of 2 Blue
EI-1894
Fig. 1L Curved Periotome - Left, 6mm Solid Handle
EI-2226
Fig. 1R Curved Periotome - Right, 6mm Solid Handle
EI-2227
Periotomes Set of 6 - Flexible Straight and Curved
EI-3010
Flexible Periotome Set of 6 with Black Textured Handles and Sterilisation Cassette
EI-3011
Periotomes Set of 6 with Cassette Tray
EI-3012
Flexible Periotome Set of 2 with Straight and Curved Tips
EI-3017
Periotome 2 mm Curved - Flexible Blade
EI-3110Browse all oral surgery instruments
Buying in your market
Frequently asked questions
What is the difference between an elevator and a luxator?
A straight elevator has a sturdier, concave blade and is rotated as a wedge or lever to loosen the tooth. A luxator (luxating elevator) has a thinner, sharpened blade that is pushed down the root to cut the periodontal ligament. Luxators should not be used as levers, or the blade will bend or chip.
Which forceps are used for upper and lower molars?
For upper molars, the No. 10S fits either side and the No. 88R and No. 88L are sided right and left. For lower molars, the No. 16 cowhorn and the No. 17 are the standard patterns. The No. 150 and No. 151 are the upper and lower universals for anterior teeth, premolars and roots.
Why are they called cowhorn forceps?
The No. 16 lower molar forceps has two pointed, curved beaks that look like a pair of horns. They are placed into the furcation between the roots, so closing the handles both grips the tooth and lifts it upwards.
Which instruments reshape bone after an extraction?
A rongeur nibbles away sharp or excess bone, a bone file smooths what is left, and a surgical chisel and mallet remove larger amounts or split a tooth. Many clinicians use a surgical handpiece and bur for bulk bone removal, cooled with sterile saline.
How should extraction forceps be sterilised?
Clean them promptly, open and unlock the hinge so steam can reach it, inspect and lubricate the joint, then pack them with a process indicator and steam sterilise. CDC guidance classes them as critical items, and HTM 01-05 likewise requires sterilisation after every patient.
References
- Boyd LB. Dental Instruments: A Pocket Guide, 7th edition. Saunders/Elsevier, 2020 (photographs used under licence)
- Hupp JR, Tucker MR, Ellis E. Contemporary Oral and Maxillofacial Surgery, 7th edition. Elsevier, 2018
- Kohn WG, et al. Guidelines for Infection Control in Dental Health-Care Settings, 2003. MMWR 52(RR-17), Centers for Disease Control and Prevention
- Department of Health. Health Technical Memorandum 01-05: Decontamination in primary care dental practices, 2013 edition
- Spaulding EH. Chemical disinfection of medical and surgical materials. In: Lawrence CA, Block SS (eds). Disinfection, Sterilization, and Preservation. Lea & Febiger, 1968
- ISO 17664-1:2021 Processing of health care products — Information to be provided by the medical device manufacturer for the processing of medical devices — Part 1: Critical and semi-critical medical devices
- Gadhia A, Pepper T. Oral Surgery, Extraction of Teeth. StatPearls, StatPearls Publishing, updated 2023
- Araújo MG, Lindhe J. Dimensional ridge alterations following tooth extraction: an experimental study in the dog. Journal of Clinical Periodontology 2005;32(2):212–218
- Hashemi HM, Beshkar M. Bacterial contamination of autogenous bone collected by rongeur compared with that collected by bone filter during implant surgery. British Journal of Oral and Maxillofacial Surgery 2011;49(6):474–477
- Peñarrocha M, Pérez H, García A, Guarinos J. Benign paroxysmal positional vertigo as a complication of osteotome expansion of the maxillary alveolar ridge. Journal of Oral and Maxillofacial Surgery 2001;59(1):106–107
- Al-Dajani M. Incidence, risk factors, and complications of Schneiderian membrane perforation in sinus lift surgery: a meta-analysis. Implant Dentistry 2016;25(3):409–415
- Centers for Disease Control and Prevention. Best Practices for Oral Surgical Procedures. Dental infection prevention and control
- Canadian Dental Association. Oasis Discussions: which handpiece for surgical extractions? Answer by Dr George Sandor, oral and maxillofacial surgeon, 20 March 2014
I am a…
Related
- Tooth Extraction Instruments
- Dental Extraction Forceps
- Dental Elevators and Luxators
- Universal Surgical Instruments for Oral and Periodontal Surgery
- Periodontal Instruments Explained: Probes, Hoes, Knives and Files
- Dental Sterilisation and Protective Equipment
- Dental Imaging and Diagnostic Equipment
- Vital Signs and Monitoring Equipment in the Dental Practice
- Periotomes for Atraumatic Extraction
- Dental Rongeurs and Bone Files
- Bone Chisels and Surgical Mallets in Dentistry
- Surgical Curettes (Bone Curettes) for Oral Surgery
- Surgical Extraction Tray Setup
- Sinus Lift Instruments